
You can’t swing a dead cat around the survivalist internet sites without running into thousands, no, hundreds of thousands of gun-related articles. Most deal with variations on a theme: 9mm vs 45 ACP or AR-15 vs AK-47. Not quite so common but still prevalent are articles that focus on training skills to acquire. However, I find it hard to find dedicated articles that focus on repair skills that will surely be needed after firearms are used daily over an extended period of time.
Want to Be Your Own AR-15 Gunsmith?
Granted, it’s difficult to make these very specific, since everyone likes a different platform, and trying to cover “how to fix any gun” is like trying to write an article on “how to fix any car”. It just can’t be done, and it’s one of the reasons I try to tell people to consolidate platforms (especially if you are part of a planned SHTF team), and to take armorer’s courses on the platforms that are mainstays of the team or the individual. I know many people that have scores of guns that each has its own individual place in “the plan”, but the bare, simple truth is this: you have two hands and your belt and back, and you can’t take ‘em all with you out the door.
Sorry, folks. It’s fine to have hundreds of guns (we encourage it, actually!) but for the ones that you’ll have with you without fail when you bug out the door, you NEED to have a personal, intricate knowledge of how they work. That YouTube video that helped you fully disassemble your SKS so you can install a folding stock probably ain’t gonna be available when you’re lining up a shot on a nice plump deer to feed the crew and the gun goes “click” with a gummed-up firing pin. Know what you have. Know what you’ll take. Know how to fix it. Yes, $300 for an armorer’s course may seem pricey, but how much did you spend on extra magazines and ammo last year? This is just as important.
So you know that guns “X” and “Y” will be bugging out the door with you, you’ve got all the magazines and ammo you need for them, and you’ve taken an armorer’s course. Awesome! You’re head and shoulders above most people out there but do you have the tools to fix these guns? Do you know how they work? Do you have spare parts for your guns in case they wear or break? (keep in mind most firearms manufacturers recommend spring, extractor, and/or ejector replacements after 5,000 rounds!) A comprehensive dedicated armorer’s kit is worth its weight in gold, and here are a few things that you shouldn’t be without in your firearms maintenance plan.
To put things in perspective: in my mind, an armorer’s kit is not a kit that goes everywhere with you: this stays where you will have a safe, calm, well-lit environment where you can work on your firearms with no pressures. A small basic in-field maintenance kit should go everywhere with your guns (look at some of the gun-specific kits from Otis as a good starting point for a bug-out cleaning kit), but the armorer’s kit will probably be too bulky to take with you all over hell’s half acre.
10 Armorer Items You Need for an AR-15
Here comes the list of 10 items every advanced AR-15 owner should have. I should note, however, if you want more than the basics, or you want everything all at once, I would strongly consider buying a complete kit right from the outset. This could save you the hassle of multiple purchases or getting halfway through a project and wishing you had some other tool to complete the job. The Avid Armorer’s Master Kit might be for you:
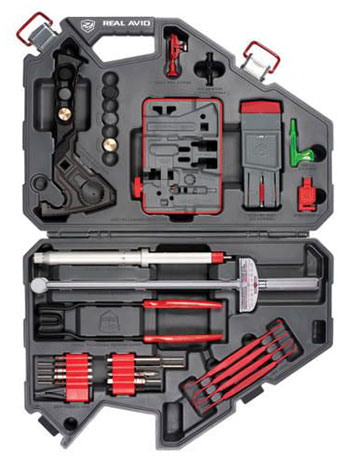
If you want to start incrementally, let’s continue with the top 10 armorer tools you might need.
#1: Heavy-duty Storage Container(s)
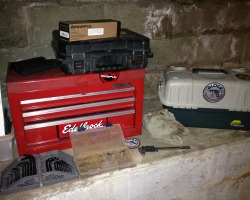
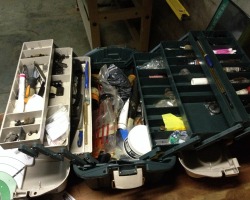
You’re going to need a place to keep all this gear and spare parts safe and organized. I used to use fishing tackle boxes… that worked pretty well for a while, and it’s a good place to start. They have lots of customizable drawers and compartments that fold out, and they’re portable, with built-in handles. The problem is, over time, you accumulate stuff. You’ll work on guns, and as you replace parts, upgrade, or keep spares, the tackle box just doesn’t hold it all anymore. The pull-out shelves pop out from their pivot points. The latches break. They simply aren’t rugged enough to be stuffed with stuff, in my experience. I still keep a tackle box with basic goodies in it for trips to the range, or working on a gun at a buddy’s house, but for serious work, we need serious storage.
I’ve since upgraded to a Sears Craftsman steel tool chest. Yes, it’s heavy. Yes, it’s big. But the construction is no-nonsense, and it holds all my various tools and accoutrements in order, with room to spare. I use plastic tray inserts to hold all the small parts, like bore brushes and jags, to keep them from rolling around and having to hunt for them. I use emptied pill bottles to hold used extra or replaced screws and pins (a godsend when you drop a small screw on the floor and it rolls into a heating vent. Been there, done that.).
Specialized gun-specific tools can go in one drawer, basic tools can go in another, and patches, rags, and other gun-related “stuff” can go in its own drawer. I’ve learned that bottles of solvents and oils can’t be left on their sides in a drawer, as they tend to leak, despite the best of intentions. So I usually get a snap-top Tupperware or Rubbermaid container for these goods. The snap-top containers work well for loose items, like old removed sights, scope bases, sling swivels, and other items that seems to just build up on me. Also, they can house gun-specific spare parts so you don’t need to go searching for one part for one gun: it’s in its own container.
If you’re just building an armorer’s kit for just, say, your AR-15 and your Glock, you probably won’t need such a big setup. I work on lots of people’s guns, so eventually I realized I needed to go this big. You’ll have to scrutinize your own setup and prepare accordingly.
#2: Firearm-Specific Armorer’s Manuals
If you haven’t taken an armorer’s course, these will help you figure out your gun…they just won’t be there to lend a hand first time around like an instructor will. If you HAVE taken a course, these are valuable back-ups to have in case you’re working on your gun and you just draw a blank on what the next step is, or how one assembly goes back together. I can’t tell you how many times I’ve gone back to my dog-eared manuals to go, “ohhh yeaaahhhhh…”.
Several companies make good gun-specific manuals: the American Gunsmithing Instituite offers manuals, DVDs, and tool kits for MANY specific firearms. I don’t own any so I can’t vouch for the quality, but it’s a definite step in the right direction. If you have a US military issued firearm, they have Military Technical Manuals (like this one for the M16/M4 platform) that will tell you everything you need to know. It’s cheap, reliable knowledge for when the YouTubes videos are no longer there.
#3: Firearm-Specific Tools
There are basic tools that you’ll use all the time when working on firearms (more on that next) but when (for example) you need to get the barrel nut off an AR-15, only the correct wrench will work. You can sometimes adapt other tools to work, but they never work as well as the specifically designed tool. When you take Glock armorer’s courses,they give you the punch and inspection plate that you’ll need, and that’s pretty damn cool.
Other companies/makes require a few specialized tools (see the AR-15 example above) and you’ll usually have to buy them. However, it’s always well worth the money. The Sig Sauer combination tool I have is amazing for working on my Sigs, even though it ran me $45. In the case of platforms where there is a LOT of aftermarket tool supply, try to shy away from the cheapo tools: if it looks to good to be true, it is.
#4: High-Quality Punch And Drift Set
Punches are used almost universally in every gun out there, to push pins out of guns, push sights out of dovetails, or slave parts together for re-assembly. An assortment of sizes, in both brass and steel, will be essential. Brass, being softer than steel, generally does not deform, dent, or mar steel parts. However, it WILL mar finishes, which isn’t the end of the earth. Brass punches will deform over time, mushrooming out where they are impacted with hammers. The stems of them can also bend in the smaller-diameters. Steel drifts are obviously tougher, and you use them to push out straight pins and roll pins from the receivers of firearms. Get hardened machined steel punches – Brownell’s and Midway USA carry good ones that are made for the gunsmith. However, being hardened steel, they are far more brittle than their brass counterparts, and they will snap and shatter. Buy a few extras in the smaller sizes (1/16”, 3/32”, and 1/8”…I’ve busted many of these sizes, especially on the rusted-up guns. Keep a set of safety glasses on in case they shatter.
#5: Bench Block
A bench block is a plastic or wood block with holes drilled in it and valleys inset so you can work on your guns and hold them steady, while preventing harm to surfaces below. Many the time has been that I’ve started drifting a pin out of a gun to realize that the pin has come out of the other side of the gun and burrowed its way into the kitchen table. You feel stupid and draw the rapid, vicious ire of the wife.
If I had set the part on the bench block, with the pin coming out and into one of the holes in the block, I may have saved myself a hung head and a tube of wood putty. A bench block also has valleys you can lay a barrel of a gun into to keep it from rolling around as you work on it. You can make your own with a bit of ingenuity, a drill, and a block of scrap wood, or you can buy your own like this one by Wheeler.
#6: Dedicated Gunsmithing Screwdriver Set
I’ll admit it, I am the BIG stickler for proper gunsmithing screwdrivers. Gun screws are generally finely machined items, with a precise slot milled into it. A proper gunsmithing screwdriver will be hollow-ground as opposed to a tapered point, like usual flat-head screwdrivers usually do. Check out this thread in a forum where the difference is shown nicely.
A properly fitting hollow-ground screwdriver fills the slot in the screw completely, and ensures that maximum torque can be applied without the screwdriver slipping and buggering the head of the screw. If the balloon goes up and the only screws that you’ll have hope of finding for your gun are the ones IN your gun, you’re going to want to make damn sure that they never strip out. The correct screwdriver helps you ensure this doesn’t happen.
#7: Allen/Torx Wrench Index Set
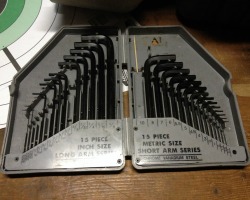
More and more manufacturers, especially in the “tactical” arena, are ditching the traditional flathead screw and using torx and/or allen head screws. Personally, I favor the flathead or even phillips head screws over the allen head (ever stripped an allen head screw? Get out the drill!) but we have to be prepared, no matter what the personal bias may be.
I prefer indexes of many different separate “L” shaped wrenchesover the all-in-one folding-type setups, but to each his own. I’ve been known to use an allen wrench as a pin punch in a pinch (say THAT ten times fast.).
#8: Hammers and Mallets
We will need impact implements of a couple kinds when working on our guns. I run with a couple: a good kick-ass ball peen hammer (Estwing all the way on this bad boy and they didn’t even pay me to say that…Estwing hammers just rock) to use on drifts and punches when tapping out pins, as well as general mayhem as needed. A brass mallet is invaluable for starting small pieces like sights in dovetails, and for light-duty impact use. A double-headed plastic and rubber mallet will be wonderful for light tapping of parts that are a bit stubborn, but that you don’t want scarred or marred. It will also work well seating and tapping parts just a small amount to get them properly aligned.
This is one of the classes of tools that will prove to be useful around the house as well…just resist the temptation or be sure to put it back when you’re done. Having the proper hammer to do a job when you’re working on firearms is a godsend.
#9: Cleaning Tools
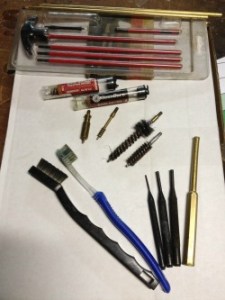
This is pretty simple, but varied according to your own personal taste and experience. I like steel cleaning rods (one-piece if possible for rifles) with bore guides for cleaning my bores, but brass rods work pretty well too and won’t beat up the bore as badly. They do snap, however. And forget those miserable aluminum Wal-mart cleaning kits: They suck. There, I said it. They will warp, bend, snap, and leave you feeling generally empty inside as well as leaving you open for ridicule from your gun buddies. Man up and buy a good cleaning rod that will last forever. I like brass cleaning patch holders to hold my patches – I shy away from the plastic ones: they always seem to bend on me.
For bore brushes, I really like the Kleenbore brand brushes, as they come in their own plastic tubes and it helps keep things organized, especially when you have lots of calibers to tend to. I use stainless steel bore brushes for busting up heavily fouled bores and with use with rugged solvents (that would melt bronze brushes over time), and I use bronze bore brushes for general cleaning. I always have used toothbrushes from household use kicking around for scrubbing dirty guns, and keep purpose-made gun cleaning brushes handy too, for various purposes. I’ll buy big lots of pre-made gun cleaning patches when I find them cheap; however, I’ll be just as happy to cut up old T-shirts as well. Dental picks, toothpicks, and LOTS of Q-tip swabsare always welcome here too.
#10: Oils, Lubes, Solvents
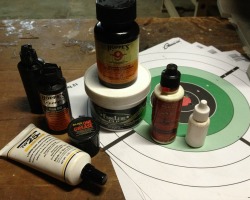
I have lots of these kicking around. Mostly because when I’m doing work on my guns, I’m not an all-in-one CLP (Cleaner, Lubricant, Preservative) guy. Do I use CLP in my field kit? Hell yes! It does an OK enough job at those duties that it’s a good way to save space when you have to be mobile but still want to care for your gun.
However, when I have the time to break down my guns, I use the right product for the job. There are literally THOUSANDS of products out there: do your research, try them out yourself; these are highly personal choices.
Here’s What I Like
Solvents: Solvents are used to chemically break down carbon, lead, and copper deposits and loosen them up so they can be scrubbed free. I’m an unabashed Hoppes #9 fan boy for this category. Hoppes has been around forever, and probably will be around forever. It’s inexpensive, it works, and you can buy it in large quantities. It stores well, too. An honorable mention goes out to Shooter’s Choice for this line of work: it works as well, maybe even a bit better than Hoppes, but it’s pricier.
Lubricants: Lubricants are broken down into two categories in my mind: oils and greases. I use oils on parts like bolt bodies, slide and frame rails, springs, and pins; parts where there will be sliding motions, back-and-forth operations. It will keep parts from binding, grinding, and keeping friction temperatures down, as well as wicking away moisture and carbon buildup. Oils also work very well for short-term to medium-term rust prevention under most circumstances.
I use greases on parts where there is actual shear force, or direct metal-on-metal interaction, like trigger and hammer mating surfaces, sears, disconnectors, etc. Greases can ease trigger pulls, and keep these parts sliding smoothly off each other. However, greases, by their makeup and nature, can gel up and increase viscosity much more drastically than oils in cold temperatures, so keep that in mind if you are in colder climes. For oils, I’ve been using FrogLube, Militec 1,and Hoppes Elite. However, I’ve been hearing awesome stuff about the new Liberty Lube line of products – we’ll have a review coming soon. For grease, I’ve found that Mill Comm TWB-25 (the same grease they supply with all new Sig Sauer pistols) is really phenomenal. I bought a 4 oz. tube a couple years ago and it’s lasted forever.
Preservatives: Preservatives are meant for long-term storage of the firearm and heavy protection from the elements. I also use them in areas that won’t see much attention in every-day cleanings, but may have water penetration: the areas between rifle stocks and barrels/actions, under scope mounts and sight bases. Preservatives, such as the ever-popular and (if you’re trying to clean it off) maligned Cosmoline, fully encapsulate the firearm and make it almost impervious to most elements.
For long-term storage and preservation of “safe queen” collectible firearms, I’ve used RIG (Rust Inhibiting Grease) with wonderful success. Preservatives are generally much thicker than oils, and should be used when maximum protection is needed. In my opinion, the “preservative” part of CLPs should be more along the lines of “preventative” when it comes to the protection of firearms. For instance, if I was burying a firearm, I sure as hell wouldn’t just coat it in Break-Free CLP and call it good. A word to the wise, though: preservatives can solidify and cake up over time, and require heavy-duty solvents (even gasoline or Easy-Off Oven cleaner, in the case of Cosmoline) to remove fully. Plan accordingly.
A Few More Extra AR-15 Armorer Tools
There are many other things that could go in a generic (non gun-specific) armorer’s kit, like a ratchet and socket set with extensions for removing stock bolts, etc., but they wouldn’t be used very frequently. As you work on your firearms more frequently, and as you see how they work and dive into other makes and models other than your dedicated SHTF platforms, you may decide to branch out and purchase things as you see fit. Items such as a bench-mounted vise with non-marring jaw pads(special vise blocks that are made for specific guns are available), a jeweler’s screwdriver set, a fine file set, channel locks, needle-nosed pliers, a hacksaw and a couple sizes of vice-grips can help quite a bit for when you want to expand.
Keep in mind: Spare (smaller) parts for your guns are probably very cheap and easy to stockpile. You’re not going to be replacing your $200 barrel every 5,000 rounds, but that $8.00 recoil spring should be. An extractor for most guns might be $20 or so, but it’s commonly one of the first integral non-spring parts to fail. Why not have a couple stashed away for your SHTF guns? Magazine springs weaken over time; have a few of them around. Companies like Wolff make spring kits for entire gun platforms, making it easy to have every spring you’ll need in one sealed bag. Get an account at Brownell’s, where they offer excellent discounts for gunsmiths, and they have most everything under the sun.
Guns these days, especially military firearms, are very intuitive and easy to work on. However, that doesn’t mean that you shouldn’t spend a few bucks and get you and your firearms platforms up to snuff mechanically. You’ll be able to barter and trade repair work (I do friends’ work for beer these days but the sky’s the limit), repair or salvage abandoned firearms, and keep your gear in running shape. Ain’t nothing wrong with any of that, catastrophe or not.
16 comments
Great read Drew. Thanks.
I have an IFAK for each of my bugout guns, but am wondering what you recommend for the AR platform beyond a small parts kit, a spring kit, and extra firing pins? Is having an extra BCG worth it? What else?
Doc,
Thanks for taking the time to read it! For the AR platform, the parts that I like to have extras of on hand are: Bolts (not the whole BCG necessarily, but that’s an easy way to go if you break a gas key!), firing pin retainer pins (the little cotter pins in the bolts), a couple spare firing pins, a complete spring kit, and a couple complete pin kits. I definitely have extra detent pins, since those little puppies fly/drop out and can get lost easily if you pull a grip, for example.
Let’s face it: you’re probably not going to be pulling takedown pins out, or the gas system apart, or swapping mag catches, in a SHTF scenario. With that in mind, I keep spares of springs and detents and firing pin retaining springs – small, easily broken or lost parts – with the gun or close by, and buy them of good quality so they’re not AS likely to fail. I also keep the gun well-lubed and clean to help ease the strain on parts so they won’t break.
If you find that you have to replace a gas key on a bolt, it’s probably going to be easier to find a new functional bolt that’s assembled then to install a new gas key and find the time to function test it, troubleshoot any problems, etc. if it’s easier for you to have a new BCG available, and you have the budget for it, I’d definitely go that route. Nothing wrong with having drop-in ready-to-go- components.
You remember that scene at the end of “Back to the Future” where Marty asks if they have enough road to get to 88 mph, and Doc Brown says, “Roads? Where we’re going, we don’t NEED roads.” Well, in armorer’s work, where we’re going, we don’t NEED stones. Being an armorer is much more basic than gunsmithing, and in my book, when you start getting into needing arkansas stones and laps, you’re getting beyond the scope of what this article is about. As an armorer, you identify what part is causing the problem, then you rip it out, replace it, and keep shooting. You’re not after a glass-rod-breaking 3-lb trigger pull to kill zombies with; you’re after 100% functionality…and to that end, I don’t think that most people getting set up to maintain their SHTF guns need to get that deep. You’re not going to craft a new firing pin for your great-grandfather’s Browning Superposed, you’re going to get the new striker spring in your Glock and get it up and running again. If your gun is broken or worn to the point where you need to start fitting OEM parts just to use it, it’s time to take what useable parts are on it and salvage them to keep other like guns running.
I don’t really recommend for people to go out and get arkansas stones and crazy specific items for polishing for their SHTF guns. It takes lots of skill and practice and know-how to use laps and stones to get that crisp, sharp trigger pull, or perfectly-fitted parts. SHTF guns are workhorses, not match guns. That being said, though, if you can use a nice high end set of arkansas stones to polish and fit, more power to you. Maybe if I feel saucy, it’ll be another article… 🙂
I have to admit, I’m spoiled…
I bought a beat up S&W 65, but it has that trigger, already. no creep, just scary perfect on single action.
yeh, you need those safety glasses.
I had a pair made in my reading prescription. some of the best money I’ve ever spent. really like the Craftsman tool cabinets…
having a well lit, secure place to work, is huge.
beyond the swiss files and punches, what do you recommend in the way of laps, and stones?
Sorry irishdutchuncle, I accidentally replied to you above.
yeh, I see. no problem.
it’s a recurring theme in my life. I know I could be more than just a “parts changer”. It’s difficult to accept that I have limitations.
I get what you’re saying now though.
I worked with and have discussed many things with classically trained gunsmiths from the ’40s and ’50s…and they have forgotten more about fitting, polishing, building, filing, etc., than I will ever be able to learn or figure out. One of my favorite stories was from a fellow who went to gunsmithing school in England. The very first day, at the end of class, he was handed a 1″ steel ball, a set of dial calipers, and a set of files, and told that over the night, he had to make a perfect one-centimeter cube. If he couldn’t do it, they wouldn’t train him. He did it, and he did exquisite work well into his 70’s.
The point to that story is this: If you want to learn more about being more than a parts changer, a blog online isn’t the best place to go. Get training. Check out the American Gunsmithing Institute; they offer at-home gunsmithing courses where you can learn what you want at your own pace, and I hear good things about it. If you wanna do it, do it! Then you can teach ME about stones and lapping compounds! 🙂
The point of these “SHTF Armorer” articles that I write is to help the people who need to be able to do basic repairs to their standard guns after a TEOTWAWKI event. I think that most readers probably would have a hard time reading more in-depth stuff…probably worse that watching paint dry if you’re not into it.
LePages glue – this stuff will hold it together until you can trade it for a 12 gauge shotgun. Any shotgun is better than the ar POS.
Nice post. I really like the block idea. My biggest project is putting together kits for my extra rifles, they need to be ready to GO.
Nice post. Spare parts are something people over look in their weapons preparedness.
LONG after your AR15 has become a useless door prop, because NO ONE has seen ammo, magazines, or parts in twenty years , my flintlock will still be feeding my great grand children. Flint knapping is a more useful skill than gun smithing post TEOTWAWKI as you don’t need factory’s to supply the 2000 steps it takes to produce a modern weapon. Modern cartridge weapons only work for as long as you can maintain a working factory and supply system to feed and maintain them. You aren’t learning a “new skill” as much as you are prolonging your “standard of living” . The problem with most “prepers” is that they never think past the crash. They won’t ask the most terrifying question: How can I teach and WHAT can I teach that will keep my children and THEIR children alive and prosperous when ALL of this is gone? Sustainability is the only thing that works, and AR15’s , rototillers, and “supply hoards” don’t get your children into adult hood post TEOTWAWKI. And Drew; FOR GODS SAKE! DON’T use “easy off” on ANY weapon EVER. It is one of the top three ways to turn a 900$ military rifle into 300$ worth of parts.
glad to see,
Ray is still with us.
I read these articles a lot and I really really appreciate all the time, effort and research these writers put into their articles. One thing I see is that most of these writers forget the most important spare part on the gun. Without said parts to repair or fix these all you have is a heavy paperweight that you are going to end up dragging around. When stock piling spare parts don’t forget to bulk up on some spare magazine springs and followers as well. You can repair what might be a source of a malfunctioning gun. These get dropped, abused and yet we expect our rifle to continue to function flawlessly yet when cleaning said weapon we forget to clean the magazine. Bravo on mentioning the detects and you are right. I have shot a lot of these into detention heaven because once they are gone good luck finding them. Thanks again for awesome article. Very educational.
Great article, really well written and thought out. Another key component to any AR15 or rifle for that matter is proper cleaning. Here’s a pretty cool blog I found on cleaning an AR15 that I found helpful:
https://www.opticsplanet.com/howto/how-to-clean-ar15.html
One other site that I’ve found interesting is how to build an ar15 lower receiver
https://www.opticsplanet.com/howto/how-to-how-to-build-an-ar15-lower-receiver-safety.html