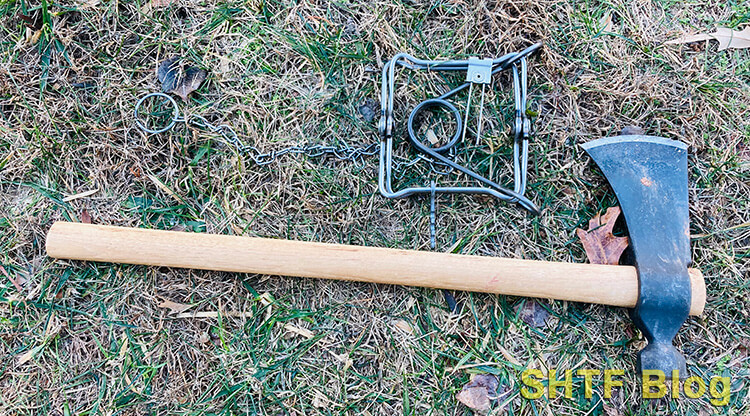
A small “survival trap” is a great way to put some meat in the stewpot. Nothing is more simple or easy to use as the Conibear trap. But to use it, you need to know how to set a Conibear trapline.
A trapline, simply put, is “a route along which a trapper sets traps for his or her quarry.” Moving along the same route helps a trapper navigate remote areas, not get lost, and adjust the trapline over time as he/she learns more about the environment, where the animals move, etc. For the prepper in a survival situation, this could be an easy, somewhat passive way to secure food.
While I’m not the most seasoned trapper by any stretch of the imagination, trapping has been a hobby I’ve tinkered with since middle school. Whether you’re concerned about bare shelves at the grocery store, you don’t like the garbage that’s pumped into manufactured food, or you’re simply looking for a means to keep meat on the table – trapping can serve as a great outlet. Running a Conibear trapline has been particularly effective.
A fundamental aspect of trapping is how to set up a Conibear trap, and today I want to show you how to do just that.
I’m always looking for excuses to escape out into the woods, and trapping is a great one as it has a very long history of helping past generations not only make money but also survive.
I consider it part of my level of preparedness. Sure, you may have your canned food stores, but what happens when the food runs out?
Will you hunt? Yeah, you and the rest of the planet. But what happens when hunting draws too much attention? Maybe you’re surrounded by Karens or an invading force. Even a grid-down, Looterville-type scenario could make hunting difficult.
In any of the above situations, resorting to trapping is an effective, easy, and quiet means of getting your hands on fresh food.
Types of Traps
So before we get into how to set out a trapline, it’s best to learn a little bit about the main types of traps that are out there. While there are all kinds of ad hoc DIY options, the most prominent traps out there fall into one of the following groups:
- Snares
- Leg traps
- Live traps
- Deadfalls
- Conibears
Let’s take a look at each type’s advantages and disadvantages.
Snares
Typically, snares are made of a slip knot and a thin piece of wire. I’ve fiddled around with a number of these designs in the past, and you’re honestly only limited by your creativity. I’ve seen snares before which were spring triggered; I’ve also witnessed the generic loop hanging over a log.
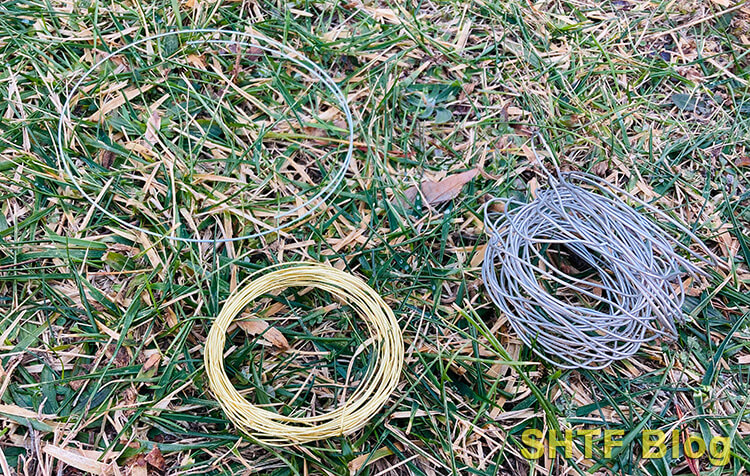
A bit of snare wire can be an excellent addition to your BOB kit as this is a very low effort and minimal gear requirement to trap meat.
Leg Traps
I’ve used leg traps in the past, but they’re a bit messy. Whatever you catch is likely still going to be alive and not happy to see you. You’re going to have to shoot it before you can get it out of the trap (My uncle – we call him “Uncle Stitches” – can attest to why).
I’ve found these traps are easier to set up than Conibears since you can use your feet, but if you want to collect a dead animal, a leg hold trap isn’t the way to go.
Live Traps
You’ve seen leg traps before. This is exactly the kind of traps used by pest control people. Live traps are essentially a metal box you put food into. The animal walks into the trap, hits the trigger, and the door to the trap swings shut, catching you a very scared, very angry critter.
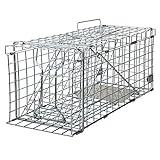
- GREAT FOR squirrels, small rabbits, weasels and other similar-sized animals, catch and release them alive
- NOT SUITABLE FOR catching mouse and small chipmunk, because they can escape through the mesh holes (Hole size: 1 x 1 inches)
- Foldable design, easy to fold flat and save space.
- EASY TO SET UP - Watch the set-up video on this Amazon detail page to learn how to use
We’ve used these extensively in the past, but the problem is you’re left with a live animal to deal with. This means you’ll still have to find a way to kill it and then dump it out of the trap.
The flip side to this is that it doesn’t immediately kill the animal. You could have a fresher animal to eat in a survival situation. Further, if it’s animal you didn’t intend to catch, you can let it go unharmed.
Deadfalls
Deadfalls are a very common trap method in survival manuals. I’ve only ever built a handful of them compared to other trapping methods, though. They’re a very useful trap to know how to craft because you can pretty easily scale them up or down depending on the size of what you’re trying to trap.
I’ve seen a lot of guys on TV catch mice with deadfalls, but I’ve yet to catch anything of my own with one. If it was a mouse though, I’d have to be in pretty dire straits to feel the need to eat it.
Conibears/Body Traps
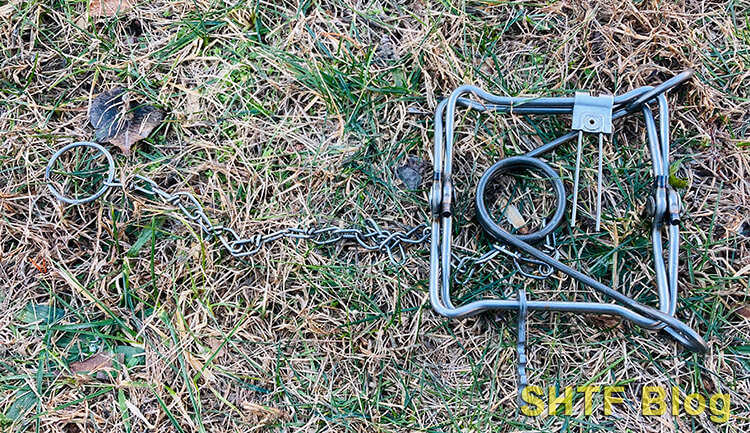
A Conibear trapline is my preferred method of trapping and is the type I’m going to discuss throughout the rest of the article. A Conibear is a metal, square contraption which is held under spring-tension. When the animal walks through the middle of it, they hit the trigger, collapsing the trap shut. The constant pressure of the trap then causes the animal to suffocate to death, though there’s always the chance the trap will break its neck instead.
Setting Your Conibear Trapline
I like running a Conibear trapline because Conibear traps are cheap, and I know the animal will be dead when I arrive. The main con here is that Conibears can be a beast to set up. There’s a special tool sometimes called a trap setter which can help you in the process. If you intend to do a lot of these, I highly recommend you purchase one.
Step 1: Figure Out What You’re Trying to Trap
Once you’ve figured out what specific kind of critter it is you’re trying to acquire in your Conibear trapline, you can move forward with the rest of your preparations. Depending on the size of your prey, you will need to buy traps for different size animals. Therefore, it’s important to know what you want to trap from the beginning.
Personally, I’m looking for squirrels. Deep in my woods, they like to come about when they think you aren’t watching, and I’m hoping to make a little bit of Brunswick stew this winter.
We said we were using Conibears, so we need to pick a size of Conibear trap which is appropriate for a squirrel.
Here’s a list of Conibear number sizes, along with the animals they’re often used to trap:
- #110 – The little guys: muskrat/mink/rabbits/squirrels
- #220 – The medium guys: raccoons/opossum
- #330 – The big boys: beavers/otters
There are many other sizes available for your Conibear trapline, but these are the ones you’re going to come across regularly. Since I’m going for squirrels at the moment (and hopefully some rabbits in the near future), I’m running a series of #110 Conibears.
Step 2: Buy Your Traps
Apparently, the online world is now against the idea of trapping regardless of reason. Therefore, you may have a hard time finding Conibear traps because major online retailers don’t carry them, though there are some listings across eBay and Sportsmansguide.com. The ads in dedicated magazines such as “Fur Fish and Game” are a stellar resource to peruse. You can always try your local tractor supply style store as well, though you might discover Conibears can be difficult to source.
I have to go to a locally run farm goods store to pick my Conibears up. I got the ones for my Conibear trapline for $4 apiece several months ago; Conibears seem to be going for $7 each now. I guess I should have stocked up on more back then.
If all else fails, you can try Southern Snares online. They seem to be normal people selling high-quality traps.
Step 3: Find Conibear Trapline Locations
There’s a lot of old timer tips and tricks here that varies person to person, but we’ll stick to my own personal experience for this guide.
Squirrels
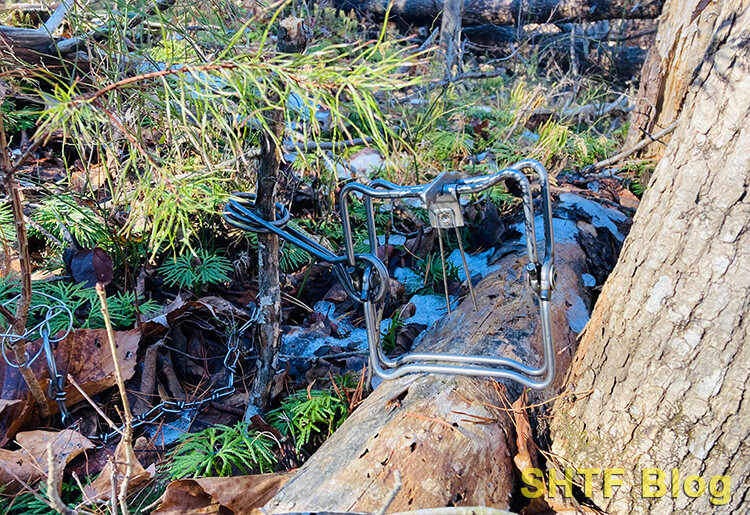
You don’t need a squirrel gun to put a put a squirrel in the stewpot. I like to look for fallen logs. They seem to prefer hopping around on logs rather than in the leaf litter below, so that’s where I set my traps. Squirrels seem to think like a goat or a 5-year-old boy: if there’s something that can be climbed, that’s where it wants to be. Whether or not this is true for squirrels where you live, I’m not sure (though I suspect it’s the same elsewhere).
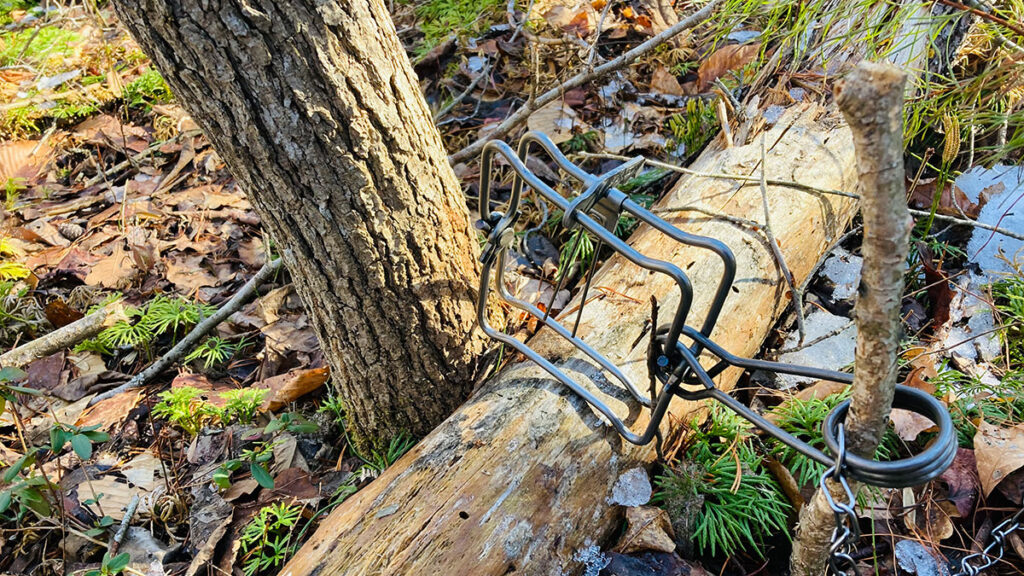
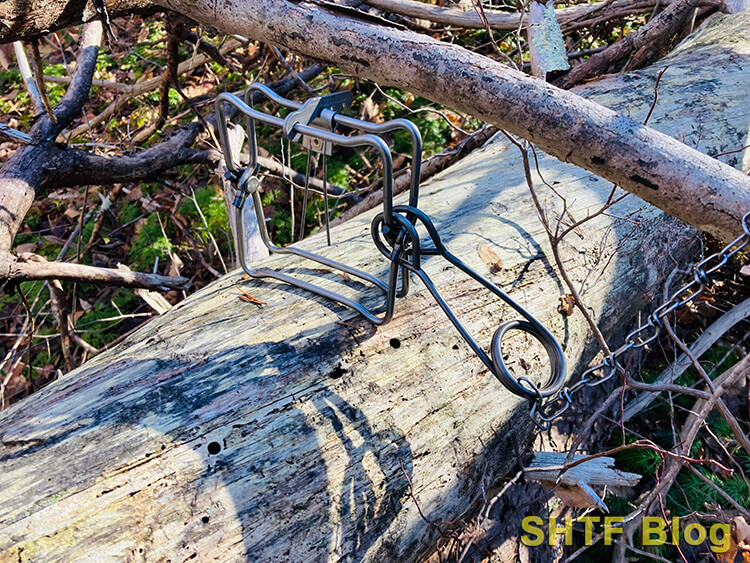
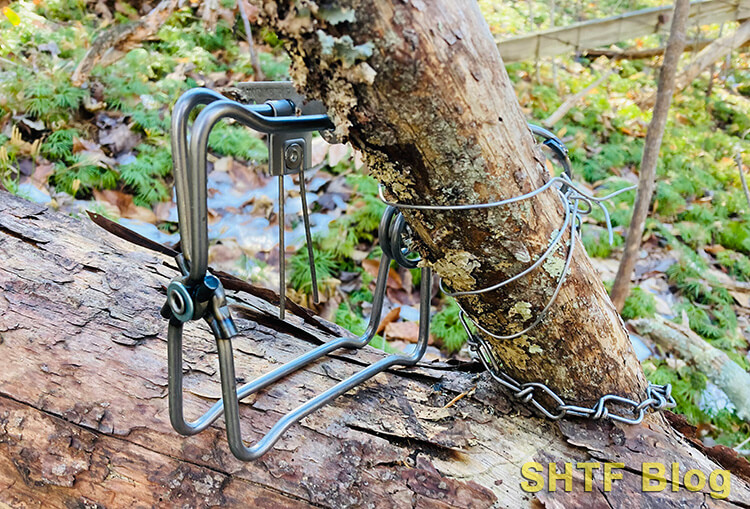
From prior deer hunts, I know the area where I’m setting up my traps is a playground for squirrels. I set up the five traps I had with me on fallen logs where the squirrel was most likely to hop across. When possible, I use nearby trees which are bracing the fallen log as an anchoring point for my traps.
Step 4: Set Your Traps
Conibears can be pretty tough to get situated. The only ones I’ve ever been able to do by hand are the #110. The larger models are nearly impossible to set by hand. Even if you do manage to work out the grip strength to get one set in the store, can you do that repeatedly with cold fingers out in the middle of the woods?
If not, buy that setting tool mentioned earlier.

- Stay safe while setting up your traps! - For ease and safe setting of Duke Body Traps. These two metal tools can manage and handle Duke traps without harming your fingers. Metal construction; Easy and...
- For #220 and #330 body traps
- Provides ease of operation when compressing body trap springs
- Use with long-spring traps for safer, easier setting
If you don’t have one of those setting tools, I’ve found that it’s easiest to use one hand to squeeze the spring while the other hand squeezes the square in the direction it needs to go.
I always set my traps to the lightest tension needed to spring it.
Step 5: Secure Your Traps
I usually secure my traps last. Otherwise, I only end up being frustrated with a trap that decides it wants to have stiff spring that I’m not able to get the leverage to set the stupid thing. There are two methods in which I typically secure my Conibear traps: wire or a post.
A little bit of snare wire can go a long way in securing your Conibear to a tree. I tie a knot around the ring at the end of the chain, and then use the other end of the snare to tie it off to a nearby tree limb or around the log.
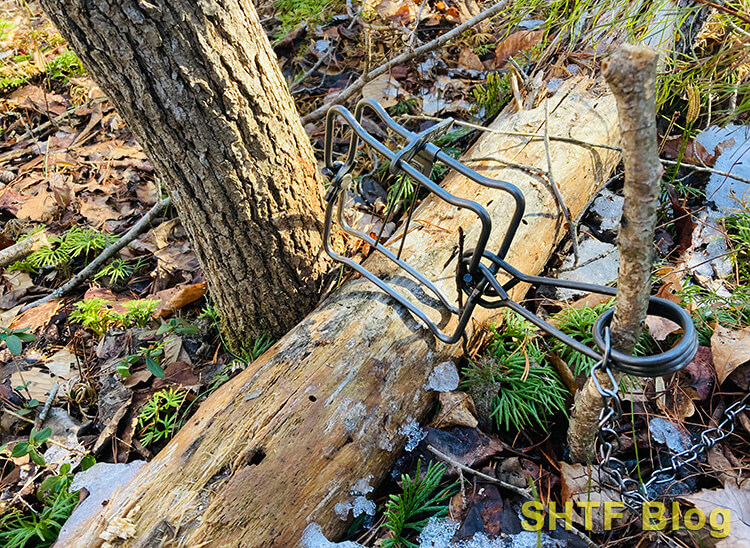
If I’m setting my Conibear/leg trap closer to the ground, then I may secure my trap with a stake. Using my Cold Steel Rifleman’s tomahawk I can chop off a pointed stake and then hammer it into the ground.
I’ve carried lengths of rebar out with me before to set up my leg hold traps, with the hopes that the extra height would stop the critter from escaping. With a Conibear trapline, though, that shouldn’t be an issue. Whatever gets in there should be dead in a matter of seconds. There’s not going to be much of an attempt at escaping.
Optional Steps
The following steps are not a requirement to trapping critters, but they (generally) can’t hurt your odds either.
Bait the Trap
This really depends on what you have at hand. I didn’t have anything with me this go round, so these traps aren’t baited. They’re simply in places I’ve seen squirrels playing before. Now it’s a playground of death.
I’ve seen some guys that stick an apple on the pointed prongs of the trigger, others will smear the trigger with peanut butter. Maybe you just want to put the bait on the other side of the trap. Either way, putting down bait is a good way to give yourself a better layer of insurance.
Flag the Trapline!
I speak from experience when I say that a rusty trap can become almost impossible to find. Rust is apparently the best camo known to man; I’m not sure why the military hasn’t yet tapped into that for their uniform designs.
Because of that natural camouflage, you may want to consider adding a marker or some brightly colored flags to your trapline. Should the trap fall into the leaf litter or simply disappear (it happens), this will help you to better ensure that you can get your $5 trap back. If you go out in the morning to check on your 8-trapline only to discover that three of them have mysteriously disappeared, that’s $15 that just went down the drain. Flagging is a cheap solution to the problem.
Final Thoughts
Trapping is a numbers game. The more that you set out, the higher your odds of actually trapping something. There is a bit of planning and setup that needs to be done first, however. Hopefully, this article has helped you to figure out just what that might be for your situation.
What are your thoughts on setting out a trapline? Are there other tips and tricks you can recommend here? Let us know in the comments below!