The apocalypse has hit and the grid is down. You have to shore up the defenses, measure out your food rations, and prepare to hunker down. But first… the coffee.

You probably already have the means to make coffee when the grid is down but can you roast green coffee beans? You may have a French press, a percolator, or a pour over device. Maybe you have even gone so far as to take my advice and build a long-term coffee storage. You stored green coffee beans the way I suggested, and now, post-collapse, you take a whiff from that bag of green coffee beans and think: That doesn’t smell like coffee!
How does a green bean go from that to a delicious-smelling, soul-warming cup of hot coffee? Heat! Coffee beans undergo a massive transformation when heat is applied. That is when their magic is revealed.
There are two ways I roast coffee beans when the grid is down: cast iron skillet and a handheld roaster. I will get into this in a moment, but the first thing you need to is…
Buy Green Beans
We call them coffee “beans,” but a more accurate description is coffee “seeds” – seeds of joy. Very fresh beans are very green. Once they dry, they become a lighter shade of green. Make sure you are buying good beans seeds to start. They should be consistent in size if you want a consistent roast.
If you are new to storing and roasting beans, I would start with a simple 3lb bag of green coffee beans on Amazon. They are single origin, cheap, and delivery is fast. It’s a low-cost way to make sure this is something you want to do before buying more serious quantities.
Do You Wash Green Coffee Beans Before Roasting?
You will get different answers to this question. Some people will say the beans already come clean. They’re right. From that perspective, there is no need to wash them. Still, others say to wash them, not to clean them, but because washing them moisturizes the beans prior to roasting.
If you do decide to wash your beans, do it after you pull them from storage, and let them dry thoroughly before roasting.
How to Roast Coffee Beans in a Cast Iron Skillet
Your skillet does not have to be cast iron. A simple frying pan will work, but that is not my preference. Preppers know the value of having a cast iron cookware set, and I believe cast iron i better for roasting beans. Whatever you do, do not use a coated or non-stick pan. This will impact your coffee’s flavor (assuming Teflon Brew is not the flavor you’re going for).
If you are going to make a habit of roasting beans over a skillet (or frying pan), I would recommend that you dedicate one for this purpose. The high temperatures will bring out the oils in the beans, which over time, will discolor your pan. Maybe that doesn’t matter to you. Maybe it does.
You are also going to need a basic oven mitt, because you will have to keep shaking the skillet and the beans will let off some serious heat. For a few dollars more, you can buy welding gloves instead. These are more durable and are better overall for cooking over open flames.
Stirring them with a wooden spoon is also an option, but I prefer flipping the beans in the skillet in a motion similar to flipping a pancake. Because of the smoke and smell that comes from roasting beans, I would advise that you roast them outside.
The entire cast iron skillet roasting process will look like this:
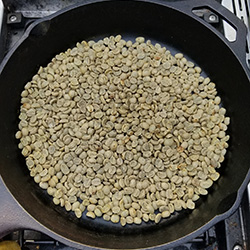
Step 1: Pre-heat Skillet Over Medium-high Heat
You want to put the beans into an already-hot skillet. It doesn’t need to be glowing red, but give it a few minutes on the flame to get up to roasting temps.
Step 2: Measure Your Beans
A good place to start might be 250 grams of coffee in a 10-inch skillet. Alternatively, just dump the beans into the pan until they cover the bottom. Having enough beans helps distribute the heat and roast them all the way through. However, you don’t want so many that when you shake them they spill out over the sides.
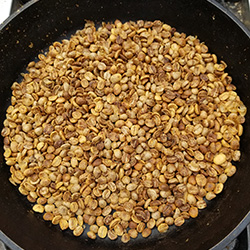
Step 3: Stir Constantly
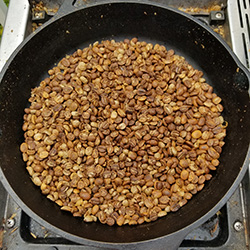
The beans will begin to turn a yellow-ish color (3 minutes). The roasting is underway! Keep stirring and mixing the beans. You cannot stop this process. It will not take long for beans go from roasted to burnt if they are not kept in motion.
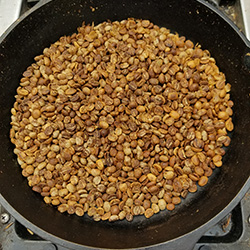
Step 4: First Crack – Light Roast (7-9 minutes)
At about 7 minutes in the beans will start to brown. You may start to see some smoke and soon you will hear the all-important “first crack.” Here is where you begin your transcendence from being a simple grid-up coffee drinker to becoming a post-apocalyptic grid-down coffee god.
This *crack* is a result of steam building up inside the bean and being forced out. It is roasting. Seven minutes in and you will have a very light roast, but that’s not you, is it? Keep going!
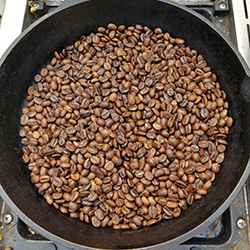
Step 5: Second Crack – Medium Roast (9-12 minutes)
Things start to “heat up” quickly after the first crack, and this is the most critical period. Increments of 30 seconds can produce noticeable differences to the coffee connoisseur.
Eventually you will start to hear a “second crack.” This is not the second crack you will hear, but the second crack of each bean. How do you know the difference? The second crack is softer than the first, and it is when oils begin to move from inside the bean to outside.
The second crack is also when the flavors of the roast begin to overpower the flavors of the beans’ origin. For many coffee drinkers, this point marks a good balance.
Step 6: Dark and Shiny – Dark Roast (12-15)
This is dangerous territory for the beginning roaster, as beans will easily go from dark roast to burnt. In fact, don’t be surprised to burn some beans on your way to perfecting a dark roast.
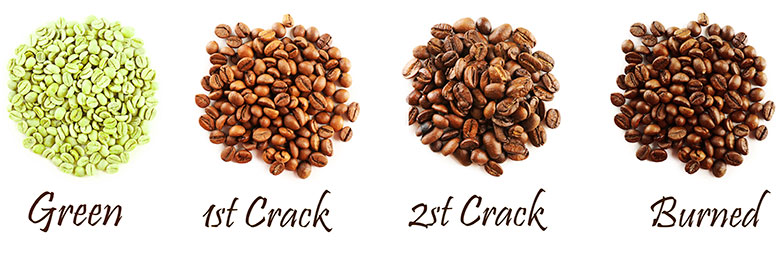
Here is a helpful chart to break down the roasting process by stage:
| Attribute | Stage of Bean |
|---|---|
| Green | Hopefully you are storing beans at this stage. |
| Yellow | They are beginning to emit a smell as the roasting begins. |
| Steam | When you start to see the steam, you know that the water inside the beans is beginning to evaporate. |
| First Crack | Roasting is truly underway now. It sounds like popcorn, only softer. Sugars inside begin to caramalize. |
| City Roast | Soon after the first crack your beans are at the very light “City Roast” stage. |
| Full City Roast | The beans are darker but haven’t hit the 2nd crack stage yet. |
| Second Crack | At this stage, the beans are manifesting another layer of intensity and flavor. |
| Dark Roast | Smoke has increased and smells more intense. This is as dark as you can get before beans begin to burn. |
| Burnt | Well, you screwed that up. The smell is really bad. The beans are ruined. Try again. |
Step 7: Cool it Down
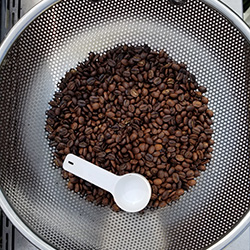
Once you have achieved the desired roast, you want to cool your beans down – quickly. The longer they are left hot, the longer they are roasting. Remove the beans from the skillet immediately.
There are different ways to cool the beans off. I prefer to use a simple stainless steel colander. It is big, it has holes for more air exposure, and you can easily shake the beans around to cool them down faster. The colander also makes it easy to…
Step 8: Remove the Chaff
The final step is removing the chaff. Coffee chaff is the dried skin of the coffee bean that becomes loose during roasting. You will see it begin to float in the air as the beans heat up. The easiest way I find to remove the chaff is to do it during the roasting process itself.
In the cast iron skillet, I blow on the beans each time I flip them. This stirs the loose chaff up into the air and out of the beans. Just know that doing this can result in a build-up of chaff around the flame, causing a fire (it’s happened to me).
The other way to remove the chaff is by stirring it up in the colander during cool down, or tossing the beans between colanders. This process doesn’t have to be perfect. You do not have to remove all of the chaff. Some will inevitably get left in the beans, and that’s fine.
Chaff is great for a compost pile. It is rich in nitrogen, so it helps fast-growing garden plants. Unfortunately, the collection of it is a pain in the butt, and for individuals roasting at home, you just won’t get that much of it. Composting chaff is a better option for large-scale commercial roasters.
Step 9: Cooling and Storage
Once this is done, you want to leave the beans airing out for around 12 hours to allow their gasses to fully escape before you grind the beans into course coffee grounds for off-grid brewing.
If you are going to store your beans after roasting them, the ideal storage container is just what you buy beans in at the store, a coffee bag with a one-way degassing valve that allows the CO2 to vent without letting oxygen in. This will keep them fresher for a longer period of time. The hardcore coffee drinker and frequent home roaster might instead opt for the Zurich Stainless Steel Coffee Vault.
Roasting Off-Grid with a Handheld Roaster
I like purpose-built products, and while I love cast iron cookware, when it comes to roasting coffee beans at home and off-grid, nothing beats a designated roaster.
The process is the same as what I outlined above for cast iron, only you want to watch the roast times, because – I find – it goes a bit faster in a handheld roaster. The heat is trapped inside better.
I have a small handheld roaster, and the downside to it is that though it creates a better roast, I cannot fit as many beans inside. I can roast more beans at once in the skillet. There are, of course, bigger roasters available.
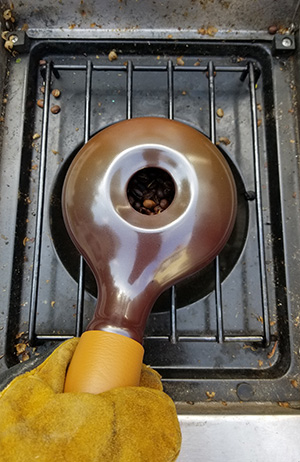
I use the ECO Ceramic Hand Roaster. This roaster has a waffle-shaped internal structure to assist with even roasting. While it has a wrap around the handle, it’s a useless wrap. You will still need the welding gloves I linked to above.
Green beans are placed inside the top hole, and the handle itself is the second hold where the fully roasted beans are poured out for cooling and removal of chaff.
Again, the steps to roasting are essentially the same. This is just another means to the same end. If you become a serious roaster, opting to roast most (or all) of your beans, I might skip both the ECO and the skillet and opt for a larger handheld roaster like the Dr. MAHN Handy Roaster. I am not sure it would roast as well as ceramic, but it seems like a good middle-ground between a skillet and a smaller ceramic roaster.
If you don’t care about roasting and brewing when the grid is down, and you just want to take more control over the coffee experience, you can buy a more serious mini coffee roaster like the KALDI.
If you don’t care about any of this and you just. want. coffee. Consider buying freeze-dried coffee with a 25+ year shelf life. It tastes better than I expected – read my review.
Is it Cheaper to Roast Your Own Coffee?
Yes, it is cheaper to roast your own coffee. When you can buy 3lbs of green coffee beans for about $20, it is certainly cheaper than the roughly $15-17 per pound you will pay for quality roasted beans. Yes, you might have to buy a roaster, a storage container, and a handheld coffee grinder, but if you consume a lot of coffee, you will save money over the long run.
Then it is just a matter of determining what your time is worth. Who knows, maybe you will come to enjoy roasting!
What are your thoughts on home roasting? Have you done it? Are you preparing to do it for a SHTF scenario? Lemme know in the comments.