Gear Corner – How to Make and Use a Hobo Stove
I’d read about hobo stoves and have to admit I approached this project with a lot of skepticism. The stoves I’ve used in the past range from gasoline stoves for heating a ten man tent to the small butane and alcohol stoves that live in most hikers backpacks. A friend told me about a stove he’d made during his hiking days and described a hobo stove I’d read about online, so I decided to give it a try.
There are various plans out there for making these types of stoves and I’ll let you Google them yourself rather than point you at one. Some of them had you measuring the holes with a tape measure. I don’t think so! No self respecting hobo is gonna measure holes in a freakin’ can! I’ll let you do what I did and that’s experiment.
I will say that this is a very easy stove to make. You need minimal tools and it can be built quickly.
Directions
Without further ado here are The Jarhead Survivor’s own plans for making a hobo stove along with the test results.
Tools needed: Tin snips. Can opener. A drill will make your life a lot easier, but isn’t 100% necessary.
You’ll also need a wire coat hanger or something like that.
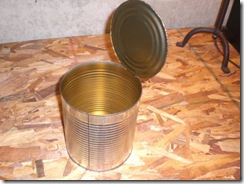
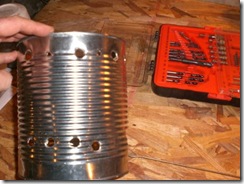
First, get yourself an old can. Here’s the one I used:
Next, cut out the top and bottom:
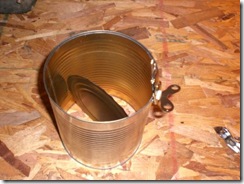
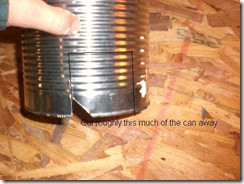
The next step is to cut a good size hole in the bottom of the can. This is where you’ll be feeding the wood into the flame, so make sure it’s big enough to accept a big handful of twigs. Note: Be careful! The aluminum is sharp and you may want to wear a pair of work gloves.
These are the beginning cuts I used. There’s a good picture near the end of the post showing the size of the hole I ultimately made, but for some reason I didn’t take a picture at this stage. Der! I’ve outlined it in this photo:
Next, drill some holes or use a punch to make some holes near the bottom of the can for air circulation. These don’t have to be perfectly spaced or anything like that, just make sure there’s enough of them to allow the fire to get plenty of air. I put a few near the top of the can as well.
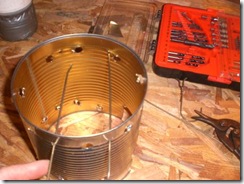
Cut two straight rods out of the coat hanger. These will go through the stove to hold the pot.
I drilled four smaller holes for the rods.
So far I’d spent about ten minutes building this stove and five of that was running around looking for a can opener. Now it was time to fire that mother up!
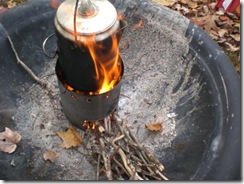
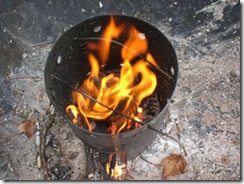
I put a bunch of small twigs in the bottom of the can and lit the fire, then let it build up a small bed of coals. Here you can see the size of the hole I created for feeding the wood in. You might have to experiment, but this one seemed to be about the right size.
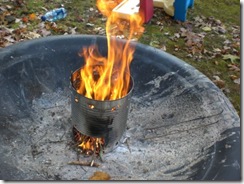
Once the fire was going nicely I put my coffee pot on.
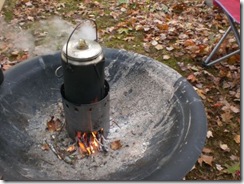
It took ten minutes to percolate about five cups of coffee, which wasn’t too bad. Notice in the picture below that the rods holding the coffee pot bent!
Results
As is true with everything there are some good points and bad points about this stove.
The Good – it’s very easy to make and there is plenty of fuel for it here in the Maine woods. A few handfuls of twigs and you’ll be able to boil a couple of cups of water in no time.
I like the way the stove focused the heat, which meant no wasted energy.
It’s lightweight and if you were so inclined carrying it around wouldn’t be a big deal.
I used hardwood twigs (oak) and there were very few sparks from this fire meaning that I’d feel comfortable using this stove in an area where there was a high fire hazard. By being extremely careful or through sheer dumb luck I’ve never lost control of a fire yet!
The Bad – it needs a lot of attention once you light it to keep it going. The wood used is fairly small and you need to feed it every five minutes or so or else the fire will go out.
If it’s raining starting this stove and keeping it going will be a bear. I haven’t tried it in the rain yet, but past experience with wood stoves tells me this will tough to keep going unless you have a dry supply of wood on hand.
I’m going to replace the coat hanger with a couple of wire stakes the next time I use it.
Final Analysis
I like this stove. Honestly, I was ready to not like it before I started, but after making it and using it I decided to leave it at a semi-permanent camp I have in the woods near my house here in Maine. It’s not something I’d carry around in my pack, but leaving it at the camp is a perfect application for it. Quite often I’ll stop by on my way in or out of the woods and building a big fire to make a cup of coffee isn’t quite feasible or worthwhile and obviously electronic appliances aren’t going to be an option, but with this little stove it’ll be easy to make a small, concentrated fire to make coffee or heat up a can of food and then put it out again. If you have a similar situation and want to add a piece of functional gear to your camp gear or just need a small, cheap stove then I’d recommend the hobo stove.
If you can think of any more good or bad points or other applications for it post it here and let me know.
– Jarhead Survivor

22 comments
What size can did you use? It looks like it’s larger than just a can of vegetables.
It’s about the size of a big can of coffee. It’s one of those big food cans they use in kitchens for beans or whetever. If I had to guess I’d say it was gallon sized, maybe a tad smaller.
That would be a #10 can. They hold around 6-7 lbs and are ~13 cups.
Instead of tent stakes, maybe some big a$$ nails? They are extremely useful, and a couple of these stay in my kit. Non galvanized if cooking is involved (or grind off galvanized finish), those big ole spikes are downright handy. A couple of those pounded into ground make a decent trivot to rest your pot so that two vessels can be heated at same time.
Just a thought – good post. I’ve save a few coffee cans from work to work on a project just like this.
A side issue is the coffee pot. I’ve been looking for a good coffee pot, but all the cheap ones are aluminum and I want stainless steel. Most of the stainless ones start at about $60 and go up. Does anyone know of a cheap but good stainless coffee pot that holds at least 6 cups?
Jack – My thoughts went to exactly the same item. I looked on-line, briefly, but couldn’t find the one that was similar to the one you described. I’ll keep looking and add another comment if I come across one. I couldn’t even find the aluminum one, which in a pinch, wouldn’t mind using. I suspect we won’t find a cheap one.
Jack – I don’t know why I didn’t think of this before, but I called a survivalist friend of mine and ask where we could find such a coffee pot at a reasonable price. His suggestion was a resource I had forgotten about: http://www.lehmans.com . They put out “The Non-Electric Catalog” filled with tons of old-fashioned stuff that fits the bill for preppers/survivalists. I found quite a few coffee pots, including a stainless one for $29.95, and one similar to the one in Jarhead Survivor’s post. Check it out.
I forgot to add my name to the comment above.
Presage Buddy
I looked at Lehman’s, but their 9 cup pot was out of stock and cost $39 + shipping. I have bought things from Lehman’s, and they’re a good company, but…
I ordered the 8 Cup GSI Outdoors Glacier Stainless Percolator for $37 with no shipping cost. All the GSI coffee pots were very highly rated on Amazon, and this style has the old fashioned appearance and a loop to hang the pot over a campfire.
https://www.amazon.com/gp/product/B0018BK7VC/ref=oss_product
That’s what I was thinking. I mean, Why remove the bottom. the only benefit I can think of would be to reduce weight, but other than that, I can’t think of anything.
I might try to remake this leaving the bottom intact like you guys are saying. The only reason I took it out was so that the flames could get directly to the pot, but as far as making one for direct cooking I admit I hadn’t thought of that. That’s why we have these forums – to share good ideas like these. Good call Bubblehead and Preppy.
I also liked that Lehmans site listed above. There’s some good stuff there.
Jack – You’re right. The GSI one at Amazon is a better deal. Looks like a buy to me. Thanks for the heads up.
PB
Here’s the Boy Scout Variation that I was taught back in the 60’s:
Clean out the #10 can (holds 1 gallon, think large Coffee Can). DON’T remove the bottom. punch some hole along the side near the bottom to let smoke escape. Rotate the can 180 degrees. Cut the flap at the open end. At the open end, 90 degrees on either side of the Flap, punch a small hole, just big enough to put in a coat hanger. When you flip it over, it should look like a small pail. The reason you keep the bottom on is so that you can carry your firewood, Sterno, etc. INSIDE the can. Leaving the Bottom on also helps trap the heat, and acts as a stove top to hold a pot, smaller can to boil water, etc. We even fried bacon and cooked eggs DIRECTLY on the Bottom, but they did have to be scrambled.
Make up a couple, hang them from a hook in the shed with all the fixin’s, and you should be good to go. Hope this helps.
Check out lannyplans on youtube and you’ll find some incredible homemade stoves from cans. This guy is a real stickler for details and designs them for the best performance there is. I have made a few and they work well. This guy even cooks a steak on these with small chunks of wood. Also, there is minimal smoke or light output from these.
I like it ! just got on this blog and good info on here ! this just goes to prove survivalists are the most resourceful people on the planet . Would be a fun topic , 100 things to do with a coffee ( any ) can . Just to see what people can come up with !
Hi T.R. – Glad you like the site. Welcome aboard and keep on coming back! -Jarhead
If I remember correctly, the “fuel” for the boy scout version (Buddy Burner, i think it was called) was cardboard stuffed in a tuna can and drenched with parafin wax. Like if a Sterno can and a candle had a baby.
those are #10 cans – get them at WalMart, Smart & Final, Sam’s Club, etc. (they’ll contain chili, peas, corn, tomato sauce, whatever), only about three to seven dollars depending upon what’s inside.
Glad to see an oldie but a goodie brought back. Dad taught me as a kid how to make them and like Bubblehead Les said, keep the bottom to retain heat and use about any surface. I used a small ravioli can with a heat tab and sticks with the same design to heat water in my canteen cup for coffee in the field. I like the large nails idea as you can use them for many other purposes.
For smaller cans (6 to 10 oz cans) you can make a sterno type stove with cotton balls covered in vasaline, alcohol or lighter fluid just put the bottom holes slightly above the level of the soaked cotton balls, I had mine about two inches from the bottom and an inch from the top . You can boil water in about 5 minutes.
I’m really happy that I found you here what’s new with you for so you have all the fun of being here is so-so
Hey guys. Remember the old ways. Cast iron pots and steel coffee pots. SAFE! and have you seen the rocket stoves. Pretty much same as your coffee can burner. I’ve made mine from a short piece of black stovepipe with your hanger or large nails at the top. Works great. Also hides the flames. And after cooking and making the coffee, heat up some flat rocks to lay on the ground under your leaf bed in the woods. The stove pipe will last 30 times longer then the coffee can and 100 times longer then the paint can or soup can, but in a pinch those will work.
Shared! I’m pretty sure a few friends would like to read this.