Are you using available technology to help you with your preparations for when TSHTF? If you’re a Luddite then this post is not  for you; however, if you own a tablet, laptop, or desktop computer then this post will show you how to obtain and use free topographic maps. You might ask the question, “If we’re using high tech why not use a GPS?” Great question. The way I use technology is to assist me now while the grid is still up.
By Jarhead Survivor, a contributing author
The way I use technology is to assist me now while the grid is still up. Creating lists, downloading and printing maps, using online resources such as SHTFBlog, looking at gear reviews, etc. If you’re planning on using your GPS endlessly after the grid goes down I’m afraid you’re going to be stuck somewhere up a river without a paddle. The batteries in your devices will eventually die. Are you prepared for that? There’s a hundred uses for technology if you have it available and you’re not afraid of it. Let’s get started.
Stuff You’ll Need
Here’s a list of software that I use. I’ll lay it out and show you how you could also use other software. First, I’m using Windows 10 on a Microsoft Surface 3 Pro. I use Windows Edge or Internet Explorer as a browser, and Microsoft OneNote to capture and manipulate images. This could easily be done on Windows 7 or Windows 8. You can use Google Chrome or Firefox as a browser, and there’s a free tool in Windows 7 under accessories called the Snipping Tool, that allows you to capture images off the screen.
OneNote is awesome for a bunch of different reasons. It’s a free download and all you need is a Microsoft account in order to use it. This is one of the few pieces of software out there that I really recommend. I basically run my life off OneNote. If there’s enough interest I’ll write another post about it in future and how I use it for prepping if anybody is interested. There’s also a similar piece of software called Evernote, which is just as awesome.
Free Topographic Maps
Who doesn’t love free stuff? I like Google maps and use it fairly extensively, but I still like topographic maps when I’m out doing Land Navigation. As is true with nearly everything these days there are other ways to do what I’m about to show you, but the following method works best for me.
To get topographic maps follow this link. This link should bring up the following page.
Use your mouse (click and drag) to get to the area you want then use the scroll button on your mouse to zoom in. You can use the pinch method on a touch screen if you’re using a tablet. Here’s what Maine looks like as I start to zoom in:
The red squares are quadrangles that indicate areas that have corresponding maps. Zoom in some more until you get to the level of detail you want. Here’s a screen shot of West Rockport in Maine in an area in the hills I’ve hiked often:
This is smaller than what I can see on my screen, but now you can see roads, lakes, contour lines, etc. Basically all the details that make a topographic map what it is. Now it’s time to actually get a screen shot and paste the pictures into OneNote or whatever software you use. When you download and install OneNote you should see a another tool called “Send to OneNote”. It’s small icon that looks like this:
If you’re running Windows 7 and didn’t download OneNote you can always use the Snipping Tool under the Accessories menu. When you have the map just the way you like it click the Send To OneNote icon on the tool bar at the bottom of the screen and it will pop up a screen like the one below. Click “Screen Clipping” and the screen will darken up a little. That’s Windows way of telling you that it’s ready for you to make a selection. I start at the top left corner of the area I want to highlight then click and hold the left mouse button and drag down and right until the area I want is highlighted.
Let go of the left mouse button and a screen like the one below will appear. I usually choose “Copy to Clipboard”, which takes your selection and stores it in memory.
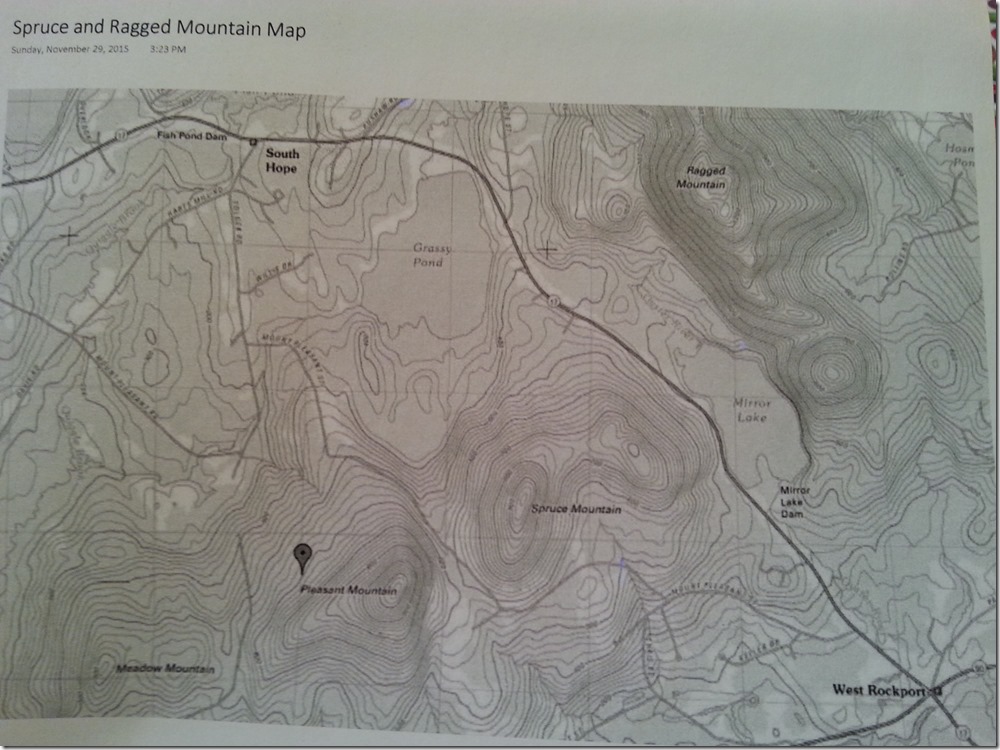
You can paste it into just about any word processor or graphics program. Again, I like OneNote for it’s versatility so I’m going to paste it there. I go to OneNote and create a new page, then I can either Right Click and choose paste or just hit the Ctrl – V shortcut on the keyboard and paste it in.
In the above graphic you can see I’ve named it Spruce and Ragged Mountain Map. The cool thing is that you can copy and paste as many maps as you want then print them out when you’re ready to use them on a trip. Below is a printed version on my black and white laser printer. If you print these out on a color printer they look great and work great too. I’ve got many of these black and white maps of various areas here in Maine.
Magnetic Declination
We now have the map of our area, but we aren’t quite done yet. If you’ve used a map and compass before you know that you have to adjust for the magnetic declination in your area. To find out what it is in your area click here.
Enter your city and state, click SEARCH MAP and you’ll get a screen back like this:
In the white information portion on the map you’ll see where it says Magnetic declination: -15 degrees 51’
I’m just going to use 15 degrees as my declination, so I write that at the bottom of my map. I can even put it in the same type of graph you’d find on a real map.
It’s a little crude, but it conveys the necessary information. Now I know what I need to use in order to convert from grid to magnetic and vice versa. If you don’t know how to do this don’t worry. I’m getting ready to write a series of posts about map reading/land navigation coming up. You might also want to check out my YouTube channel for more info on this topic.
Use It!
You now have a perfectly good map to use when you’re out on your land nav trips. Many of you probably use a GPS when out hiking, but I encourage you to start taking a map and compass when you go out and track your progress on a real map. That way when the batteries die on your GPS you’ll have a backup and the knowledge on how to use them to get where you’re going.
Questions? Comments?
Sound off below!
-Jarhead Survivor
Photos By:
MSSCoventry


7 comments
Great! Thanks Jarhead!
Excellent! Other than the need to print out everything you’ll think you need *before* you need it, I don’t see any drawbacks to this. 🙂
or just download them from the usgs store
really great. I think when SHFT the navigation items will be turned off for civilians, so this is good to have knowledge and tools.
yeh, what Dennis said.
“They”can shut off the GPS system. having map and compass skills is more important than having the most perfect survival guns, or other toys.
Thank you for stopping by.
Google Maps Engine has been discontinued. We want to thank all our loyal Google Maps Engine customers.
Sincerely,
The Google Maps Engine team
Frequently-asked questions
What will happen to my Google Maps Engine data?
All data stored with Google Maps Engine will be systematically deleted from Google servers.
Will there be any way to retrieve my subscription data from Google in the future?
No — all data stored in Google Maps Engine will be permanently and irrevocably deleted. Google will not be able to recover any Google Maps Engine data for any user after February 1st, 2016.
There is another site you can use, can print out to PDF or use the Clipping Tool in Win-7 to save the maps
https://www.digital-topo-maps.com/