This article explains how I built my outdoor cooking fire pit. There are virtually endless designs that you can come up with if you’re also looking to build your own. You’re limited only by your imagination.
I wanted to start cooking with open fire because 1) I like playing with fire, 2) it’s more of a challenge than a grill, 3) it’s something I can do while camping, and 4) as a prepper, the ability to cook meals over an open fire gives me options. If the grid goes down and the mushroom cloud goes up, I can cook entire meals with nothing more than some dry wood and a match!
I came up with my own open fire cook station design because I couldn’t find one that met my needs. I wanted a big and versatile cook station. I wanted the ability to have different fires to cook different foods in different ways, and big enough enough to entertain guests.
There is an off-the-shelf equivalent (in concept) campfire cooking stand to what I’ve built. It costs less than half mine cost to build and it’s better for one fire car camping. It’s the portable campfire cooking stand from REDCAMP. If you want a smaller version of what I’ve built, this could fit the bill. It’s just less… robust.

- Material: The Swing Grill Campfire Cooking Stand is made of high quality carbon steel material make it solid and durable to use, high temperature resistant, can be directly used in campfire.
- Size: The Swing Grill is 34x34"/88*88cm(HxW) the Grill Grate is 16*11"/41*28cm. Weight: 22.3lbs/10.13kg. The support angle of the grill has been fixed, it is very easy to install, and stable, to...
- Adjustable design: The BBQ Grill Swing Cooking Stand comes with the convenient swing grill, chain latches to raise, and lower grill height. You can adjust the height of the campfire grill according to...
- Practical Campfire Grill: Making it easier to cook a hot meal with this portable outdoor folding grill when you're outdoors. Designed for use with outdoor cookware, frying pans, skillets and pots, for...
The nice thing about my design is that you can follow it for a general how-to and adapt it to fit your needs, space, or budget. Not that this fire pits costs that much when compared to commercial outdoor cooking fire pits. In fact, considering its size and versatility, it’s much less expensive than anything you could buy online or at a store!
The other good thing about this outdoor cooking system is that it can be easily disassembled, much like the dry fit concrete block fire pit underneath it. It’s all just screwed together.
How to Build My Outdoor Cooking Fire Pit
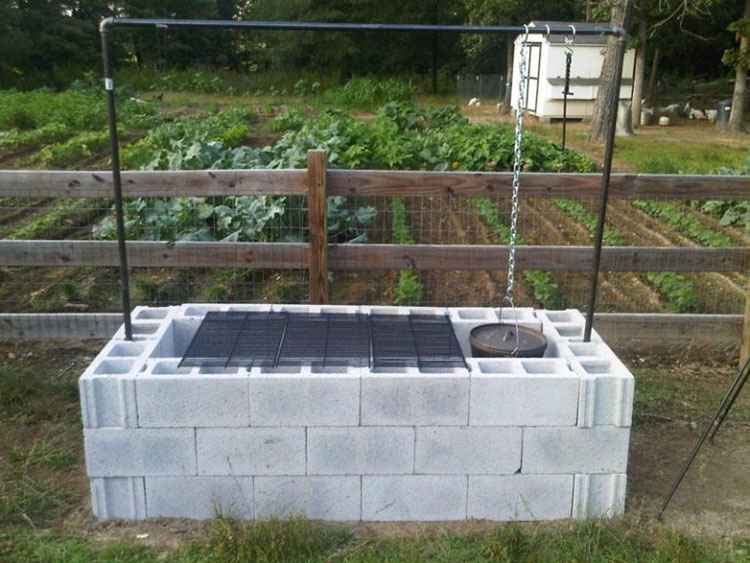
1 – Build a Concrete Block Fire Pit
I built the frame of the pit from dry stacked concrete blocks. If you have not read my article on how to build a concrete block fire pit, start there as this article focuses on expanding that fire pit to turn it into a cooking fire pit. I explain in that article how modular this fire pit it, I go into the pros and cons, costs, etc.
If you decide you don’t want a concrete block fire pit, or you already have an existing fire pit of some other type, you can still read on to learn how I created a system for hanging cooking grates, Dutch ovens, etc. over the fire with the ability to move them up or down to adjust the heat as needed.
2 – Gather the Cooking System Materials
Once you have a fire pit, you’re set to build the structure for an over-the-fire cooking system. If you have any familiarity with cooking over an open fire you know that once you have fire building basics down and know how to control a fire and create the coals you need for cooking, all that’s really needed is a way to control the grate, pot, or pan’s distance from the heat.
The ubiquitous Dutch oven tripod is an example of this. I have one of these in addition to the system I’ve build because it’s portable. I can use it over a campfire anyway. I have even used it when cooking over my Solo Stove. I bought the Lodge “tall boy” tripod online at Cabela’s, but they’re also available on Amazon.
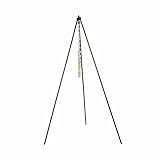
- Tall Boy tripod features 60" legs with 36" chain
- All-steel construction with high-temp black finish
- Adjustable chain to hang Dutch ovens over campfire
- Perfect accessory for cooking great food in the great outdoors
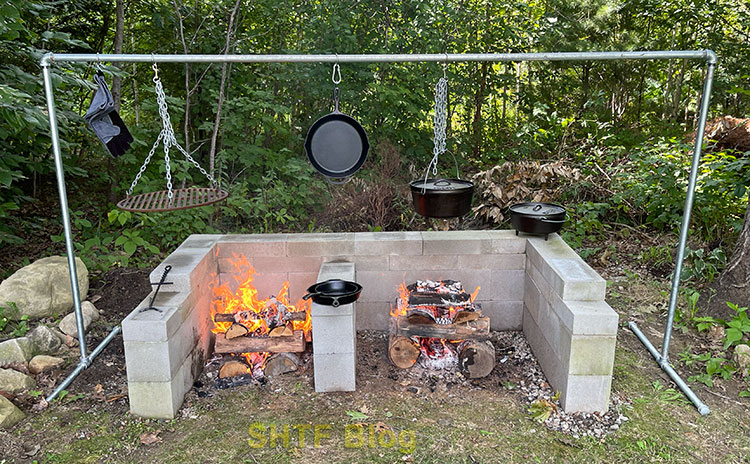
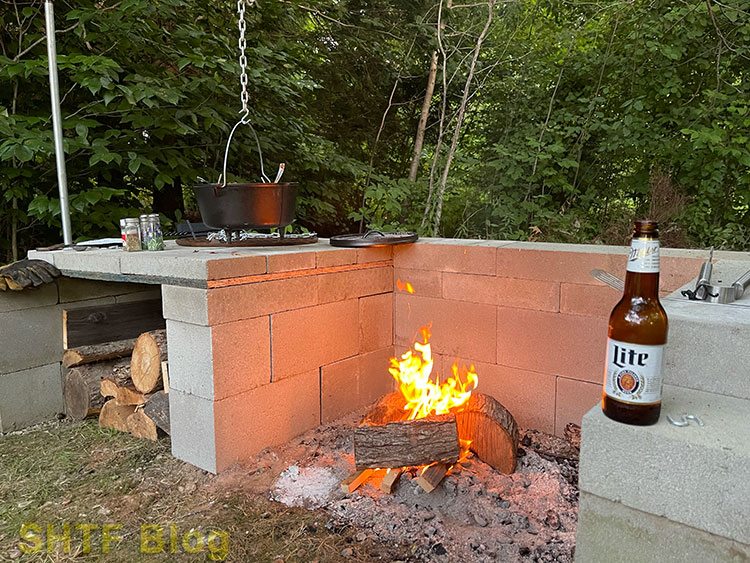
This outdoor cooking fire pit system takes the concept of the tripod and injects it with steroids. The tripod is an exceptionally strong geometrical shape. It can bear a lot of weight. I compensate for that in my design by beefing it up.
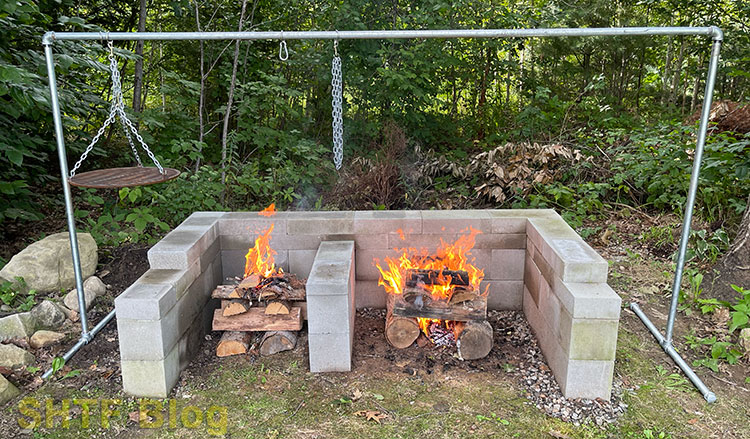
Rather than 3 steel rods to form a tripod, I built a rack out of 1 1/4″ galvanized steel piping. This is a system that allows me to hang multiple grates, Dutch ovens, or anything else from it via steel O-rings, hooks, carabiners, chains, etc. I can move them up/down or left/right. I have options!
The centerpiece of this system is the 10′ long pipe that stretches across the entire length of the fire pit. It is supported on each side by 5′ pipes that form the legs. Those legs are then supported by two 18″ pipes each, creating a 36″ foot at the bottom of each 5′ leg. I purchased everything at Home Depot.
There are different length pipes available and you can even get pipes threaded to a custom size. You can also save a bit of money by skipping galvanized piping, but where mine sits outside all year long, I spent the small amount more and opted for galvanized.
All of the materials and costs at time of purchase are listed below:
| Product | Cost | Quantity | Total Cost |
|---|---|---|---|
| 10′ Pipe | $40.21 | 1 | $40.21 |
| 5′ Pipe | $26.16 | 2 | $52.32 |
| 18″ Pipe | $20.31 | 4 | $81.24 |
| 1″ Pipe Cap | $4.32 | 4 | $17.28 |
| 1″ Pipe Elbow | $4.70 | 2 | $9.58 |
| 1″ Pipe Tee | $6.30 | 2 | $12.60 |
| 3/16″ Chain | $2.17 per foot | 15′ | $32.55 |
| S Hooks (2 pack) | $3.17 | 4 | $12.68 |
| Bolt Snap | $3.97 | 2 | $7.94 |
| 2″ O Ring (2 pack) | $3.37 | 2 | $6.74 |
| Total Cost | $273.14 |
3 – Assemble the Steel Pipes
I did not have to have any pipes threaded as I was able to work entirely with standard sizes. This made buying the pieces fast and easy. Assembling them requires a bit of thought, however. The “rack” gets cumbersome fast. If assemble out of order you’ll be taking it apart again. Fortunately it’s all just screwed together, so disassembly isn’t a big deal.
Follow these steps:
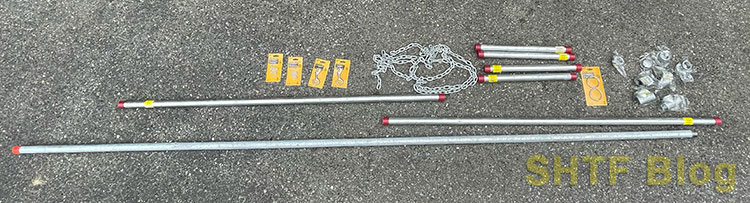
- Start by laying everything out on the ground.
- Slide all of your O-rings onto the 10′ pipe.
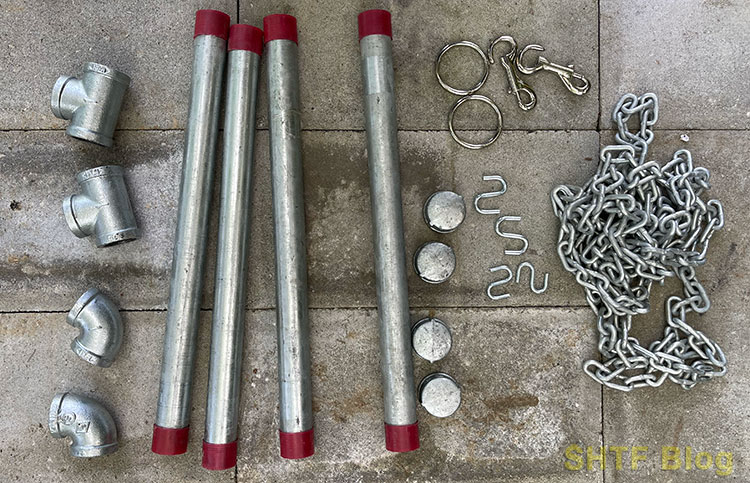
- Attach one 45-degree elbow to each end of the 10′ pipe.
- Attach one 5′ pipe to each end, screwed into the 45-degree elbow.
- Attach on pipe T into each end of the leg to build out the footing.
- Attach one 18″ pipe into each other end of the T pipe on each leg.
- Screw the four end caps on all open ends of the structure’s feet.
- Stand into place over your fire pit.
4 – Measure and Cut the Chains
You’re now ready for attachment points. Hook any latches, carabiners, or S hooks over the O-rings you have in place on the top bar. Now take your long length of chain and determine your first cut.
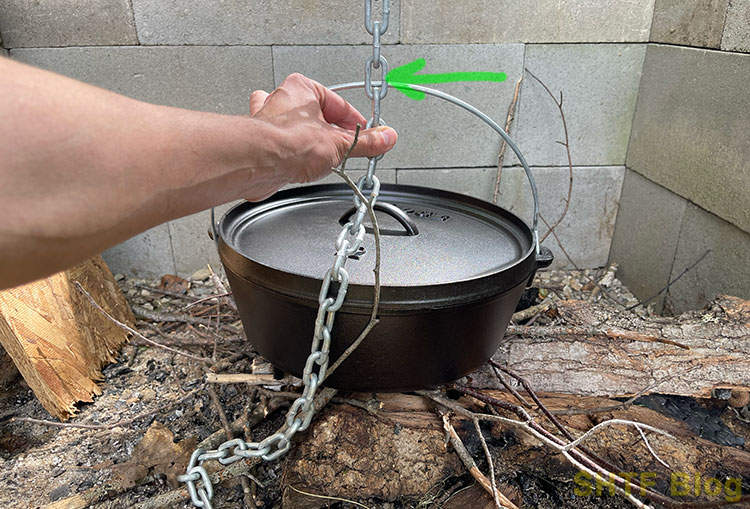
In my case, this was for hanging a Dutch over. No tape measure needed! I set a few logs/stick into the pit to figure out the maximum length I would want the Dutch oven to reach. I held the handle up and set it against the length of chain. That link is the one I needed to cut.
I cut my galvanized chain with a bolt cutter. If you don’t have a bolt cutter a cheaper (but more time consuming) method is a hacksaw. Alternatively, you can figure out your lengths in advance and have hardware store staff cut them for you in advance as chain is sold by the length (usually) and cut to length in the store.
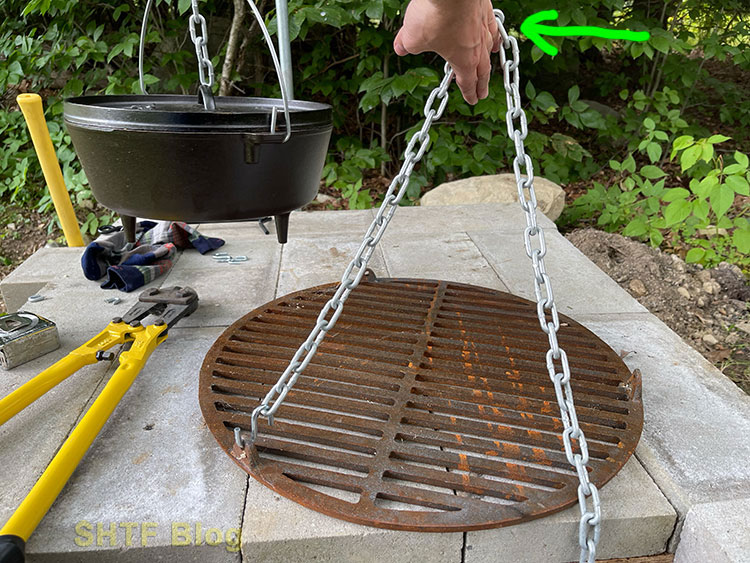
Next up was cutting 3 smaller lengths of chain to accommodate my steel grilling grate. I needed 3 small lengths of chain to attach to each point of the grate and then come together at the top and connect to a longer length of chain that would hold the entire grate and be used to move it up/down.
In this case I just hooked an S hook into the grate and attached it to the chain. I then pulled the chain taught at a roughly 45-degree angle to where it hovered over the center point of the grate. I marked that link as the one I needed to cut. I think cut 2 more lengths to the same size and these were my 3 chains that support the cooking grate.
I think repeated the process I did with the Dutch oven with the grilling grate to determine how long I needed to cut the chain that would hand down to support the 3 chains of the grate. Easy.
At this point in the process I thought I was pretty much done. It wasn’t until I started using everything for cooking that I realized another step was needed…
5 – Crimp the S Hooks
The problem was when I started moving the grilling grate and Dutch oven around connections felt a little… uncertain. I wanted to maintain the versatility and be able to connect/disconnect everything as needed but I also wanted to know that everything was secure. I decided to crimp some of the S hooks to make certain chains would be less apt to accidentally disconnect.
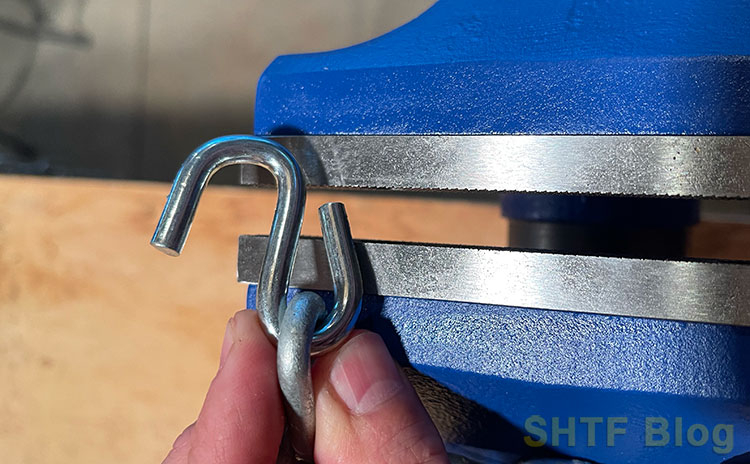
I crimped all S hooks that I knew wouldn’t be moved from the chain. In other words, if I didn’t need to hook/dehook anything from it, I crimped it. This mean crimping the S hooks attached to the 3 chains on the grilling grate (I also could have crimped them to the grate if I really wanted to). I also crimped one end of each S hook attached to the 2 chains descending from the top bar. When done I could unhook the grate or the Dutch oven from the S hook but not the S hook from the chain.
Enjoy Open Fire Cooking
You’re now ready to cook!
I can’t underestimate how important the concrete block fire pit design was to this outdoor cooking fire pit. The truth is I designed the two to function together. The cook station feature was not an afterthought. Both the fire pit and the cook station are modular. I can adapt them to fit my needs of the day. I can easily expand or contract the entire thing with a few more (or fewer) pieces.
You can use this setup to make two fires, one fire with a concrete block cooking table, etc. You can hang multiple Dutch ovens off it, brew coffee, grill steaks, etc. You can even decide to forgo the cooking setup entire and delve into the world of dirty cooking!
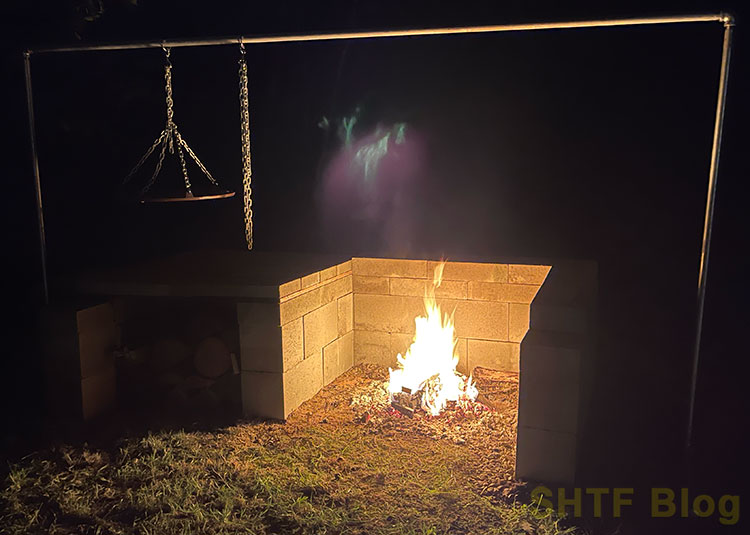
This design functions equally well as a simple fire pit in the event you want nothing more than to watch flames dance and wood burn to ash.
If you’re using this fire pit to cook meals, I would suggest burning only organic materials. No painted wood, no pressure treated wood, and no garbage. This is your cooking fire pit, not a trash incinerator. You’re cooking food here. Keep the space clean. You’ll be glad you did.
Others’ Concrete Block Outdoor Cooking Designs
Conduct a quick scan of the internet for “concrete block outdoor cooking firepit” (or something similar) and you’ll find designs others have made. Doing that is what inspired my own design. Combine elements of my design with others’ if that works best for you.

Further Reading
Building an outdoor cook station is really just the beginning of outdoor cooking. There’s a big learning curve that comes with cooking over a fire. It’s not as easy as setting a temp and timer on an oven or gas grill. It’s a skill that has largely been forgotten, but once you begin to make progress you’re realize how fun it is and how it adds a whole other layer to barbecuing and cooking in general.
For the prepper, outdoor cooking also adds a level of self-reliance and personal preparedness. You are no longer dependent on electricity or gas to cook a meal. All you need is dry wood and a fire.
To help you get started I would recommend these three books: Food by Fire, Cooking with Fire, and Dutch Oven Cookbook.
- Hardcover Book
- Wolf, Derek (Author)
- English (Publication Language)
- 208 Pages - 05/25/2021 (Publication Date) - Harvard Common Press (Publisher)

- Marcoux, Paula (Author)
- English (Publication Language)
- 320 Pages - 05/06/2014 (Publication Date) - Storey Publishing, LLC (Publisher)
No products found.
Thoughts? Comments? Suggestions? Let us know what you’ve done for outdoor cooking in the comments section.
1 comment
Very nice.. Thanks