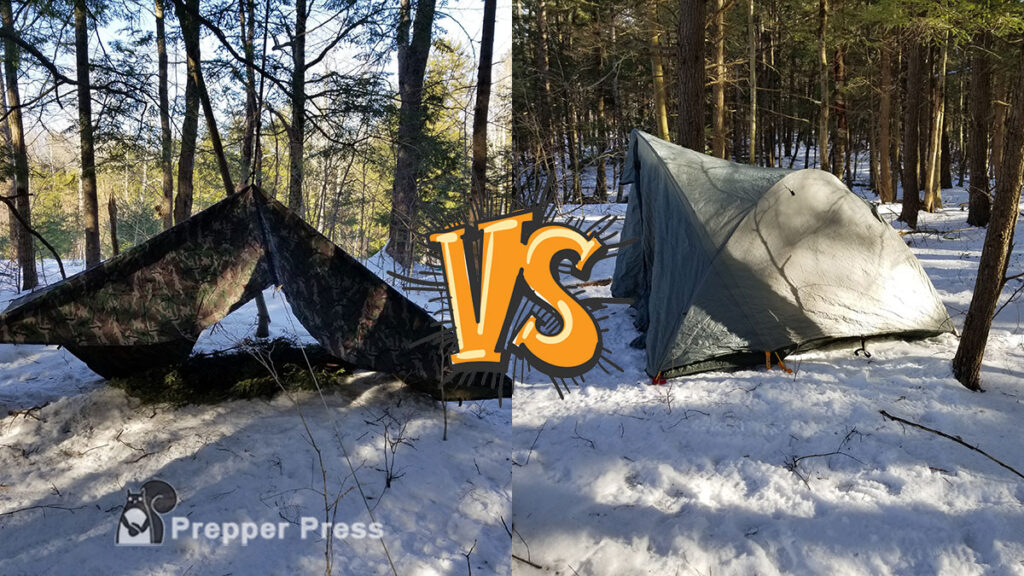
I’ve written articles comparing all kinds of bug out bag gear, even the bag itself. Now let’s talk about bug out bag shelter. For most people, this means a tarp vs tent comparison. I tested both in a storm. May the results inform your decision.
While this debate might not make be on the scale of an AK-47 vs AR-15 argument, there are preppers who believe solely in carrying a tarp in your pack and those who argue for the tent. Both arguments have merit, so let’s take a look at each.
I mention a variety of products in this article. For convenience, they’re listed here:
| Product | Retailer(s) |
|---|---|
| Aqua Quest Camo Defender Tarp | Amazon |
| Multi-Purpose Blue Poly Tarp | Amazon |
| L.L. Bean 3-Person 3-Season Tent | Discontinued |
| EMS Refugio Equivalent Tent | Eastern Mountain Sports |
| Big Agnes Blacktail Equivalent Tent | Sportsman’s Warehouse |
| Suunto Compass | Amazon and Optics Planet |
| Paracord | Amazon and Optics Planet |
| U.S. Army’s Guide to Rope, Knot Tying, and Rigging | Amazon |

- 100% WATERPROOF: 20,000 mm rating and heat-taped seams keep you dry in sustained heavy rain and shifting winds.
- HEAVY-DUTY BUILD: 70D nylon with an extra-thick dual coating, reinforced webbing, bar-tacked tie-outs, and precision stitching—trusted by guides and rescue teams for decades.
- STORM-SECURE SETUPS: Dense tie-out grid and braced corners pitch fast and low for stable shelter when the wind shifts.
- 10×10 WOODLAND CAMO SPECS: Finished size 9'7" × 9'7", 92 ft² coverage. 19 tie‑outs. Weighs 3.3 lbs. Packs compact. Includes: tarp + stuff sack.
The Matchup
The contestants for this tarp vs tent match up are an Aqua Quest heavy-duty “Defender” 13×10 woodland camo survival tarp versus a discontinued 3-person L.L. Bean freestanding 3-season tent. Let’s start of with the…
Defender Survival Tarp
The bug out novice might think a tarp is a tarp is a tarp, but that is most certainly not the case. You have standard tarps of differing sizes and quality – and the you have survival tarps. What makes a tarp a “survival” tarp? Construction. Let’s take a quick comparison of the 13’x10′ Aqua Quest Defender and your standard 12’x16′ all-purpose blue tarp.
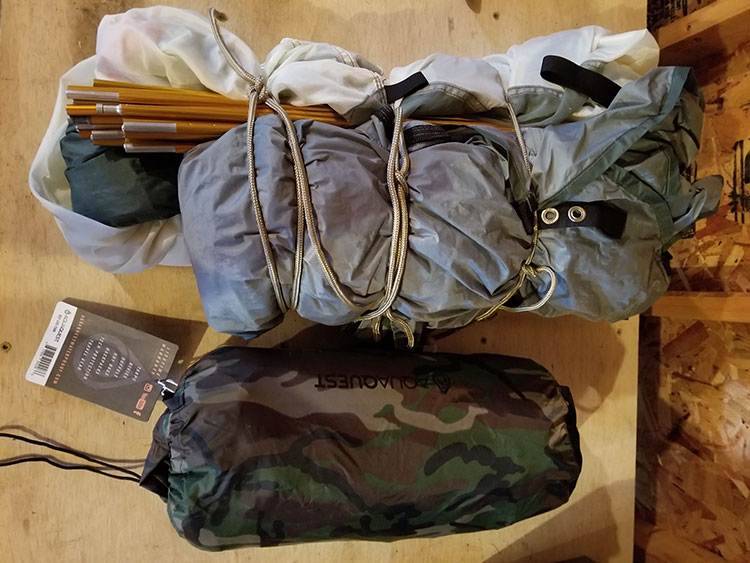
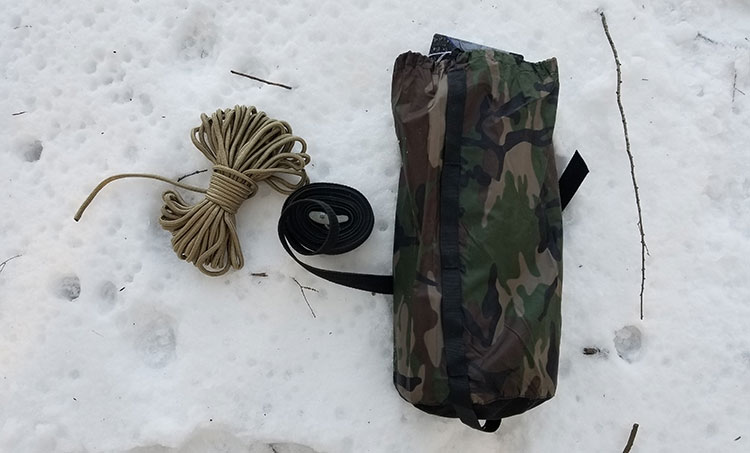
Sizing. The picture below is your first indicator of quality difference. The Defender is at the top, tightly rolled in a carry bag whereas the blue tarp will not roll nearly as tight, leaving it big and bulky.
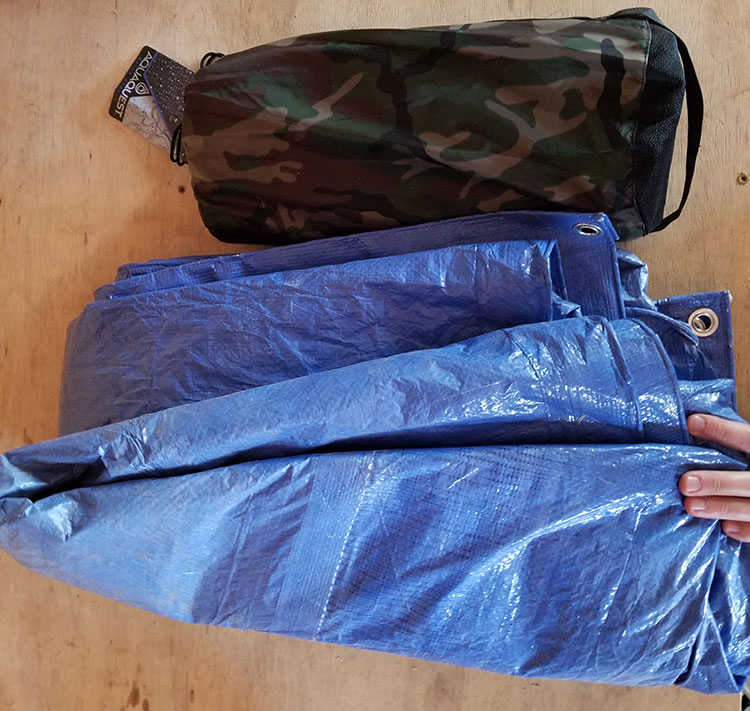
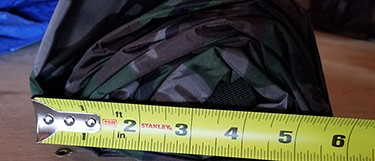
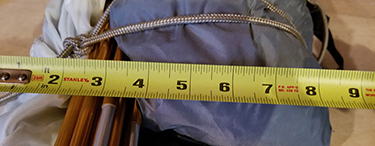
Yes, the square footage of each is a bit different, but the survival tarp is still more compact. The material is better quality. Rolled up it measures roughly 15″ x 6″.

| Survival Tarp Measurement | Outcome |
|---|---|
| Packed length | Approximately 15″ |
| Packed diameter | Approximately 6″ |
| Weight | 4lbs |
Corners. The survival tarp has reinforced corners with pockets and web loops. These allow for stronger and more diverse attachment points. The all-purpose tarp has your standard grommet that is renowned for ripping apart under stress.
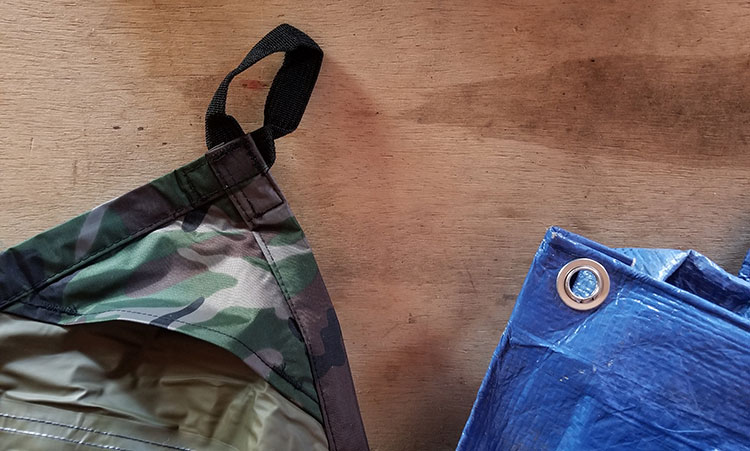
Material. The above picture also illustrates the material difference. The all-purpose tarp is made of high-density polyethylene. The survival tarp is 100% waterproof, has 70D nylon, heavy TPU coating, reinforced stitching, and heat-taped seams.
Attachment points. The survival tarp is covered with reinforced web loops. These make a dramatic difference when trying to erect your shelter in various configurations, critical for use in the different locations one would encounter in a bug out scenario. They are located on the back side of the tarp and all along the perimeter.
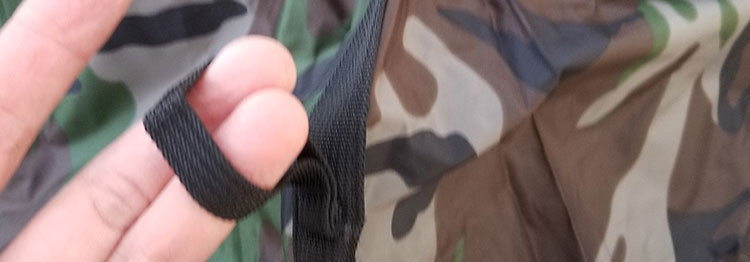
These loops can be used for overhead hanging, pole inserts, etc. With the all-purpose tarp you are left with a limited number of grommets around the outside perimeter.
Noise. You won’t see this in the pictures, but the survival tarp is noticeably quieter compared to your average all-purpose tarp. Unfolding it, setting it up, all of it. Its material is smoother, softer, and quieter. The practical implications of this are limited, however. If you need to maintain noise discipline in a bug out situation to this level, you are probably not going to set up a tarp anyway, but it’s worth noting.
Tarp Advantages for Bugging Out
Advocates for the tarp will point to its advantages: they’re cheap, waterproof, can be pitched anywhere, and they versatile.
Cheap. Like anything, tarps vary in quality, and with that difference in quality comes a difference in price. You can buy a tarp for as little as $10 or as much as $100. The point here is that building a bug out bag is expensive enough as it is. Tarps are readily available and affordable.
Waterproof. This is why we buy tarps in the first place, no? To shed water. I cover the top of my woodpile with one, my camper – heck, I sometimes even pitch them over my tent!
Pitched anywhere. Tarps are just big sheets of material that you can pitch as shelters in a various ways. You can drape it over some cordage running between two trees. You can take a trekking pole and stake it from that. You can attach it off your car, bike, or kayak. You are limited only by your surroundings and imagination.
Versatility. Need a wind break? A hammock? Flotation device? Need to cover your gear? Seal off areas to trap heat? Collect rainfall for drinking water? Need to carry or drag large items? Need to make a stretcher? All of these tasks are easily performed with a tarp.
L.L. Bean 3-Person 3-Season Freestanding Tent
The tent I’m using is an older 3-person tent from L.L. Bean. I’ve owned it for a long time and it has served me (and the kids) well. It was purchased in the 90s as a backpacking tent, back when people had not yet caught on to the idea of ultralight hiking and gear. While it was used for backpacking, at around 7lbs it is on the heavier end. I never liked carrying it in my pack, but it is roomy and rugged.
This particular tent has long since been discontinued, but an equivalent tent would be the EMS Refugio or the Big Agnes Blacktail.
Sizing. While listed as a 3-person tent, like all tents, that is misleading. It is more like a 2-person tent with a bit of space for some gear at your feet and/or stowed in the vestibule.

| Tent Measurement | Outcome |
|---|---|
| Packed length | Approximately 21″ |
| Packed diameter | Approximately 8″ |
| Weight | Approximately 7lbs |
Attachment points. Being a freestanding tent, there are few attachment points needed. The collapsing poles of the tent bend and bow to form its shape. The only places it could be attached externally would be with tent stakes to the ground.
Tent Advantages for Bugging Out
Advocates for the tent will point to its advantages: they come in many varieties, they’re easy to set up, they’re bug proof, and they have a floor.
Many varieties. Need a tent for 2, 3, or 8 people? You can buy one. Need something light for summer nights? No problem. Need something for above tree line on the side of a mountain in winter? They make tents for that too. From Coleman to Marmot and all the manufacturers in-between, there are endless varieties of tents.
Easy to set up. Going beyond the tarp’s ability to be pitched anywhere, tents are that and easy to set up. Freestanding tents in particular are easy. All you need is a level space, and in a pinch, you don’t even need that.
Bug proof. Some people seem naturally resistant to blackflies, mosquitoes, and other biting insects. I envy these people. Bugs flock to me. It’s absurd. I plan camping trips around bug season. I love the screens in a tent.
Floor. Tents have a floor built into them. It’s a barrier against the ground, against bugs, and it creates an enclosed, homey feeling.
The Storm Torture Test
I set both the tarp and the tent up on the morning of Christmas Eve 2020. Why? Because weather was projected to be foul, windy, and rainy. Power outages were expected.
I checked the detailed weather forecast in advance so I would have an idea where to orient the shelters. Winds would be coming in from the south southeast with wind speeds at 20-25mph and gusts between 40-45mph. These winds would be paired with rain – heavy rain – and that’s exactly what we got.
I was nestled all snug in my bed, when out on the lawn arose such a clatter. I sprang from my bed to see what was the matter. Away to the window I flew like a flash, tore open the shutters and threw up the sash. Wind was howling, and the rain was pelting. Visions of ripped up tarps and tents danced through my head. Santa must have had quite the challenge up on the roof!
Important to note. I approached this test imagining I was bugging out. That is the point of this tarp vs tent test. But what does that mean? It means I saw the entire process and test from the lens of having traveled by foot for a full day and now, potentially in a semi-dangerous situation, needing to settle down for the night – discreetly – to stay protected from a storm.
Setting Up the Tarp and Tent
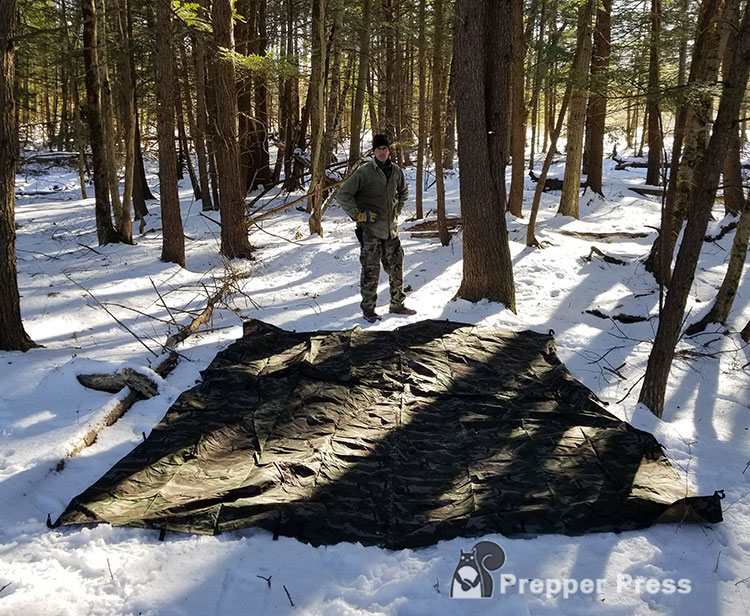
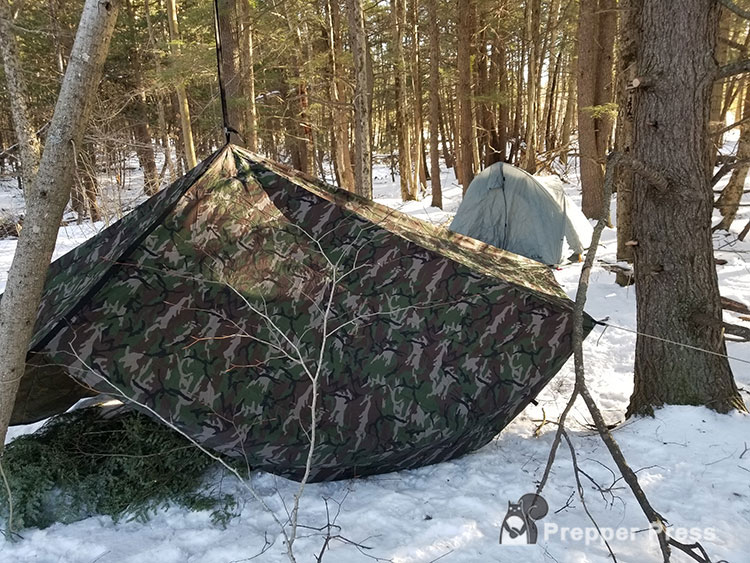
The ground was covered in snow. This complicated placement of the shelters for a few reasons. First, it was hard to tell what was level ground. But given my familiarity with the area, I knew – roughly – what space was level and what was not.
The second reason was staking the tent or tarp to the ground would be difficult if not impossible. No tent stake would stay solid in the snow and under that snow was frozen ground. For the tarp, I would have to rely on securing it to ground-level tie-off points, branches and trees. For the tent, I would have rely solely on its freestanding feature.
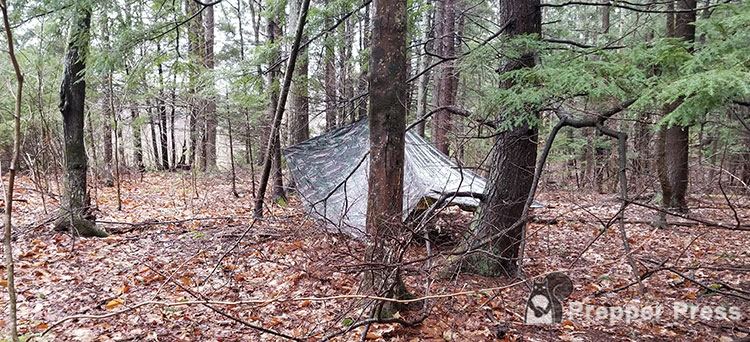
Pitching the Tarp
Finding a suitable spot for the tarp took much longer than finding a spot for the tent. If I was in a true bug out situation, with darkness closing in, I would have to allow additional time to find a suitable location or be carrying enough bug out gear to create my own anchor points, like different poles and stakes. Given my preference toward keeping a lightweight bug out bag, it’s not something I would consider.
I ended up pitching the tarp under a branch and close enough to different anchor points. All I used for setup was some paracord and a strap from my truck. If you’re counting ounces and inches, the cordage was not factored into the tarp’s specifications. A bit of paracord is something I would carry regardless of tarp vs tent shelter choice, so that weight seemed inconsequential.
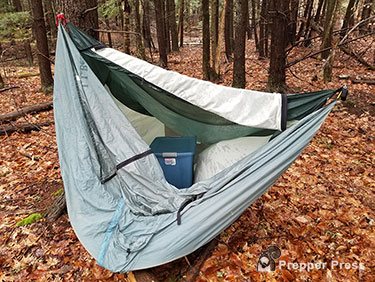
I laid the tarp out fully to choose the attachment loops I would use for different anchor points, starting with the near-middle loop that I would use to hang the tarp from an overhanging tree branch.
If you choose to use a tarp for your bug out shelter, make sure you have a basic understanding of ropes and knot tying. The U.S. Army’s Guide to Rope, Knot Tying, and Rigging is as good a guide as you will find.
Steps to pitching the tarp:
- I spread the tarp out,
- I hung it from an overhanging branch with the truck strap and attachment loop,
- I tied off different corners to the nearest trees or logs,
- I cut evergreen branches from nearby trees to lay them out on the ground as insulated bedding.
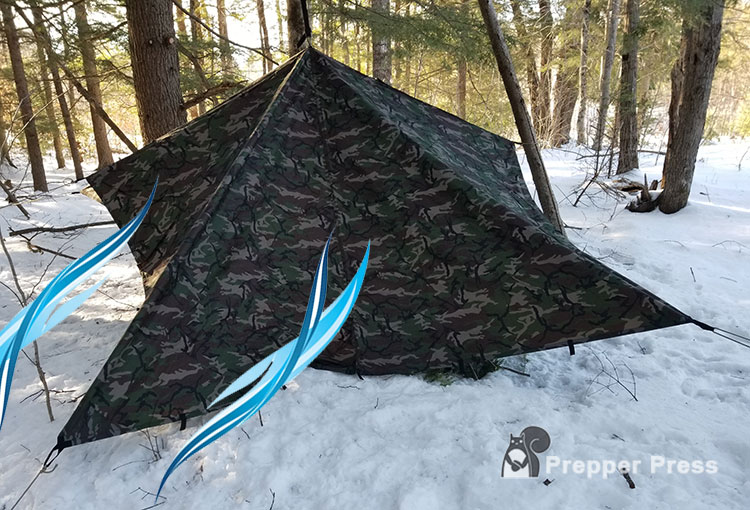
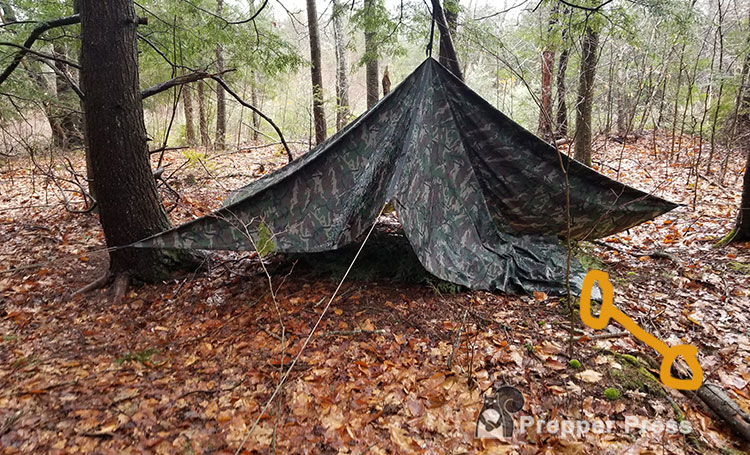
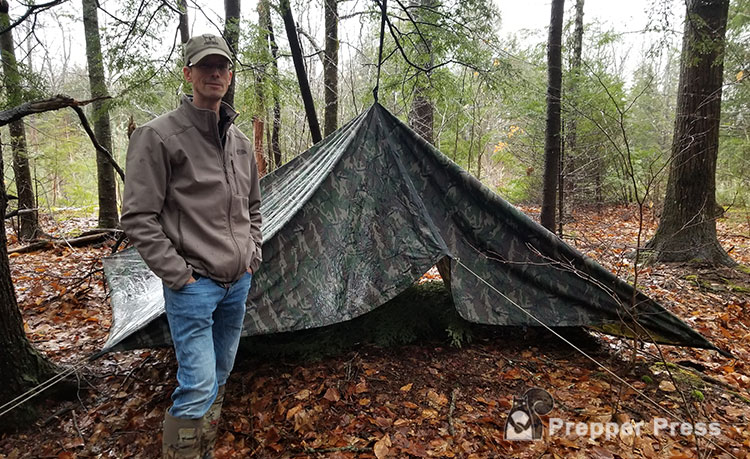
You can see in the above picture where I illustrated projected wind direction. I did two things to help secure the tarp for the wind: 1) I pulled the corner of the tarp facing the wind closer to the ground to limit air coming up and under the tarp, potentially blowing it apart, and 2) I secured that same corner to a small log lying on the ground. I did this so that the anchor point would have give. In other words, if the winds were exceptionally strong, the log would get dragged (providing give) rather than holding strong and potentially tearing the tarp apart at some anchor point and sending the tarp flying off into the forest.
With the tarp secured at the top, sides, and a pine bough bed underneath, I considered it finished.
Pitching the Tent
Pitching the tent was significantly easier and faster. It was so easy I had my son do it while I was pitching the tarp, and he finished much sooner than I did. The process was as easy as extending the tent poles, putting them through color-coded loops, and then securing the rain fly over that. Bam – done!
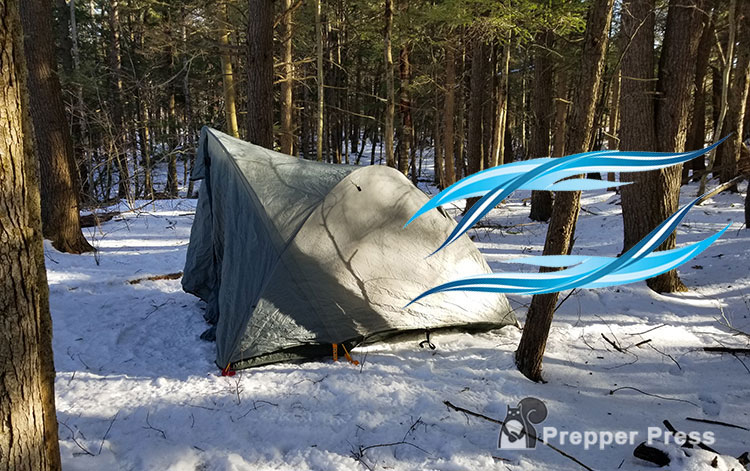
Again, you can see in the above picture where I illustrated the anticipated wind direction. The tent lacks the ability to adjust the height, which I was able to do with the tarp by moving the hanging strap up and down. Given the anticipated wind speed, I expected that a tent lower to the ground would fair better, but I did what I could and positioned the lower end facing the wind to make it as aerodynamic as possible. Had there been significant snow, I could have built a small wall around the back side of it further protecting it. That could have been done for both tarp and tent.
In the above “tarp vs tent” picture you can see both together. If this competition was based on setup alone, the tent would win hands down, but the real test would come overnight. With everything situated it was time to go home.
Wait – what? you might be wondering. You’re not going to sleep in them?
No. Remember I said it was Christmas Eve? There were presents to wrap and a big morning the next day. And, while I’m sure I could survive the storm outside with either shelter, I knew it would be a lousy night’s sleep. I’ve done these types of adventures before, and while I’m sure I’ll do them again, this was not the night for that.
Post-Storm Tarp vs Tent Results
The wind and rain was wild that night. I was certain both the tarp and the tent were blown across the woods hung up in trees (at best) or ripped to shreds (at worst). The storm woke me up (from inside my warm bed) several times. While we didn’t lose power, many people did. Trees swayed and rain drops were heavy. The ground was absolutely water logged. Soppy. Drenched. If the temperatures had been colder, it would have been a full-on Nor’easter.
How the Survival Tarp Performed
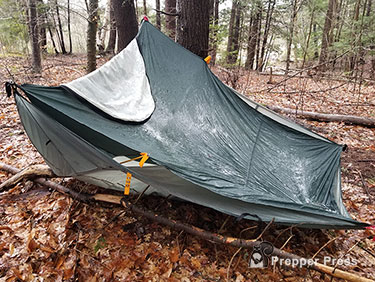
Does this picture look like it was taken in a different season? It was taken the next afternoon. Rain and warm temperatures decimated the snowpack. But to my amazement – the tarp stood!
You can see in the above picture the small log where I had attached the corner of the tarp facing the wind. As I said, this was to allow a bit of give in case the winds became too strong. With strong winds and no snow to provide additional resistance, the log was dragged toward the tarp. Post-storm this was easily rectified by dragging the log back out, extending the tarp canopy that was present before. The tarp took a big beating regardless – and survived.
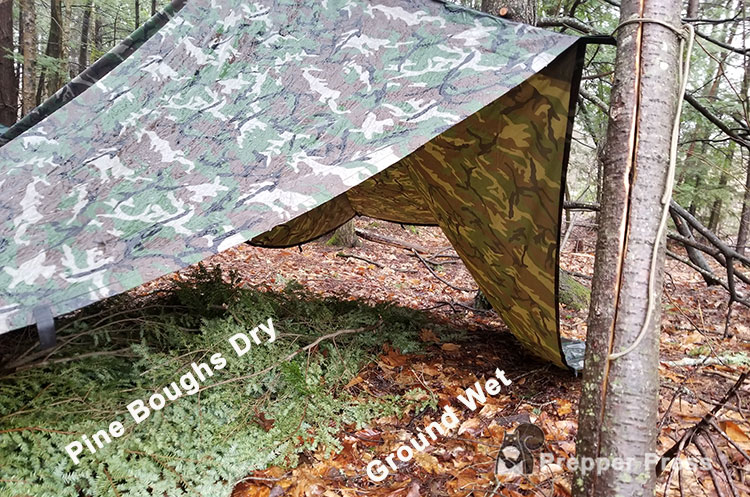
When bushcrafters tell you to make a bed of pine boughs to sleep on take them at their word. The difference was like night and day. The pine boughs were completely dry. The ground all around it, even under the tarp, was soaked. In a survival situation, where you could be end up soaking wet in cold temps, this could make the difference between life and death.
How the Tent Performed
My poor 3-person tent that had served me so well for many years…
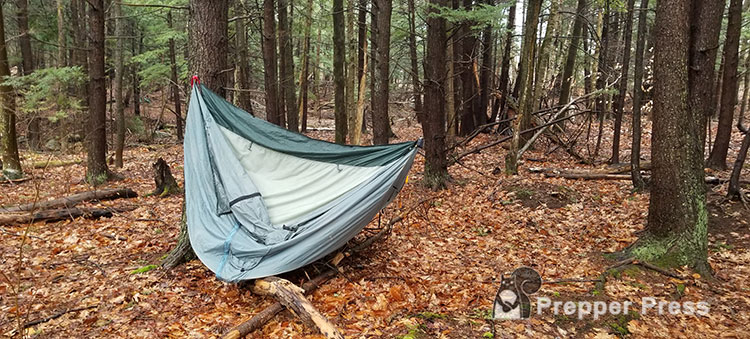
It’s obvious here that the tent encountered problems. I was not terribly surprised by this frankly. While the pictured look disastrous, there are some factors worth considering here:
- There was not significant weight inside the tent. You can see in the picture below that I placed a plastic tub inside the tent. It contained a small hand saw, a roll of twine, and extra cordage. It didn’t weigh much, and clearly wasn’t enough to hold the tent down. Had I been inside the tent with a full bag of bug out gear, the tent would not have flipped over.
- Considering the conditions, the tent actually performed fairly well. It was not shredded apart and poles were not bent/destroyed. It would not have surprised me if the tent had become permanently ruined (part of the reason I used an old tent for this tarp vs tent test).
That said, the tent was soaked.
Sleeping inside the tent would have led to wet gear, regardless of the tent walls. There was just too much rain. The only way I would have stayed dry would have been to replicate the pine bough bed inside the tent. This would have made sleeping more comfortable and dry, but it would have also run the risk of having pine boughs puncture the tent floor, ruining the “floor” advantage the tent had over the tarp.
And the Winner is…
The survival tarp. I was thoroughly impressed by its performance. Setup was a bit of a pain, nowhere near as convenient, quick, or quiet as the tent, but there was no doubting its performance.
The tent, however, did not get a fair shake. I should have weight it down with more gear inside, particularly considering I could not use tent stakes to secure the base given the snowpack. What surprised me was the tarp’s performance, not the tent’s.
Does this settle the tarp vs tent debate among ultralight hikers and preppers planning a bug out shelter? No, I don’t think so, but it does add significant evidence in favor of the survival tarp. It may have its disadvantages (everything does), but it held strong under adverse conditions. And, if you need to be stealthy, the camouflage pattern doesn’t hurt.
What are your thoughts on the tarp vs tent debate? What do you pack in your bug out bag and why? Let me know in the comments section, and if you have any questions, post those there as well. I’ll do my best to answer them.
5 comments
Using a fabric tent and tarp, I must say a tent is better. I can’t sleep under plastic crackling noise, it is like popping popcorn in the mildest of breezes.
I agree, which is another argument for the quieter “survival” tarp I mentioned – if someone were to choose a tarp.
IMHO a tent is much better than a tarp because it gives you much better protection from wind and rain and cold, and a little bit more protection from insects, rodents and other small animals. Obviously, the sides of a tent won’t stop a hungry bear (neither will a tarp) but it may give you a little more reaction time to defend yourself. If weight isn’t an issue, then I carry both because a tarp over a tent gives you even more protection from the elements and a couple extra feet of tarp length gives you a little extra semi-protected space for gear and/or dry fire wood!
A very subjective test of the two. How long were the tent pegs? what sort of soil were they in? I much prefer a tent but I use tarps on the motorcycle, the bike being a ‘tent frame’ Also bugging out I only have a single tarp because comfort is not a high priority and mass and weight is in a BOB. Good review all the same, food for thought
Thanks, Tom. Tent pegs were standard size you’d find with a backpacking tent, small and lightweight. They would not have made much of a difference anyway as they would have been stuck in snow.