Having bug out bag cookware is an essential part of planning a bug out. As Napoleon once said, an army marches on its stomach. The same idea applies here – to be effective and sustained, you must be well-fed. “Well-fed” nearly always requires cooking, and cooking requires cookware.
I’ll get to my recommendations on the best bug out bag cookware available to preppers, but before I do, let’s examine the factors that go into the decision. First, let’s establish why…
You Must Be Prepared to Cook
Building a bug out bag is a bit of a balancing act, primarily in the cost, size, and weight of your gear. Every item has inherent advantages and disadvantages, and in some cases, it may make sense to leave a piece of gear home entirely. In fact, I often see so-called “experts” suggesting a person pack everything under the sun, from books to entertainment.
That’s bad advice!
You’re packing a bug out bag to leave a SHTF situation, not a suitcase for a vacation. You must make the hard decision of what not to take.
Gear that you cannot forgo, however, is cookware. We know we need to eat, and we know we need to eat more when undergoing physical exertion (like bugging out by foot). These are self-evident, but if your plan is to just eat pre-packaged foods that don’t require cooking, that is a mistake.
Reasons you must incorporate cookware in your bug out plans:
- Living on granola, energy bars, and other packaged “room temp” foods for 3 days, while not impossible, will not lift your spirits or morale in a stressful situation – it’ll add to it!
- You want the means to heat food and water. This is important not just for comfort, but for survival. You could be bugging out in a snowstorm, become wet or cold. The ability to consume warm food and drink is critical.
- Water – mainly potable water. I will cover purifying water for bugging out in a future post, but one method of making water potable is to boil it. You can’t boil water unless you have something to boil water in.
These are the reasons you must be prepared to cook in a bug out situation and why you need to carry cooking equipment to do it. What that equipment looks like, however, there we have a lot of flexibility, and what I carry for “cookware” might surprise you. Hint: It’s as simple as simple can get.
Cooking Equipment Generally
You have near infinite possibilities to choose from. Make a product search for “bug out bag cookware” and you’re going to get a lot of “complete” bug out bags in search results, products that are simply not worth the money. Those all-in-one bags are made for people who want the fast, convenient way out. That’s not you.
Make a search for “camping cookware” and that won’t yield what you’re looking for either. You’re not planning a camping trip, you’re planning to bug out!
What you want to look for are cooksets made for backpackers, hardware designed to fit in a bag and be carried – just like a BOB. Still, there are almost infinite options here. I’ll help narrow those choices down, because today’s products have come a long way.
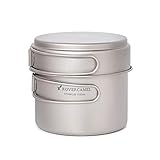
On that subject of coming a long way, this is the set I used religiously for many years (not what I carry in my BOB).

It’s all stainless steel, and I added the stainless cup (center) at a later date. It’s rugged, has stood the test of time, and… heavy! I bought this well before today’s high-tech products ever hit the market.
If, after reading this article, you think this stainless steel setup is the best for you (it might be), you can buy an improved but similar version of it. Today it goes by the “MSR Alpine 2 pot set” and it’s available at Optics Planet, EMS, Moosejaw, and Amazon.
Cost, Size, and Weight
I break the analysis of all bug out bag gear down into three categories: cost, size, and weight. These are the three determining factors preppers must use to decide which pieces of gear to buy and pack. Everyone has their own budget, circumstances, and physical abilities to carry weight. There is no right answer for everyone, only the right answer for you!
Cost
If you are building a bug out bag from scratch, cost plays a more significant factor than if you’re adding or upgrading pieces here and there. A decent set of backpacking-type cookware isn’t going to break the bank for most people, but add it up with all of the other necessary bug out gear and you’re approaching serious money.
Size
Thanks to advances in technology and the popularity of backpacking, you can get cookware sets far more compact than the stainless steel set I worked with for years. Granted, I used the space inside the pots to pack additional gear, but still, space is at a premium in bug out bags. Noise discipline is also important. Cookware is prone to being both bulky and noisy.
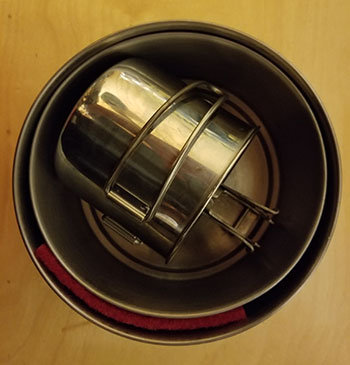
You can implement some creative packing to offset both of these drawbacks. See the picture on the right, it’s my pot set packed up and ready for the lids to cover it.
Note that I slid the pot scrubby between the two pots to help reduce the clanging while moving. On a hike I place something like an extra pair of socks, military shemagh, or some other fabric product inside the steel cup and inner pot to both save space and further reduce noise.
Weight
Anybody that has read my bug out bag articles before knows that I take the weight of the gear very seriously. Why? Because I’ve lived out of a backpack for 3 days before (our BOB goal) while on the move, so I know how important bag weight is when you need to get from point A to point B.
What makes up the weight of your cookware depends on two things: 1) the material it’s made out of, and 2) exactly how much cookware you’re carrying.
Quality of material. Stainless steel is the classic material, and it’s where I started (and at times continue) when I am on a multi-day backpacking trip. Steel is strong, nearly impossible to break and no temperature is too high. It is also versatile. You can use it across different stoves and firepit setups.
Anodized aluminum is perhaps more common these days. It heats quickly and evenly, and the anodization process results in a stronger material that doesn’t negatively interact with the food you’re cooking.
Titanium is the higher-end choice. It is very strong, very lightweight, and much more expensive than the other materials. If you have the budget for it, titanium may be the best choice for you.
Quantity of material. How much you carry determines weight as much as what you carry. It is exceptionally easy to just toss everything into a backpack, cinch it up, and call it done. But put that pack on and walk with it for 3 days. You will soon understand why Appalachian Trail hikers go ultralight, and why you might want to build a lightweight bag.
Look at the difference when I trimmed the weight of the cookset I have. On the left is the entire stainless cookset on a scale, on the right I have just the one larger pot, one lid (doubles as frying pan), pot grip, and utensils.


The point here is to slim your gear to the absolute minimum while still ensuring you have redundancy in systems should one method fail.
Utensils
Cookware isn’t just pots and pans. How are you going to stir your food or spoon it into your mouth? A tactical shovel? I don’t think so.
Cooking utensils are cheap, so if you are on a budget, you just need to grab an extra fork and spoon from your silverware drawer and pack it away. Will they be the lightest option? Almost certainly not.
I know some people simply pick up a few plastic spoons and forks when they go to a restaurant. While lightweight and free (love that combo), they are sorely lacking in quality. I’ve used these before in similar situations. It is not long before the fork and spoon become distorted and unusable when immersed in boiling water, never mind the chemicals that will leach out from the plastic into your food. They’re simply not designed for the cooking tasks associated with a bug out.
There are more suitable options. We’ll get there, but next is making sure you…
Match Cookware to Stove
Beyond cost, size, and weight, you need to pair what you will cook your food in with what you will cook your food on. In other words, some stoves might call for different types of cookware. In most cases you won’t run into a mismatch, but it is still something to be mindful of.
For years, this was the setup I used on multi-day hikes:
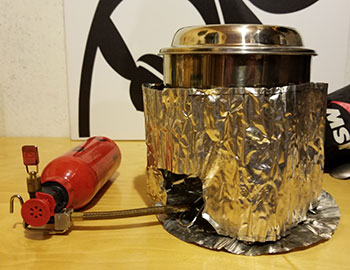
One the left is my old MSR Whisperlite stove (still going strong) and on the right is my stainless steel cookset sitting on top of the fully-assembled stove. The Whisperlite has been the standard among backpackers for a long time, but it has given up some market share to newer, more advanced units.
Best Bug Out Bag Cooking Equipment
I’m going to lay out what I think are some of the best cooking gear available on the market today. It will not include my stainless steel set. That said, what I pack in my bug out bag is also not listed in the following chart.
Best All-Purpose Options
My general, all-purpose suggestions include:
| Cooking Gear | Cost | Weight | Note | Purchase Link |
|---|---|---|---|---|
| MalloMe Mess Kit | $ | not listed | More accessories than I think are necessary, and quite small, but inexpensive. | Amazon |
| Lixada Titanium Cookware Set | $$ | not listed | I really like the large pot in this set with the hanging handle. That adds versatility. Includes a titanium spork. | Amazon |
| Trekology Titanium Cook Set | $$ | 7.4 oz | All-in-one system that includes a small stove (I’d have a backup stove). | Amazon |
Several of these, I should note, include a simple burner unit powered by either gas or solid fuels. Don’t let that be a deciding factor, however. Buy the cookware, not the burner. Burners included in these sets are, in my opinion, not of the quality you want to rely on in a survival situation.
Best Bugging Out Solo/Minimalist Choice
Lixada Titanium Ultralight Pot – This is a 1100ml hanging pot with lid. If you are traveling solo, and need to move fast (lightweight), this is the choice for you.
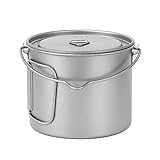
- Large 1100ml Capacity for Versatile Cooking: With a generous 1100ml capacity, this camping pot...
- Ultralight Titanium Construction: Weighing only 5.4oz (153g), this titanium pot is 40% lighter...
- Smart Foldable & Nesting Design: The foldable handles tuck away neatly, and the pot's compact...
What I like is its combination of simplicity and versatility. It’s just a single pot, but its tall design and hanging handle means you could use it over an open fire to cook or boil water.
The larger capacity makes it particularly useful for boiling water. The folding handles will fold in for packing and fold out for use as a big mug to drink your bug out coffee.
Best INCH Bag Choice
If you are making an INCH (I’m Never Coming Home) bag, your choice may differ a bit. You are planning for something more than a 3-day bugout, so quality matters more.
Lixada Titanium Cookware Set – This set includes a bigger version of the pot above and adds a frying pan.
- Cookset includes a 1100ml titanium pot, and a 350ml titanium pan.
- Made of titanium, lightweight and corrosion-resistant.
- Titanium material leaves no metallic smell or taste.
This is an instance where I would spend the extra money for titanium, but beyond just the Lixada, I would opt for a bit more gear in an INCH situation, as you will be out longer and have to rely on more.
Best Vehicle Kit Choice
Primus Campfire Cookset – I love this set. You’re going to pay a bit more for it, but you get a whole lot more. You get the durability of stainless steel without the cost of titanium. The set comes with plenty of hardware: 1.8L sauce pan, 3L sauce pan, and 21cm frying pan. Handles fold away, everything stacks neatly inside itself, and there are integrated colander lids. Perfect to store in a vehicle!

- Durable 18/8 stainless steel
- Set consists of: 2 pots with 2 lids
- Colanders and frying pan
The best thing about a vehicle kit is that you have to worry a lot less about size and weight. That freedom also allows you to get more for your money. Remember I said I wouldn’t recommend the stainless steel set I own? The vehicle factor creates an exception.
I should add here, on the topic of matching cookware to stove, that one of the best options for a vehicle kit cookstove is the Whisperlite International. For only $10 more than the standard version, you have one that will burn on white gas, kerosene, and – particularly important for vehicle kits – unleaded gasoline!
What I Keep in My Bug Out Bag
Those recommendations are not what I carry, however, as mine is not a traditional cookset. Some might see my choice for bug out bag cookware as… a bit unusual, perhaps.
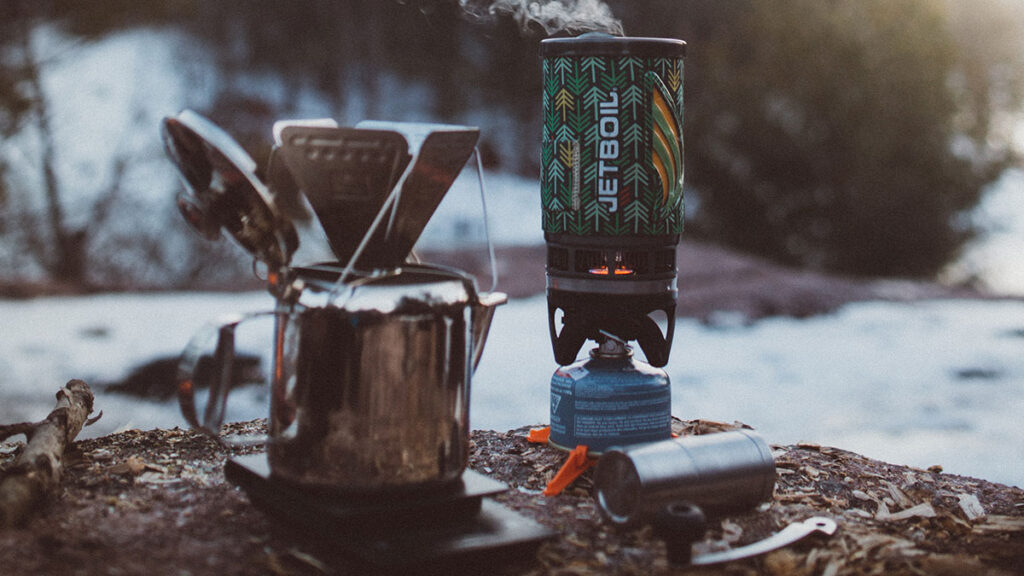
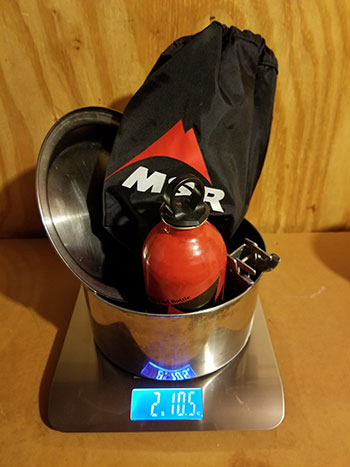
I use multi-purpose containers, and by that I mean, the “pot” that my actual stove is packed in, and the packaged food I’m carrying. In other words, I carry a Jetboil stove and dehydrated or freeze-dried food. My entire stove fits within the tall “pot” of the Jetboil – fuel can included!
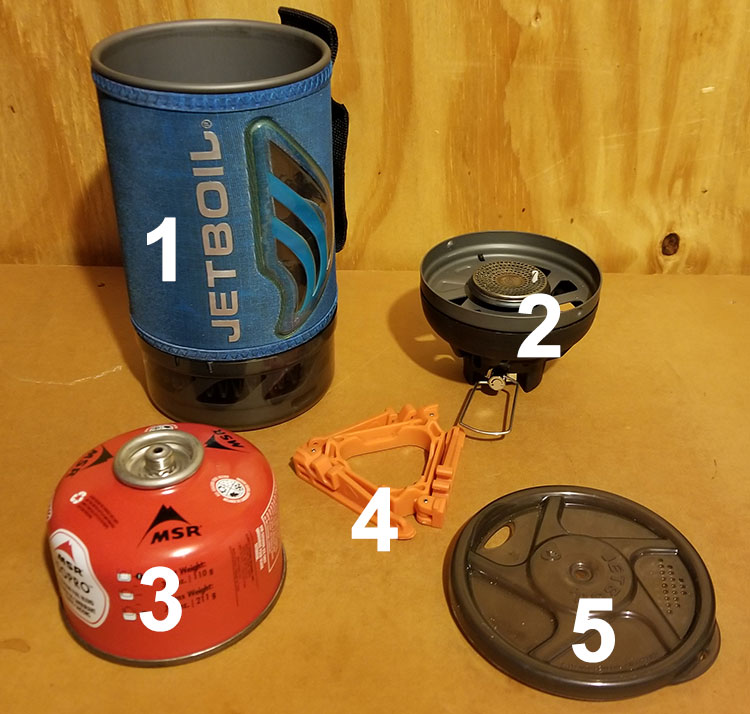
My “cookware” and stove are like one unit. The burner (2) gets turned upside down and placed in the pot (1) first. Then the folding fuel can base (4) goes in. The fuel can itself (3) then goes in upside down, and I cap the entire thing off (5).
BONUS: The stove has a push-button start, so the fact it can so easily start a solid, reliable flame makes it great redundancy for your bug out bag fire starters.
The “cookware” is extended – so to speak – by the packaged food I carry. I heat water, then dump it in the food package, stir it together, and wait the required time. Bam – hot meal!
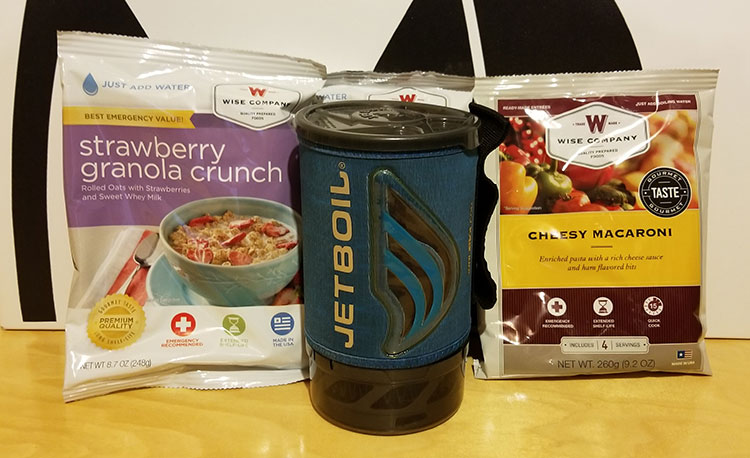
I pulled these foods from one of my ReadyWise buckets for illustrative purposes. I can boil water in a flash. The entire package is very lightweight, and there is no need to carry any dish soap or pot scrubby. Lean and mean!
Here I’ve illustrated the weight difference. On the left is my MSR Whisperlite sitting on the scale with a single stainless steel pot, lid, grip, utensils, and fuel cannister. On the right is my Jetboil with everything packed inside plus utensils.
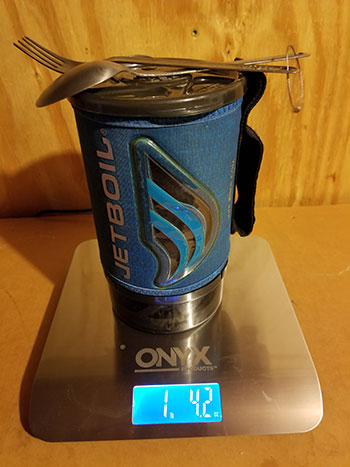
The weight difference is dramatic. My setup weighs less than half of the Whisperlite stainless pot combo.
Is my setup the best of all worlds? Not even close, but I pack to BUG OUT, not to have a good time living comfortably with three-course meals. I want to get to my bug out location. That is my sole objective, and I select gear based on achieving that goal as quickly and safely as possible.
If you want to replicate my system you can buy the Jetboil at the following locations. Prices are usually the same for all Jetboil products, but check them just to be sure. Some of the sites participate with the Rakuten plugin, so if you have that installed it might save you some money.
| Jetboil Product | Retailer |
|---|---|
| Jetboil Flash Cooking System | Optics Planet – Eastern Mountain Sports – Moosejaw – Amazon |
| Jetboil MiniMo Cooking System | Optics Planet – Eastern Mountain Sports – Amazon |
| Jetboil Sumo Cooking System (large) | Amazon |
My Utensils
I carry MSR titanium utensils to go with my stove. As I said in another post, I walked past these at Eastern Mountain Sports many times before dropping the money on them. A few decades later, they’re still going strong. They are virtually indestructible and weigh under one ounce!
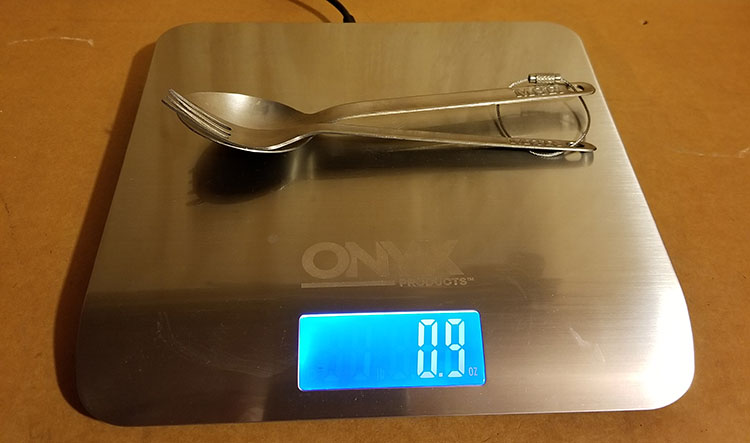
The most affordable backpacking utensils? Nope. The lightest and most durable? Probably.
The Problem with My Setup
I said at the beginning that every item comes with inherent advantages and disadvantages. My choice to forgo the conventional pot/pan set is no exception.
What happens if I need to fry up squirrel bits? It wouldn’t be easy with no frying pan.
What happens if the stove breaks and I need to boil water? Out of luck. I have no pot to hang over a fire. (Note that I still carry multiple methods for purifying water to drink.)
While my setup is not the answer for every scenario, I take its limitations into consideration. I know it comes risks, but the lean-and-mean approach also comes with advantages.
Will I be screwed if my stove dies? No, I also pack a few MREs with built-in heaters and if push came to shove, other gear I have could be used to boil water in a pinch.
Bug Out Bag Cookware Wrapped Up
You need the means to cook food – any food – when bugging out. The ability to heat water is paramount, not just for cooking, but for overall survival.
Building a bug out bag should be done carefully and deliberately. The bag you are building to – theoretically – rely on in a survival situation is not something you should buy pre-assembled off the shelf. Make it custom to you and your situation.
You may have an entirely different cookware choices than what I outlined in this article, and I’d love to hear what you think in the comments section.
3 comments
Great read, and a subject I constantly battle with. I usually carry a GSI Halulite Dualist cooking pot setup, but it does lack the frying pan capability. But it’s a Godsend for boiling water for freeze-dried foosd or purifying, cooking soups, and making coffee for me and hot chocolate for the little fella on camping trips. I’ve accentuated it with a stainless spoon and fork combo, and an old Korean War-issue GI mess kit. It’s a good setup for camping food, but for a serious bugout, a frying pan for fish and rodent frying can’t be overlooked.
And here I was getting excited that someone was thinking beyond boil and eat, then you thew a curve and select the one stove that is really not for cooking, but boil and eat.
I think your original setup was more versatile though a bit big for one person. I’m experimenting with the Stanley pot and a stainless cup like you had or a stainless version of that Lixada pot. While I’m building it as a 3-day, I want the option of going longer if needed by supplementing food through scrounging. The Stanley pot stacks inside the standard 20 oz. Cup or a 1L bottle will also fit inside the cup saving space. Gives two pieces of cookware to work with.
While titanium is light, my experience has been that it sucks for “cooking” because of its non-existent thermal properties.
If you like the whisperlite or similar you may want to look at the modern versions that can take canister as well as liquid fuel, giving you a choice before heading out as to which may be best to use.
There is definitely nothing wrong with your selection as you have decided lean and light works best for you, where I’m targeting mine for complete unknown and flexibility of having to go beyond what I planned for in my on hand supplies. Plus I live in the southwest where you could be 100+ in the day and suddenly drop to 40 or less in an evening. Does it happen often, depends on where you’re at and time of year. Part of the planning for an Emergency bag.
Solid feedback, particularly with Titanium. Yes, boil and eat doesn’t make for a great meal, but in a bug out situation, it’s fast and effective.