Underground fallout shelters are difficult and expensive to build. What if there was an easier way by building an underground bunker from septic tanks?
by Charl, a guest writer who helped someone do this very project in South Africa
Important disclaimer: Follow these instructions at your own risk. Do your own research. The article that follows is for informational and entertainment purposes only. Talk to a professional before attempting a real life bunker conversion of this type.
Shelter, Water and Nutrition (Sustenance) and Fire. I would rate those three the most important enablers of survival. You could add in planning and attitude. I would just fire back that Planning and Attitude would center around getting: Shelter, Sustenance, and Fire.
On earth, ambient heat rarely causes death. Humans are naturally adapted to cool ourselves. But exactly the opposite is true for cold. That is why fire is so important. Also, heat exposure releases nutrients in food we would otherwise not be able to get, it’s called cooking.
Note that if you are seriously concerned about the probably of facing nuclear fallout, it’s worth investing in some Potassium Iodide pills. Preppers stock it and you should, too.

This article will be taking a unique look at underground shelter, and how to incorporate fire for heating and cooking into the mix. A unique take on the underground bunker, I hear you mumble? Unique indeed.
Can You Use a Septic Tank as a Storm Shelter or Bunker?
In a short answer – yes. The tanks require modification, of course, to accommodate underground living. Septic tanks are not new and have been around in some form or another for thousands of years. This suggests that you convert a concrete septic tank into a secret underground bunker. Septic tanks are prevalent, readily available, and the installation of them do not raise suspicions about bunker building.
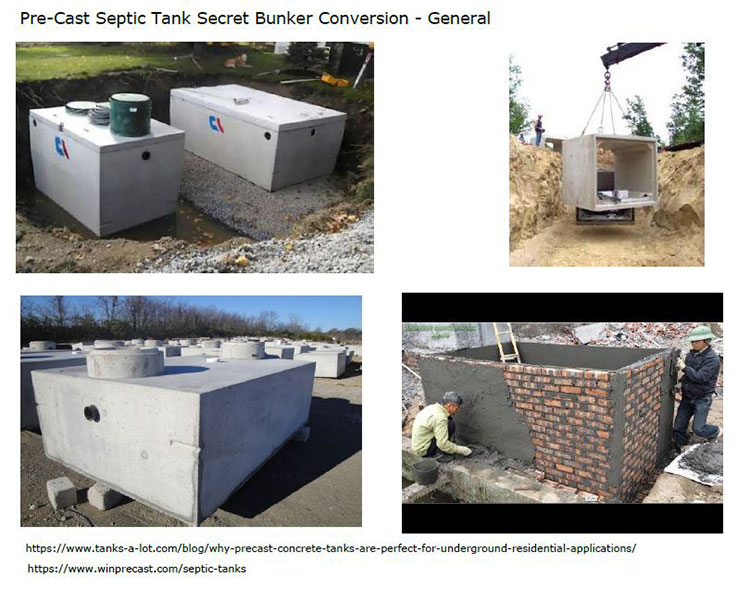
This article assumes a new installation. Conversion of an existing septic tank is possible, but that is a whole different article. Here I will write from the point of view that you build a septic tank on a pretext, but that you never commission it for its intended use. In other words, you are making a secret bunker. Instead of having it built for you as such, once the septic tank installers have left, you just simply don’t call the plumbers to connect it to your house or business.
Septic Tanks
When constructing this hollow underground space, be sure that your septic tank has the following attributes. These should be standard, but discuss them with the builders beforehand.
1 – It must be watertight. This sounds counterintuitive, but consider the following. If groundwater can get in, it could mean that after heavy rain, the contents of your tank could be forced up and out the manhole.
Also, you don’t want microbes from the tank mixing freely with the groundwater around your house. This gets into fruit trees, can end up in wells, etc. Septic tanks are usually waterproof for this very reason, but just be sure you and your builder are on the same page.
2 – The tanks will and must have an inlet, an outlet, and an inspection cover (manhole). In our scenario, we will be using the inlet and outlet for ventilation and cables, and the manhole as an entrance.
Another important aspect of septic tanks is that they are supposed to work in two stages. The first stage is for primarily solid matter, this sinks to the bottom where microbes will digest it over time. The second stage, or second tank, is where the overflow of the first stage runs into. Here it can be further purified or treated, or simply runoff to seep into the ground, like a French drain. If you are building a multi chamber unit, great, now you have two bunkers!
3 – The tank needs to be big enough. Make sure the dimensions of the tanks are such that you can, at a minimum, stand upright inside and when you lay down, your head and feet don’t touch the sides. The minimum size in my mind is 12 feet x 12 feet base and 7 feet high inside.
You also get pre-cast units. These come in rectangular or round, silo like shapes. You can also build them yourself, the same way you would build a room, foundation, floor, walls, concrete roof. Always just be sure, it’s waterproof and will not cave in. Self-built units will need pillars or other types of reinforcement to ensure the walls do not fall inward after heavy rain.
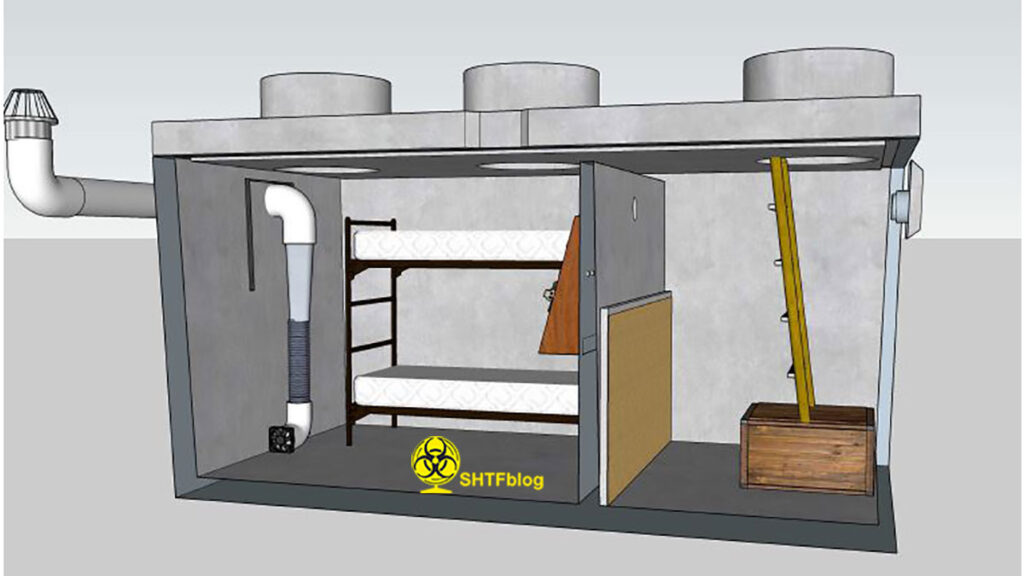
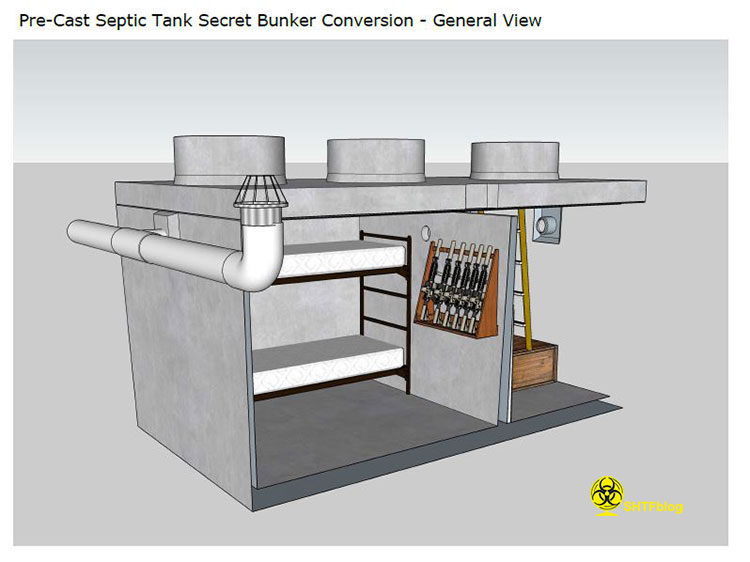
Making it Survivable
I call this making it “survivable” rather than “livable” because what we are building here is not a high-end underground bunker complete with flat screen television and more luxurious features typical of professional, purpose-built bunkers.
From here on, I am writing under the assumption that the tank is built, the builders have left, and now you will start retrofitting it to become a secret hideout and storage area for WTSHTF.
Lock-ability
First of all, you will need to have access into and out of the unit. This must happen through the manhole. Always make sure the manhole is higher than the surrounding area. You don’t want runoff water flooding in. Secondly, I would recommend a square cover. It will be easier to get a hinge onto it going forward, it will also be easier to close and control the cover once you are inside.
The cover must be lockable from both the inside and outside, but design your lock system in such a way that you cannot be locked inside by someone on the outside. It is possible for someone to weight that cover down with you inside, that is why you will have a long steel pipe and hydraulic lift jack inside with you. Also a sledge hammer and chisels, if for some reason you need to demolish a way out.
Plan your site in advance so that you can plant a hedge or a few shrubs around the entrance. It should be obvious that a secret underground bunker should have a non-obvious entrance. The other option is to have it overtly obvious. Right smack bang visible for everyone. Just make sure nobody sees you enter into or out of the bunker. Then your secret is safe.
Build Access
Next is the ladder system. You can use a rope ladder, nothing wrong with that, but consider installing a proper steel frame ladder that you can climb up and down without too much risk of it moving. From this point of view, try to make sure your manhole cover is close to the edge and not in the middle of the tank.

Another important thing to consider is how you close that sucker once you are inside. I suggest a platform that is stable enough to stand on while leaving both hands free to maneuver the manhole cover. You will have a tough time closing it if you are still on a ladder.
So this is how it should go. A rope, steel or wooden ladder taking you down approximately five to six feet below the manhole cover onto a landing platform on which you can stand and close the cover. From there you will need another set of steps or a slide to get you onto the floor.
HVAC – Heating, Ventilation, Air Conditioning.
You will also need ventilation or you will suffocate and die. Rather than it being a survival bunker it will be a death bunker. Remember that CO2 has a higher density than O2, and will settle near the floor, O2 around the top. This has implications for bed placement as well as ventilation.
Don’t sleep on the floor. You can use hammocks, bunk beds, whatever, but don’t sleep on the floor. Also, if you are using wood, coal or charcoal to heat, then you must not go to sleep unless you have all your safety protocols in place. People who suffocate in rooms with heating fires still going end up looking blue, as the fire continually uses oxygen and you have higher and higher ratios of oxidized blood (blue, as opposed to red, oxygen-rich blood).
Heating
My recommendation, if you want to install a carbon-based stove, is that it should have its own oxygen supply from outside. This can run close to the chimney. Keep this in mind when buying a unit, and discuss it with the supplier.
Secondly, you can use gas, and some of the newer heaters come with Oxygen Depletion Sensors (ODS). I would still not sleep with it on though. If you are freezing, heated rocks in your bed won’t kill you. This brings me to my next point.
Insulation
You could easily insulate your bunker quite effectively. You could use a caulking gun and apply silicone or resin based adhesives to the walls, and then apply polystyrene insulation panels. You can do this on the floors, walls and also the roof. Think cold-room panels. They are designed to keep the heat out, but just as easily keep heat in. For acoustic purposes, I would finish with a final layer of thin plywood or Masonite.
Ventilation
Familiarize yourself with 12V DC computer cooling and server fans. These little guys can run for hundreds of hours without much of an issue. They are also easy to use, relatively cheap, and can run of 220V AC or 12V DC. This means you can easily run them off small solar panels or batteries like those in your car. I would suggest keeping a few spare, if you need them. The airflow they will achieve is more than adequate for humans to survive.

As mentioned, these fans work of 12V DC or 220 AC. If you have a solar system, you can connect these straight to the batteries. You also get 24V DC fans, make sure to match your fans to your batteries. A PV system could include an inverter, in which case you can run your fans on 220V AC. Worst case scenario, you charge a battery up in your truck by driving a few miles, and then use it inside to power your fans. Most generators will also charge batteries.
Next you need to familiarize yourself with woodworking, dust extraction ducting systems and 4″ PVC or Flex-Drain piping systems. If you just google those two phrases, you will immediately realize what I am getting at.
The woodworking dust extraction ducting system is ideal for use inside the bunker. Use the 4″ inch PVC or Flex-Drain pipe for outside the bunker, as it can be buried beneath the soil, and running it underground, you can create a system that will not reveal the location of your bunker.
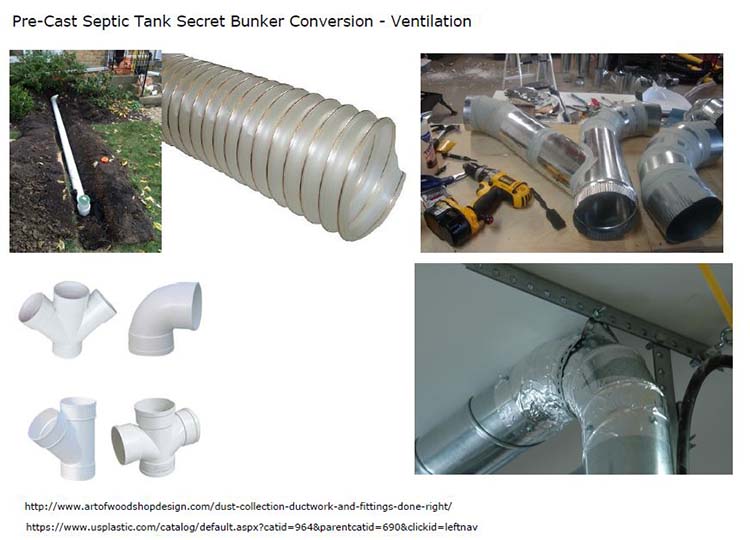
I would suggest having a few T-junctions both in the inlet and outlet airflow ducts. This just creates a measure of redundancy. If a specific duct outlet gets blocked, you have another option. Also, make sure that insects cannot gain access. There are specific fittings for this for drain pipes. You can also create your own by inserting filters. Those big old air filters and filter housings they use on trucks can easily be converted into a air filtration system. The point mainly being to keep bugs out.
Duct and piping systems are very easy to use. Glue on the PVC drain pipes and ducting tape on the inside system.
I strongly recommend two lines of airflow. Do not think too strictly about them as one line in and one line out. The idea is that you can change the direction of airflow as needed.
Consider the following two scenarios.
Scenario 1
It is a hot summer day, the 100th in a row and your bunker is running hot. You will want to be able to extract air from the highest point possible, bleeding heated air out and cooling the bunker.
Scenario 2
It is a freezing winter day, the 100th in a row and your bunker is freezing cold. You don’t want to bleed the little heat you have out. So you don’t want to extract air from the highest point, but from the lowest point, because that is also where the CO2 is accumulating.
As a side note, I just want to mention that the warmer it is, the more all these gasses mix, so in summer, it’s all just one big mix, and taking air out the top of the bunker makes sense. Below room temperature, and the colder it gets, the lower the heavier gasses will settle. Those with highest density at the bottom. Pertinent to the current discussion is the point that in winter, all the bad stuff is settling at the bottom.
With regard to airflow, in my estimation, you only need one fan on one line to work. If the fan is pushing air into the bunker, the positive pressure inside will automatically push air out the other line. The reverse also applies. If you are pulling air form the bunker, the negative pressure inside will pull air in through the other line. If the lines are very long, air friction could cause the air to lie still, then you should run both fans simultaneously.
Do not ever assume that your system is running or working. Make sure to check. Light ribbons of cellophane or even toilet tissue can show you if air is moving, attach them as needed. Further, you get simple battery devices that can measure your level of oxygenation by clamping over your finger, get one. Lastly, buy a CO2 meter and or CO2 alarm. You get models that work like smoke alarms and will warn you if there is any issue.
An analog way of doing this is with emergency candles theoretically stocked in your bunker. It should burn with the same vigor and length of flame outside in the open air as inside the bunker. If the flame is weak and low inside, you have oxygen issues, sort them out!
Install Lighting
How you install lighting is up to you, but I suggest painting the walls white or just a very subtle light blue. This will reflect maximum light and save your energy consumption. You can also put in big mirrors, they reflect light and are darker in low light environments than white walls. Remember, inside a bunker there is no day and night. All light is artificial. You will need to maintain your circadian rhythm. Wake, work, sleep, as per normal.
Underground Bunker from Septic Tanks Summary
There is still a lot to be said about bunkers, but by now you should have the basics down. Remember that the laws of physics always apply, so try to think on this from a first principles point of view. Airflow will abide by what heat, density, and pressure dictate.
Heat is just energy in the surrounding air. You either want to keep it in or get it out. Try to use physics as your helper and keep energy consumption to a minimum. Don’t work against physics, this requires maximum energy.
Otherwise, I suggest jumping onto those websites and start getting those quotes on pre-fabricated bunkers… err… I mean septic tanks!
If you want to read more about how to survival a nuclear exchange, see Cresson Kearny’s Nuclear War Survival Skills.

- Kearny, Cresson H (Author)
- English (Publication Language)
- 340 Pages - 04/29/2022 (Publication Date) - Knowledge Publications Corporation (Publisher)
2 comments
Nice Idea you won’t have to worry about the tax assessor seeing it they can’t make assessments on what they can’t see.
a old friend ,bought a “New” 20,000 gallon Fuel tank for gas station Buried it, some concrete to hold it down,2ft dia.access, planted cedar trees to hide it -from nosey neighbors, told them was septic.. they bought the answer ,added 12 volt lighting, water from another tank buried also, pump to extract water.bunk beds for he & mrs. 5 gal poo bucket & poo bags , lots of really nice set up items.. couple tornado hit the area,,, not a problem at all. county never said a thing when someone blabbed he was burrying a tank. told them water for garden.ha-ha.that was over 10 years ago all is still fine talked to his mrs..said it doing just what it was planned for.
keebler