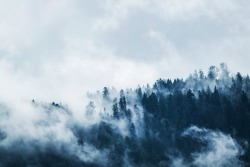
Have you ever tried to build a shelter from natural materials in the woods? Have you ever tried to do it with no tools? Have you ever tried to do it with no tools in the winter in a foot of snow? Well I did, and here’s what happened.
I went out snowshoeing with my yellow lab (Phyllis) and thought it might be cool to pretend that I was lost and needed to set up a shelter for the night. It was about noon in mid-February, which meant I had roughly four and a half hours to build a shelter and get a fire going.
Since I never go into the woods without minimal equipment I can’t say that I had zero gear, but I didn’t use any of it when I built it. Here’s a little video of just how easy it is to build a shelter from natural materials in the snow with no tools. What could go wrong?
Time Line:
- Fall on my ass: 5 seconds
- Swear: 17 seconds
- Gather wood: 1:20
- Breaking wood: 2:51
- Constructing the shelter: 4:54
- Tipping: 6:08
- Covering the shelter: 6:53
- Digging the firepit: 7:19
- Lighting the fire: 8:24
- Chillin’ in the shelter: 9:03
Don’t Lose Heat!
Before we actually build the shelter let’s take a look at some of the objectives. First and foremost, don’t lose heat! You lose heat through the following processes:
- Convection – think blowing wind here
- Conduction – like sleeping on the cold ground or sitting on a cold rock or log
- Radiation – heat leaving your body like heat waves coming off a woodstove
- Evaporation – sweat
Building a shelter from what you have around you with no tools and keeping these rules in mind is a bit of a tradeoff. Do the best you can with what you have.
Resources and Construction
In my case, I decided to build a lean-to style shelter from what was lying around in the forest. In the section of forest I was in, there were a lot of standing dead fir trees about three to four inches at the base. I looked all over and found a good supply of what I’d need, then went back to where I’d decided to set up my camp.
It was in the forest near water, although this wasn’t absolutely necessary since there was so much snow on the ground. However, it’s easier to gather water or ice then melt snow, so you exploit whatever edge you can, which is what I did in my mock survival situation. It was also close to my supply of wood and a decent amount of fir trees, which I’d need for the fir boughs.
Next I laid a small log between two trees supported by small logs I’d broken and put underneath to hold it up. This “cross beam” was about three feet off the ground. Then, I laid a couple of ribs along it to get an idea of how long they’d need to be so I could break bunch to the right length.
After this, I went and gathered what I hoped was enough wood to put the ribs on the shelter. (If you haven’t seen the video, you should check out the first minute or two. I completely fall on my back, while breaking some trees off). Hey – nobody said it was going to be easy. Next I had to break the tree length sticks to the right size. To do this, I found two trees close together. Then I stuck the wood I wanted to break between the two and pulled on it until it broke where I wanted it to. This isn’t pretty, but it gets the job done. (Again, see the video for a demonstration).
I tried to build the shelter with its back to the wind so as to cut down on convection. When you have a wind blowing it lowers the temperature considerably and with my shelter set up with its back to the wind and the fire throwing heat in, I was in pretty good shape.
Covering It Up
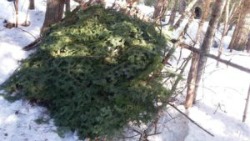
Once I had the ribs on it was time to cover it up. There are plenty of fir trees in that area, so I resorted to a technique called “tipping”, which means to break the tips off some fir branches in order to get what I need. This doesn’t particularly hurt the tree as long as you don’t snap off every branch. I gathered five or ten armloads and put some on the outside of the shelter and a few armloads inside as well to avoid losing heat through conduction.
Special note: if I were going to build this for real, I’d put a lot more pine boughs over the top and on the ground to really help with the insulation. Since this was a demo and I was getting tired I decided to go light on the insulation.
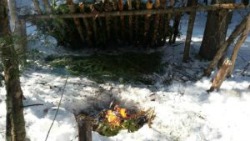
Next I broke some wood up for the fire and grabbed some small dead branches off fir and pine trees. I piled the wood up and put the tinder on top then lit it with a lighter I happened to have in my pocket. (I could have used a firesteel, but the lighter was quicker and easier).
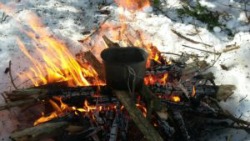
Pretty soon I had a merry blaze going and decided to make myself some coffee. Part of that small kit I told you about is a military canteen cup, so I poured in some water and made coffee using a coffee bag (exactly like a teabag, but with coffee instead).
After Action Report
It really wasn’t that difficult making a shelter using natural materials. True, I don’t feel like I totally finished it, but it would have been easy enough if I needed. I could have also covered it up with snow to really insulate it or added more to the front to make it less of a lean-to and more of a full shelter instead. The total time to make the shelter, even in the snow, was about two to three hours. The thing about a shelter like this is you need a lot of wood to keep you warm through the night. In the area I was in, it wouldn’t have been a problem because of all the dead wood laying around, but in other areas it might not have worked out so well.
Again, you’ll need to adjust the kind of shelter you have according to the materials available. Questions? Comments? Sound off below!
8 comments
Good article, and you have ably demonstrated just how technically simple it is to construct a shelter. I have built three-sided lodgings with log poles and branches (and slept in them) at 7,000 feet in forested terrain, and without tools. I wasn’t under the time constraints that you imposed, so I was willing to take the time to construct something a bit more elaborate than the basic lean-to. The point is, there is no reason that a back-country trekker or bug out group can’t provide effective and durable shelter when the need arises.
great demo, Jarhead.
It gives me hope that “common sense”, can be demonstrated so nicely.
(many of us don’t seem to have any)
That’s awesome. Definitely a project to try with the boys!
That looks like its great–for Maine. Here in the highlands od Kentucky –Not so much. Its WET here in the winter. Deep snow and deep cold are both “once in ten year” events. The big challenge to winter survival in the Appalachian high lands is finding ANYTHING that isn’t rotten and dry enough to burn. Here the pole and bark “Wickieup” is the best solution for anything longer than overnight. For temporary shelter I use what the natives did. We call them “rock houses” they are really just shallow depressions in the cliff faces but they reflect fire heat wonderfully and are often deep enough to keep the rain off. This is a really “wet/cold” climate. Staying dry is the biggie for us.
Very good article and video.
Thanks!
.Very good article and video.
Thanks!
Perfect for the long trek to your survival location if an EMP renders vehicles useless!
Great video Bob! Good info can and will save your life.