So we know to try to keep any severe damage from happening to our precious magazines – that one’s a 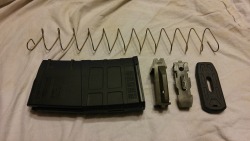 no-brainer. But we also need to be aware that during normal use and training, magazines get dropped onto the ground, which is the natural habitat of mud, dirt, dust, snow, small bugs, standing and/or running water, and sand. Also, carbon and powder fouling (especially from suppressed guns), lead, copper, and brass debris from the cartridges will become denizens of the magazine just through normal use.
By Drew, a contributing writer
This post is Part II of a series (Read Part I)
Next To Godliness
Let this crap build up, and eventually, your mag ain’t gonna run no’ mo’. So you train and shoot… and as a happy consequence, you now have some cruddy magazines. What kind of maintenance do we need to do to keep these crucial systems from becoming your gun’s Achilles heel?
Related: Rifle Magazine Management Strategies
Luckily, MOST modern box magazines can be easily disassembled for cleaning, so you don’t have to make do 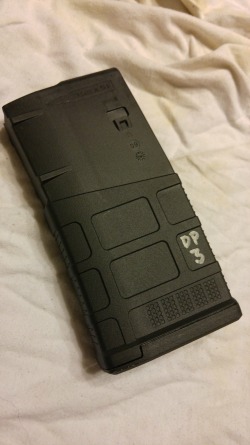 with turning the mag upside down and shaking to get the sand out via cartridge count holes. This will be a general guide on magazine disassembly – I heartily recommend you perform a little internet/YouTube research or consult your local gunsmith for a magazine disassembly consultation for your specific firearm if it doesn’t seem to work with what I’m outlining here. As stated previously, your standard magazine has just a few parts: the magazine body, the magazine follower, the magazine spring, the magazine insert, and the baseplate.
-
Magazine Body: The outside sheathing of the magazine, that encapsulates all the parts to the magazine as well as the cartridges. Usually steel, aluminum, or polymer.
-
Magazine Follower: This component provides a bearing surface for the magazine spring to exert pressure on the cartridges, as well as helping to provide proper alignment to the cartridges. Usually steel or polymer, can be seen through the open end of the magazine when the magazine is empty.
-
Magazine Spring: A steel coil spring (with very few exceptions). Provides the upward force to feed the ammunition from the bottom of the magazine, out into the gun.
-
Magazine Insert: A small, flat component that sits inside the magazine body and uses the spring’s tension, combined with a small tab or detent, to keep the baseplate locked in place. Usually steel or polymer.
-
Baseplate: The bottom flat plate of the magazine. Provides a bearing surface for the spring and keeps dirt and debris from entering the bottom of the magazine. Can be made of a multitude of materials; usually steel, aluminum, or plastic/polymer.
Tools needed are few. A small flat-headed screwdriver is useful for gentle prying, and a punch, or even a bullet nose or pen/pencil can be used to depress the magazine insert to unlock the baseplate. A rubber/plastic mallet or block of wood is useful for using gentle impact coercion to re-seat baseplates.
You won’t need many cleaning supplies, either. I like Q-tips and toothbrushes to get in the hard-to-reach tight areas, and a small, clean, dry rag and a short cleaning rod works pretty well to rid the magazine innards of detritus and debris. Unless your magazine has lots of carbon buildup, you shouldn’t need any solvents or cleaners – it’s best to wipe the magazine internals clean and leave the inside dry and oil-free.
Oil will attract dirt and dust…and it’s also possible penetrating oil can do what it was designed to do and work its way into cartridge primers, neutralizing the priming compound. If you’re in a high humidity or salt area, you can put an extremely light coat of oil on the magazine spring – but remember, it can attract and hold debris. The ONLY time I put heavy oil or grease on the inside of magazines is if they are going into seriously long-term storage. If this is the case, I will mark these magazines with a note that they must be cleaned before use.
The Breakdown
For the visual purposes of this article, I’m going to use an AR-10 .308 Magpul PMAG, since these are the same 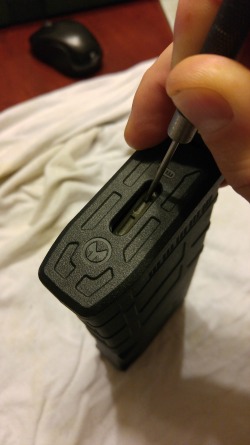 internally as the PMAGs used by pretty much anyone with an AR…and conveniently, the disassembly principles are largely the same as many magazines that commonly used SHTF guns would utilize.
For most modern magazines, disassembly starts with removing the baseplate. The baseplate will usually have a small hole or slot where a protrusion from the magazine insert interfaces to keep the baseplate locked in place mechanically – see the oblong gray surface on the baseplate of this PMAG.
Take your punch and push this magazine insert down, dropping its tab down and out of its corresponding slot on the baseplate. This will allow the magazine baseplate to be pushed forward (sometimes backwards) off the magazine body.
If this is the first time the magazine has been apart, the baseplate will likely fight you to stay on the body. Likewise, if you have a steel magazine with a steel baseplate, you may have internal corrosion locking parts together. Here is where that mallet and/or screwdriver will come in handy. While keeping forward (towards the front of the magazine) pressure on the baseplate with your thumb, try tapping and/or gently prying the baseplate forward if needed. Once that baseplate starts moving forward, you won’t need to keep downward pressure on the magazine insert to keep it from jumping back into its slot in the baseplate.
Keep your thumb at the back of the baseplate and keep pushing forward over the open bottom end of the 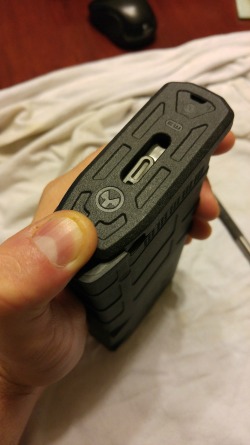 magazine. Use your thumb to keep control of the insert and magazine spring, as they are under spring tension – and once you pop that baseplate off, there’s nothing keeping the spring in check – and go flying it will. Keeping a thumb or palm over the magazine will help keep things under control.
Gradually release the spring tension (there can be quite a lot!), and then pull the spring and insert out. The magazine follower may or may not be stuck or locked onto the spring. If it is locked on, the follower will come out with the spring. If it is not, you may need to turn the magazine upside down to get the follower out.
IMPORTANT: Be sure to note the orientation of the spring, magazine insert, and follower – they only go back together one way that will allow the magazine to work! If you reassemble the mag and it doesn’t play nice, chances are a part was reassembled backwards, upside down – or missing altogether. Take a picture or make a sketch or use your eidetic memory for reference until you’ve done this a few times and gotten the hang of things. As I was re-assembling the magazine I took apart for purposes of this article, I actually put the magazine insert on the spring backwards and tried to re-assemble. Nope. It’s good to have reference points, whether you’re a first-timer at magazine work or a seasoned disassembly veteran.
While your magazine is apart, now is an excellent time for upgrades if you want them. Extra capacity baseplates, new stock or increased strength magazine springs, anti-tilt followers, and Ranger pull plates are all great upgrades depending on the magazine you have. Magazine parts are cheap, so if you predict heavy usage for certain magazines your own, throw a few bucks down and let them know they’ll be loved.
Once you have performed your desired upgrades/maintenance/cleaning, it’s time to reassemble. Essentially this 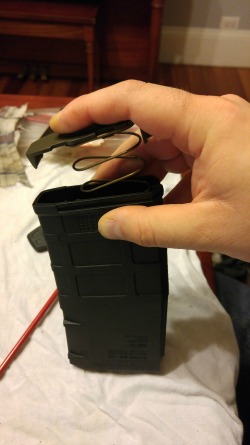 is assemble in reverse order: Magazine follower goes in first – usually it is attached to the magazine spring and not just free-floating. The spring follows the follower, and the magazine insert – also usually connected to the spring – goes in last. You’ll now have to compress the spring by pushing it down far enough into the magazine body to get the magazine floorplate started. Sometimes holding the spring tension in one hand and trying to wrangle the baseplate while holding the magazine body can be a little exciting – you might want to use a padded vise to hold the magazine body (careful not to crush the magazine body!) or borrow a friend to help hold things stable. I was able to get the spring in my Magpul PMAG back in by myself, but it took a couple tries.
The baseplate may need to be gently tapped back on. Just be sure to get it started on the magazine body as far as you can before starting to hit it. Keep the spring pushed down to keep it from catching on the baseplate and binding or kinking.
Once the baseplate is fully seated, the magazine insert should snap back into its baseplate hole securely. You 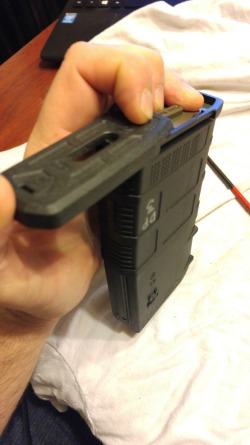 may need to use your punch through the baseplate hole to align things properly – but everything should go together nicely once all the components find their correct homes. My PMAG went together slick with no tapping necessary, but it was relatively new.
- Glock Magazines can be a complete bear to disassemble, since the magazine bodies have small tabs that keep the baseplate locked in place. At my Glock armorer’s course, the instructor said to take a long, skinny tool like an allen wrench or a Glock disassembly tool, and insert it inside the magazine baseplate hole. Push the magazine insert out of the way, and use your tool as a lever to carefully pry against the inside of the magazine body. Careful – this method can damage your magazine if you’re a bit hamfisted. Once you get the baseplate moved forward about one quarter inch or so, take the tool out, position your thumb over the back of the baseplate, and push forward and off, using your thumb to keep the magazine spring and magazine insert from launching. When reassembling, use a small rubber mallet to tap the baseplate back over the tabs to lock in place.
-
Ruger 10/22 magazines are a different animal altogether, and the description on how to take them apart would fill an article in itself. Luckily, someone else has already done that, and the excellent instructions can be found by clicking here. I use these as reference when I work on my personal 10/22 magazines.
-
If you’re running a firearm that’s a bit different or you can’t find magazines anywhere, try looking at The Numrich Gun Parts Corporation. Brownells and Midway USA are pretty good sources too for entire magazines or replacement parts. However, I’ve found that far and away, the best luck I’ve had in sourcing oddball magazines is to stay diligent at your local gun shop’s bargain bins and used item bins (any good gun shop has them). They probably won’t be labelled – bring along a magazine for reference. eBay is an excellent source as well if you know what you’re looking for.
-
Safety glasses are nice for when springs and components go launching. Lots of spring tension usually associated with these activities.
-
A great many .22 pistol and rifle magazines won’t be very easily disassembled – I was reminded of this when I pulled out a Ruger Mark I magazine for pictures. Best to go online for your specific gun and do some disassembly research.
Wrapping It All Up
Yes, my article above is a little vague on details for specific magazines, and it was intended to be that way. No one article can sum up all the different specifics of each firearm’s feeding mechanism. However, as stated, most modern detachable box-type magazines follow the same basic design and you can probably figure things out on your own magazines with a little head-scratching and common sense.
NOW is the time to sit down and learn how to de-crudify your magazines. Once the balloon goes up and you have to depend on your magazines – or salvaged magazines – to save your life, it’d sure be nice to have a basic knowledge and understanding of how magazines work and go together so you can keep your gear running. Having the knowledge to pull damaged magazines apart also helps, since you can cannibalize parts from damaged or found magazines to keep your magazines going.
How about you? Do you have any tips or comments on magazine maintenance you can share with your brethren? Sound off in the comments below!
All Photos By Drew
9 comments
The AR is the worst possible choice for a survival rifle. Followed closely by EVERYTHING using detachable magazines and batteries. You want a good weapon to use in the long term? Get ANY manually operated turn bolt rifle that uses commonly available ammo. Carrying an “assault rifle” as a long term survival weapon is stupid. The AR needs parts replacement every 2000 to 5000 rounds on average with a projected lifespan of fifteen to twenty five thousand rounds between major overhauls. UNDER IDEAL CONDITIONS. In combat the M-4 platform can have a lifespan of less than six months. (US Army) Mauser’s will last for century’s of hard use under conditions that would destroy even the best semi auto within days. Plastic and alloy are poor choices to bet your life on. But you guys run with the meme. Its making money for somebody.
Hey Ray! I’ve seen plenty of Mausers, Winchester 70s, Remington 700s, and even Mosin-Nagants with played-out magazine springs. I’d rather, personally, have the ability to be able to chuck or repair a useless magazine and replace with a functioning one. Just because one is fixed and one is replaceable, it doesn’t mean one is less susceptible to fatigue or wear than the other…No system is perfect in an imperfect situation.
Knowing how to perform maintenance, even on tupperware plastic and alloy guns, will extend the lifetime of your firearm. And there is no practical difference between knowing how to replace the magazine spring on a Mauser or the magazine spring on an AR box mag. The parts lifespans are probably very similar – it just takes a lot more time to go through 20,000 rounds in Mauser than it does an AR.
Ok, so get a bolt rifle over a semi-auto, because why? Bolt rifles do break and lock up, do not kid yourself. So, a semi-auto will reach 10,000 rounds before a bolt action rifle. I’m not sure anyone has really looked at bolt action rifles to see how long it will last before mechanical failure. This article is about carrying for your equipment so you reduce the risk of failure.
caring not carrying
ok you did a good job with magazines now how about tube magazines for shotguns? i didnt see anything about those how do you clean those or do they have to be maintaned at all ? how long can you keep one loaded with out cause damage to the spring ? the list can be endless
Kevin, in the article I explained that maintenance on fixed tube magazines like shotguns will be a future article. Stay tunes!
thank you
Tube fed shotguns (Their mags) are easy to disassemble. At the end of the tube there is a cap, unscrew that and set it aside, in the case of a Rem 870 there is a plastic piece that you push in and rotate half a turn and pull it out. Then just pull out the spring and follower.
Good article, like anything mechanical or with any moving parts things are going to wear if your using it. Best methodology is to maintain it so that wear does not progress rapidly, also that being said while things are torn apart be sure to look them over so you might identify any problems or differences before they cause failure. Found a great product @ Lowe’s made by DuPont (usually in the tool area) it’s a dry Teflon lube very nice due to the fact it lubricates but does not leave a magnet like residue for debris. My small bottle has lasted many mag rebuilds and has many other handy uses.