The AR-15 is the rifle of choice for most preppers in the U.S., but maintenance is critical, and that includes bolt carrier group cleaning and reassembly. This confuses many people, but follow these steps closely and you will master the BCG disassembly, cleaning, and reassembly.
You should find this post very helpful. If you want more detailed specifics about your AR-15, see the AR-15 Rifle Builder’s Manual: An Illustrated, Step-by-Step Guide to Assembling the AR-15 Rifle.

- Reaser, Rob (Author)
- English (Publication Language)
- 72 Pages - 03/14/2016 (Publication Date) - CreateSpace Independent Publishing Platform (Publisher)
If you have an AR, you should absolutely know how to work on it. You may love your bullet-launching Range Barbie to bits. You may have even built one yourself. You lovingly selected every part, widget, accessory, and optic to make your AR an extension of you.
But if SHTF and your AR-15 breaks, you won’t exactly be able to roll down to the local gun shop and expect the gunsmith to fix your problem while you wait. You may hope to find a parts gun in an abandoned police cruiser or National Guard armory that will have parts interchangeability with your AR (most are Mil-Spec and therefore mostly interchangeable), but who’s going to perform that necessary work on your rifle? Guess what, buddy – you are!
Luckily, the AR platform is pretty easy to work on once you’ve dug in a few times and you get a handle on what’s going on in there.
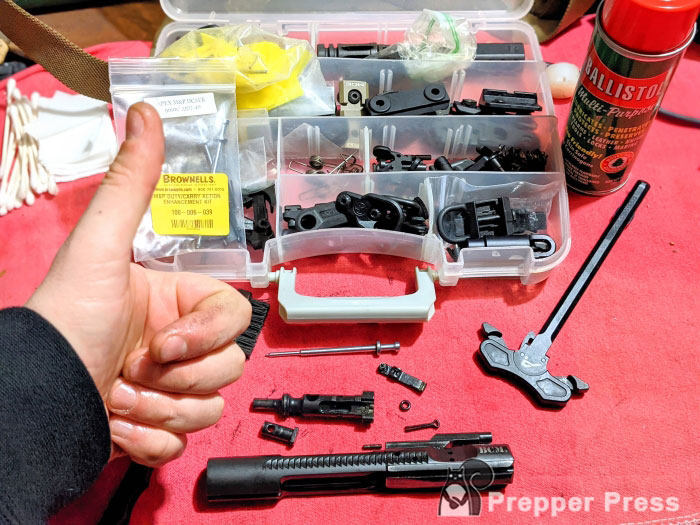
Personally, I keep a smattering of easily-replaced (read: field-replaceable with few or no tools) parts in the Magpul ACS stock compartments of my go-to rifle. This includes a cut-down 1/16″ punch, which lets me work on most of my AR with maybe a convenient rock utilized as a hammer. Every AR owner should have a spare parts kit, but those replacement parts and punch are useless without knowledge.
Here are some other parts that we’ll go over. These are all small, low-cost parts that every AR enthusiast and prepper should have for spares
| Spare Part | Retailer |
|---|---|
| Firing Pin Retaining Pin | Optics Planet |
| Firing Pin | Optics Planet |
| Bolt Cam Pin | Optics Planet |
| Extractor O-Ring | Optics Planet |
| Bolt Upgrade Kit | Optics Planet |
What’s that? You can field strip an AR, but not much else? Well, let’s start fixing that problem, starting the process with learning how to maintain the most crucial element of the AR-15/M4 system: bolt carrier group cleaning.
What is the Bolt Carrier Group?
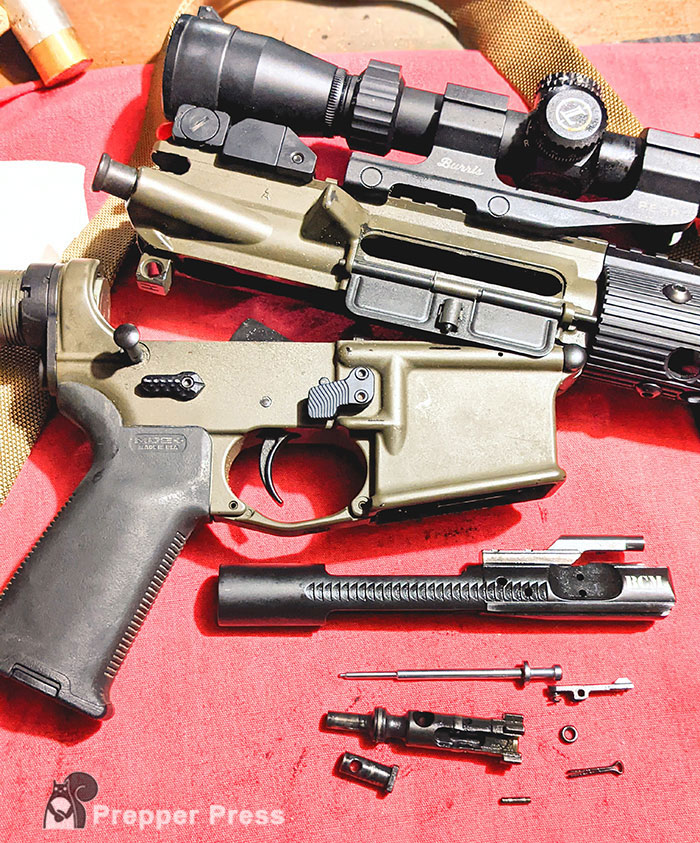
The Bolt Carrier Group (BCG) is an assembly made up of several individual parts that work in harmony to ensure your AR-pattern rifle functions properly. It is comprised of the bolt, carrier, extractor, ejector, gas key, gas rings, cam pin, firing [in, and the firing pin retaining pin. Also, there are springs and pins that work with the extractor and ejector.
Tools Needed for Bolt Carrier Group Disassembly
First, we’re going to assume that you can remove your bolt and charging handle from the gun in the normal field-stripping procedure. You’re going to need a few specific things:
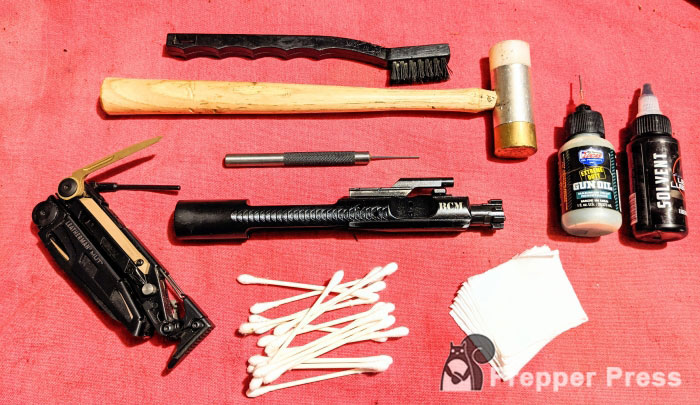
- A 1/16″ or 3/32″ drift punch…this should be relatively easy to come by at your local hardware store. Make sure you get a good one; cheap ones bend and snap very easily.
- A small brass and nylon hammer will probably be needed.
- A few cleaning patches.
- A bunch of Q-tips.
- Some good gun cleaning solvent – I like good ol’ Hoppe’s Number 9.
- High-quality gun oil – Lots of good options out there, I favor Hoppe’s Elite Gun Oil, Lucas Extreme Gun Oil, or Ballistol.
- A small scraping tool (I use a jeweler’s screwdriver, or more recently, the scraper tool on a Leatherman MUT).
Ready to get dirty?
How to Disassemble the Bolt Carrier Group
Disassembling the bolt carrier group may seem intimidating but it breaks down into four steps outlined below. Be patient, take your time, and carefully remove everything so parts don’t go flying.
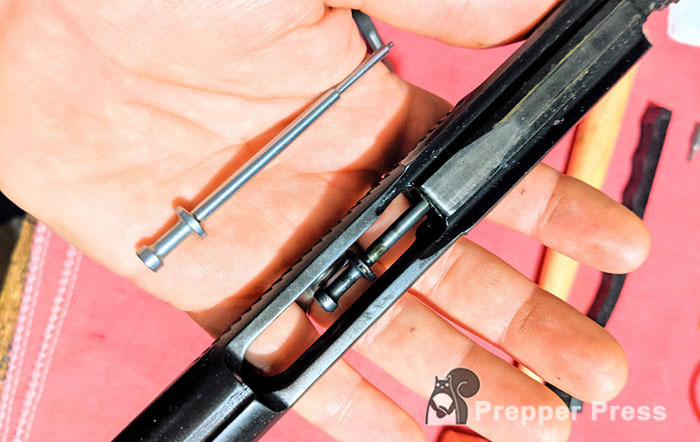
Step 1 – Remove Retaining Pin and Firing Pin
First, we’re going to pull out the firing pin retaining pin. This is a small, cotter pin-like affair that is recessed into the side of the bolt. Using a punch or nose of a spare 5.56mm cartridge, pry it out.
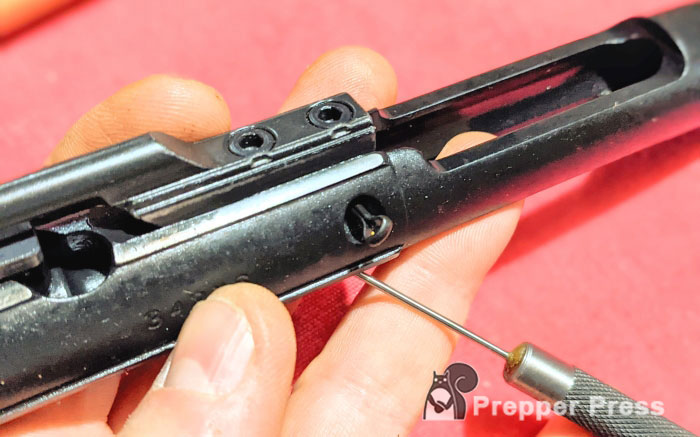
A word about this pin: it is a hardened pin. If it breaks somehow, you’ll need to get another AR-15 specific pin. Just going to NAPA and getting a random cotter pin won’t work. Those car parts-sourced cotter pins are soft, malleable metal and will break very quickly, leaving you completely shafted.
Dedicated firing pin retaining pins are cheap. So, there’s no reason not to buy a few of these expendable parts and have extras on hand. I once had a retaining pin break on me during a range session; the gun stopped functioning. Fortunately, I had a spare on hand, taped to the inside of my pistol grip. Prepper!
This pin, as the name suggests, retains the firing pin in the bolt housing. Removing the retaining pin allows us to remove the firing pin, which, depending on your level of gunkiness, may drop right out, or need to be pried/pounded out. At under $10 each, it’s also worth buying an extra firing pin.
Step 2 – Remove the Bolt Cam Pin and Bolt
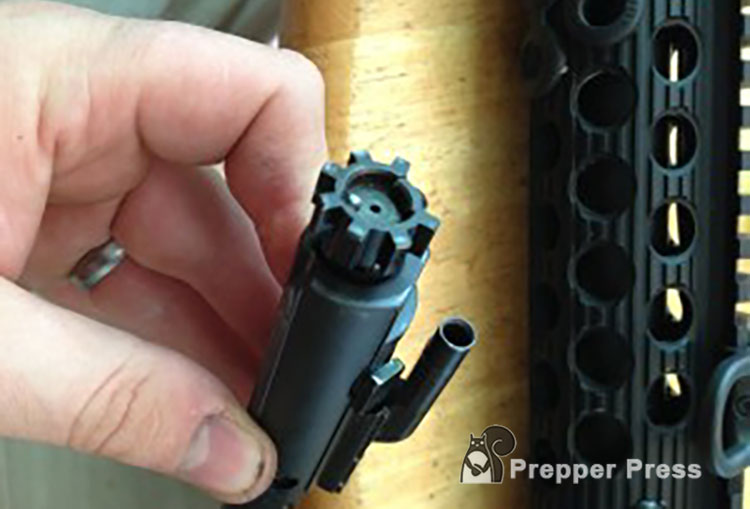
Next, we’ll get the bolt proper out of the bolt carrier group. To do so, we need to pull out the bolt cam pin (buy a spare). Push the bolt head backwards into the body of the carrier (you’ll see the bolt slides and rotates back and forth inside the carrier), and once the bolt head is fully in its rearmost position, the cam pin can be turned 90 degrees in either direction.
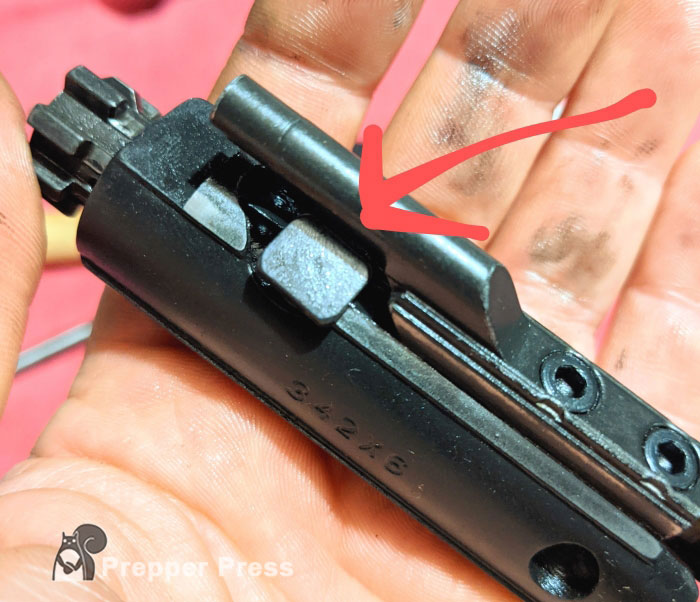
Once the cam pin is rotated 90 degrees, pull it straight out of the bolt carrier body. It should come out easily.
Once the cam pin is out, the bolt can be pulled forward out of the carrier body. If your gas rings are fresh, the bolt may come out a little tightly, but really the bolt should pop out with no real problems.
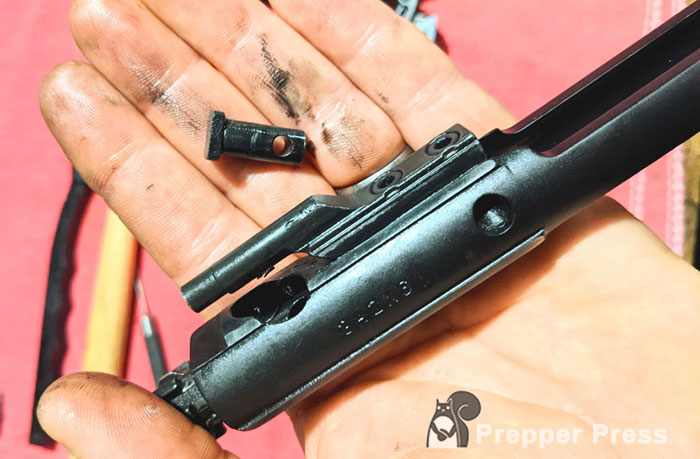
Step 3 – Disassemble the Bolt Proper
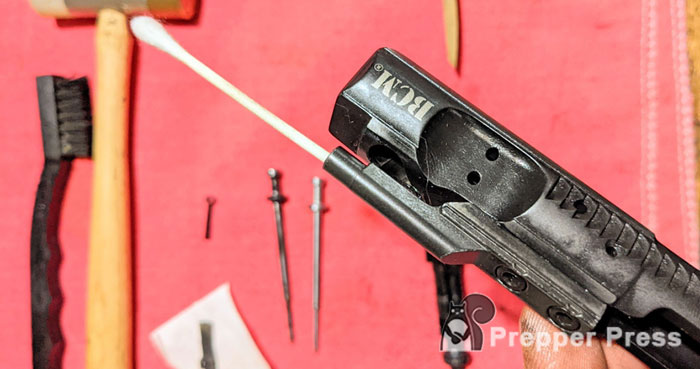
To disassemble the bolt proper, there are two pins we will need to remove. Grab your trusty punch and drive out the small pin shown in the photo below to remove the extractor. Be careful: the extractor has some spring tension behind it. Keep your thumb on it to keep from launching parts into the great beyond next to the detents you probably already launched before.
Remove the flat extractor, lifting it out slowly, watching the spring tension. Be careful not to lose the spring (and rubber extra power “doughnut”, if it’s so equipped). Set the extractor and its spring aside; we’ll get back to it in a second.
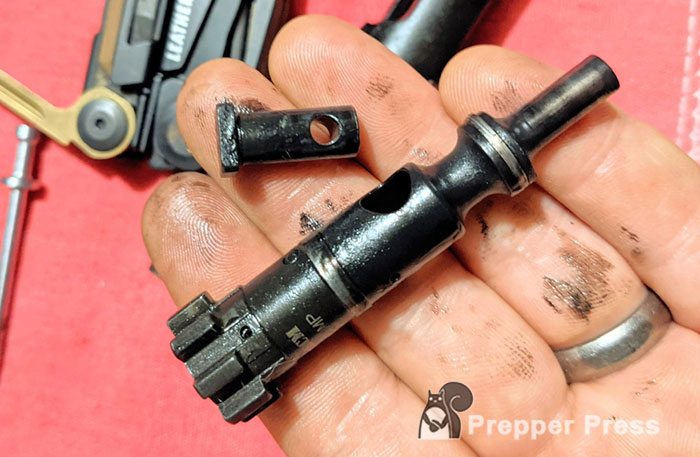
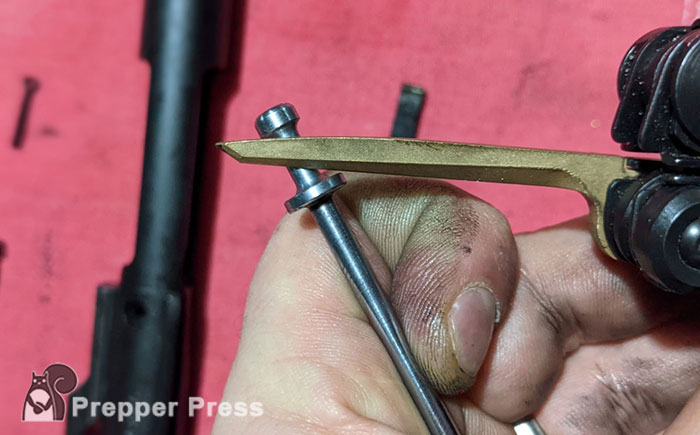
Step 4 – Remove the Ejector
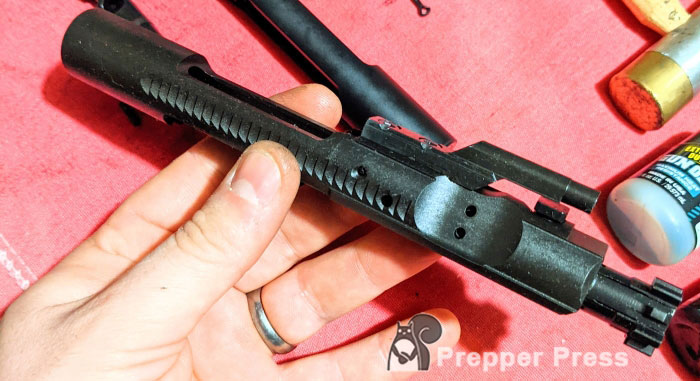
Next is the ejector. I usually don’t pull out the ejector on routine tear-downs, but it’s an easy process. Drift out the tiny roll pin indicated below (keeping your thumb over the face of the small round ejector located in the face of the bolt! Serious spring tension here, kids!). Pull the ejector and its spring forwards, out of the front of the bolt.
Take note of the orientation the ejector comes out. There is a notch in the ejector for the pin, and the ejector needs to go back into the bolt in the same direction it came out so your rifle will function properly once reassembled.
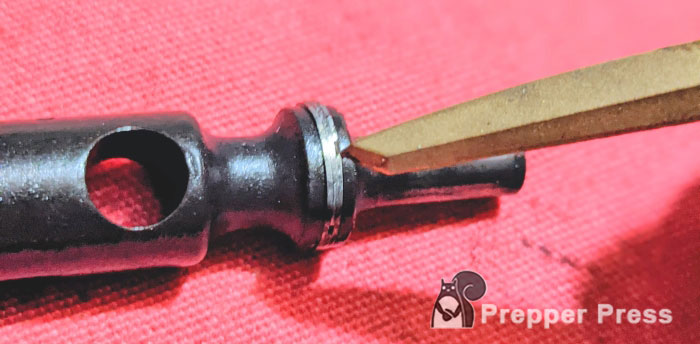
I also don’t pull the gas rings off unless the rifle isn’t running right. If the rifle only partially cycles or “short-strokes” you can start looking at the gas rings. There are three gas rings; you can see them as a slim silver band towards the rear of the bolt body in the picture below. If you need to remove them, use a dental pick or something similar to pry them out of the groove, then peel them out one by one. These rarely need to be replaced unless the rifle is seriously malfunctioning, so I generally leave them alone.
If you need to re-install new gas rings, be sure the gaps the in rings are staggered and do not line up; this ensures a proper gas seal.
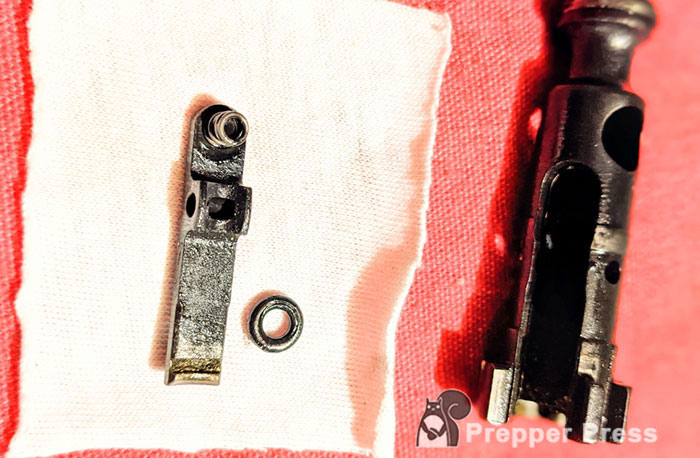
Back to the extractor! The extractor houses a couple extra parts: the extractor spring, the extractor spring buffer that resides inside the extractor spring, and usually a rubber O- or D-shaped ring that sits around the extractor spring. This O-ring really crutches the extractor spring in the power department, and it’s easily retrofitted if yours doesn’t have one.
You can source them from multiple sources, and they’re usually very inexpensive – find them here for three bucks. Or you can order up a brand new extractor kit for not much more. You should absolutely have an extra extractor – just in case.
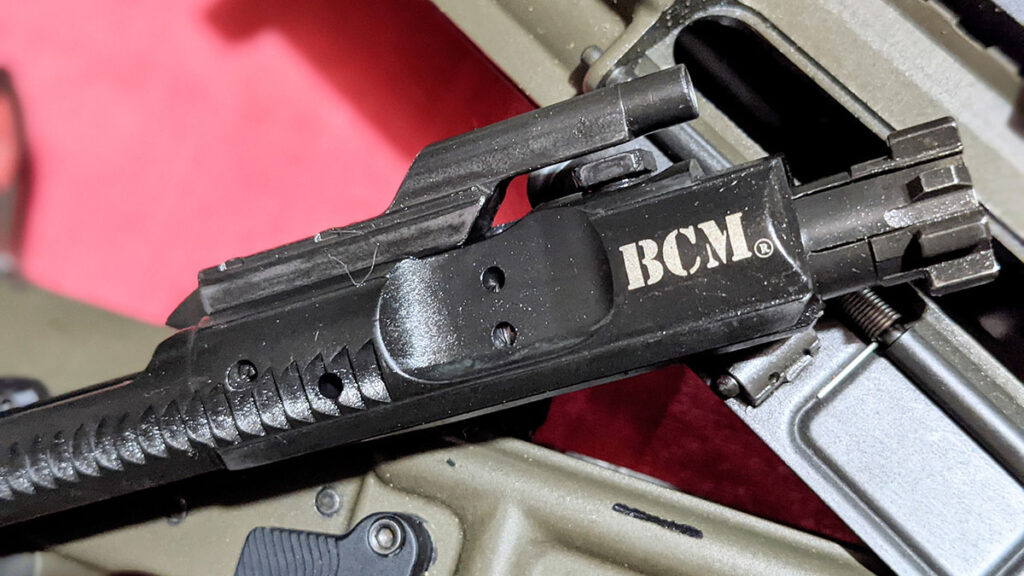
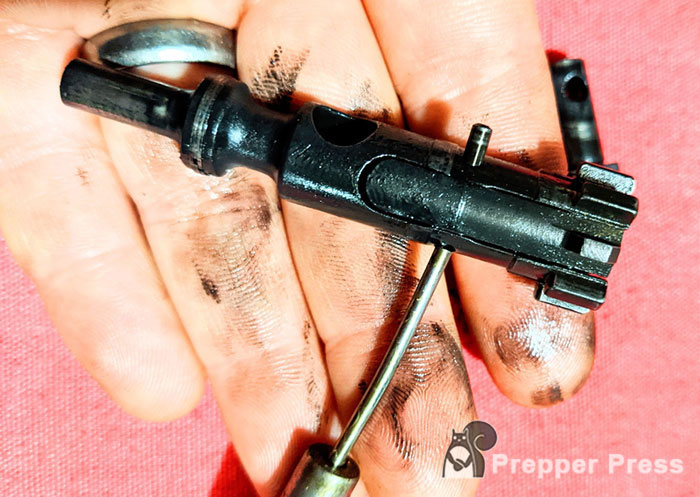
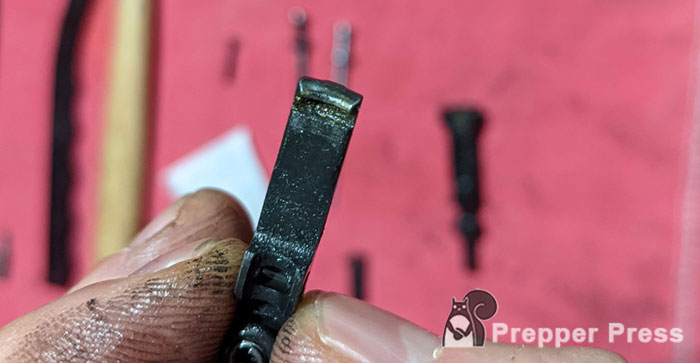
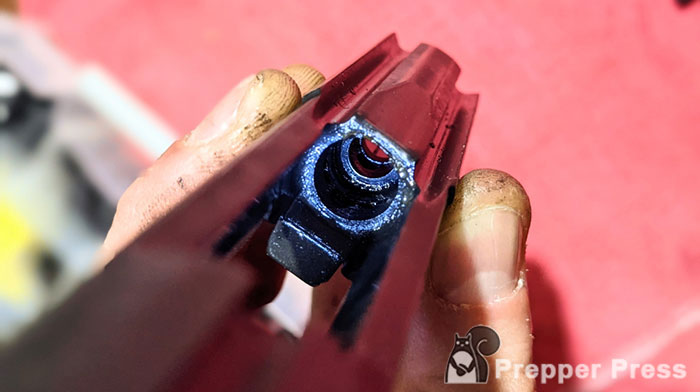
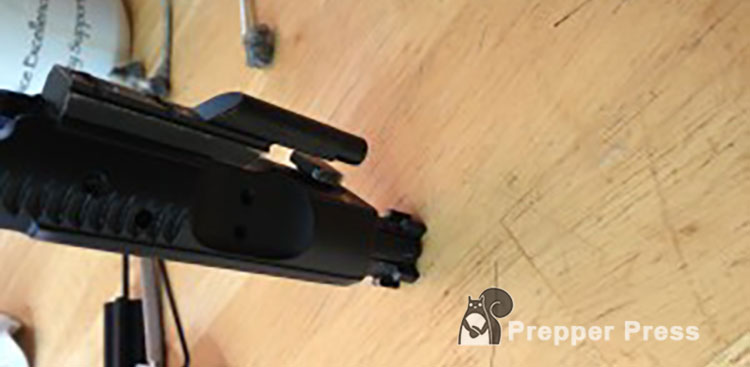
Another item, the last part of the bolt, is on the carrier body, and it’s called the bolt carrier key. It’s held in by two cap screws that are heavily staked in. You can see it in the first photo of this article, where the Firing Pin Retaining Pin is partially pulled out. This key allows gas into the bolt from the gas block, and the key must be sealed strongly to the bolt.
Make sure it is secure on the bolt carrier and that you can’t see daylight between the bolt carrier body and the key. If you can, it’s wasting action gas and needs to be replaced. But if it’s not wiggling and if you can’t see daylight under it, leave it alone.
How to Clean the Bolt Carrier Group
Cleaning the bolt carrier assembly is relatively easily once disassembly is complete. As a direct gas impingement system, hot gases and carbon from the cartridge firing are directed right into the body of the bolt. As such, the bolt carrier group gets very dirty very quickly. With all the crud being subjected to lots of cycles and lots of heat, carbon quickly builds up and hardens inside the bolt.
If the BGC is not properly cleaned, carbon builds up to the point where the firing pin won’t work properly, or the bolt may not go fully into battery. Therefore, it is imperative we do a little bit of extra maintenance inside the bolt while it’s apart. Gas piston AR guys don’t have to worry as much about carbon buildup, but it’s still important to keep the innards of your AR bolt carrier group properly clean.
Let’s start with that extractor. The groove in the underside of it catches the rim of your case and pulls it out of the chamber. If that groove has crud built up in it, the extractor cannot properly grasp the rim of your expended cartridge, and you will have a failure to extract, probably followed by the next round from the magazine being fed into the back of the case that didn’t extract. And that, my friends, is a whole lot of suck.
We can prevent that from happening by simply cleaning the extractor groove. Take a small screwdriver, a toothpick, dental pick, whatever – and scrape the gunk out. Use a Q-tip with powder solvent to break things loose if it’s really built up.
Use a Q-tip or two and clean out the extractor cutout in the bolt body for good measure. I will put a very, VERY light coat of oil or none at all in the extractor cutout. Oil attracts dirt and grime, and dirt and grime will impede the extractor from properly actuating in its cutout. I do, however, put a drop of oil in the hole the retaining pin goes through, so it will pivot freely when assembled.
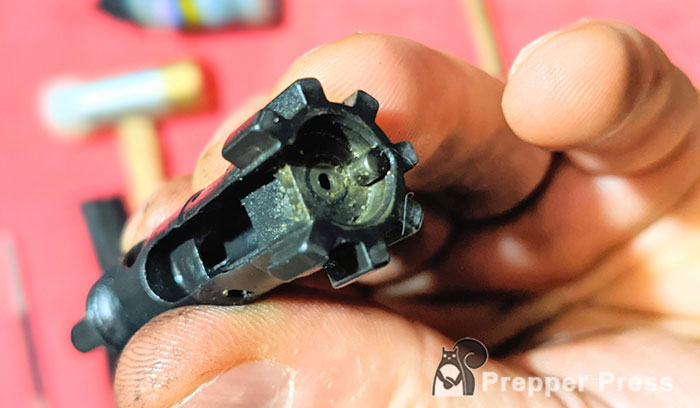
When cleaning the bolt, you need to get all the built-up hardened carbon off the “tail” of the bolt. I soak it down with Hoppes # 9 or a cleaning patch, then scrape it away with a small screwdriver. This is one of the important areas on an AR bolt: if this is allowed to build up with carbon, it will eventually impede backwards progress of the bolt in the carrier body, and the gun will not function. Use a Q-tip and clean out the hole for the bolt cam pin, and all the locking lugs on the head of the bolt. Clean the bolt face as well.
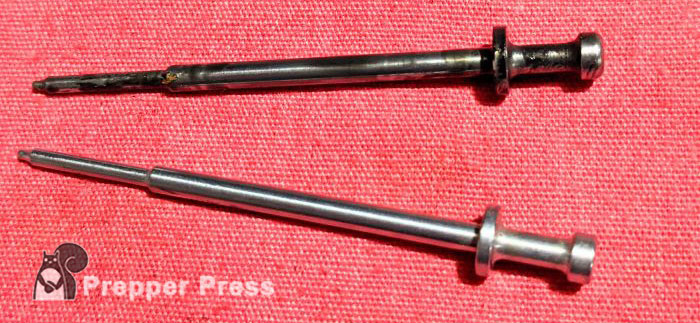
When cleaning the firing pin, make sure all the carbon is cleaned off. Again, if it’s loaded up with grime, it doesn’t free-travel inside the bolt and the gun will not function.
When cleaning the carrier, pay special attention to the areas inside. Carbon builds up like crazy inside of the carrier, and it all needs to get out. I soak this puppy with Hoppes or other solvent for a few minutes, scrape it with a screwdriver or dedicated bronze scraper, and usually blast the carrier’s innards right out with Gun Scrubber or non-VOC brake cleaner.
I make sure the bolt is nice and dry, with no cleaning solvent residue anywhere, inside or out. I will usually heat the big parts – bolt and carrier – up inside my oven (don’t tell my wife) at about 170 degrees or so to open the metal’s pores up, then I’ll use Militec-1, FrogLube, or a similar high quality metal-penetrating lube oil lightly on these parts, inside and out.
I let them cool completely to close the pores, then thoroughly dry off the excess, with just a light coating of lube on the outsides of the parts – enough to leave a fingerprint in the coat of oil when you touch it. The main thing is not to leave enough lube on the parts to attract dirt, sand, etc., but to have enough for the parts to not wear as they actuate, nor corrode if they sit for a while.
I put a drop of high-quality gun oil on the bolt cam pin as well. I like to leave the firing pin clean and dry, with no lube on it to attract anything that will impede its moving freely.
How to Reassemble the Bolt Carrier Group
Reassembling the BCG is kind of a reassemble-in-reverse-order setup:
- Re-install the ejector, spring, and its pin (if you pulled them),
- then the extractor and its spring, buffer, and O-ring.
- Put the bolt back into the bolt carrier, making sure the extractor will be facing the ejection port of the rifle once it is installed. This is important for the function of the rifle. If the bolt head is in 180 degrees off, the ejector will punch the fired cases back INTO the rifle instead of out of the ejection port. This is undesirable, for obvious reasons.
Insert the bolt cam pin as you took it out, rotate it 90 degrees so it will clear under the gas key, and then slide the firing pin into the back of the bolt. Make sure the firing pin slides back and forth freely, then install the Firing Pin Retaining Pin into its recess in the side of the bolt carrier.
The bolt should slide back and forth, and rotate freely in the carrier, with some resistance from the gas keys sealing. To test if the gas rings are still good, extend the bolt fully out of the carrier, then set the bolt face down gently on a table or flat surface. Gravity should not let the bolt carrier slide down on the bolt; it should stay fully extended. If it does slide down, it’s possibly time to replace the gas rings on the bolt body.
That’s about it! Re-install the bolt and charging handle in your rifle, and make sure everything functions as it should. Then go shoot the hell out of it and get some training!
Questions? Comments? Anything else you’d like to know about the AR platform in an article? Let’s hear it in the comments below!
Stay safe!
16 comments
Good article thanks for the links!
Good article, lots of pictures, but I don’t know that everyone need an AR.
I seriously like my HK-93. I think it’s the best 223 rifle ever made.
Kinda strange that the German’s make the best firearms on the planet, but they loose every war they start.
Well done WR. I am not a fan of the platform but there is no question regarding it’s proliferation and usefulness in both good and bad scenarios.
You can take that bolt down with the point of a 5.56 bullet(I keep a M-193 dud on my bench to do just that). The best lube I have ever used is good old LSA . I have shot 600 rounds in a day thru an M-16A1(I hate to think how long ago THAT was) and still had the “gunk” suspended in oil. AND! RW You were right; that M-4 feed ramp make a serious change in the feed reliability V. the old A1’s. The 5.56 M-193 still sucks past 300 meters, but I just put 300 Rds. thru an A4 without a hiccup . I’d still want to carry my M-1 NM if TSHTF but that “improved” AR is a far cry from the rifles I trained with in the 70’s
Ray, I’m going to have “‘RW, You were right’ – Ray” printed up poster size and framed. 🙂
I’ve never liked the ergonomics of the HK platforms (though slapping the charging handle down to get it into battery is VERY satifying).
I definitely respect everyone’s choice in firearms…what you’re comfortable with is what you’re going to be most effective with.
I am just of the opinion that since everyone and their grandmothers owns an AR-15 now, and with the current market glut of cheap, high-quality ARs, it would be a pretty smart idea to have one at least stashed away, since parts and accessories such as magazineswill be much easier to find than, say, new mags for your HK93.
I concur, Ray.
Back in my Army days, I was always told to make sure the gas rings don’t have their gaps lined up.
EXACTLY — SOP
Nice write up. I love the platform, maybe because I learned how to shoot with it. There were days I put over one thousand rounds through it without a hiccup or cleaning, granted it was cleaned to perfection by me beforehand. They are plentiful, light and accurate. I wish I could afford to have about a dozen.
how would somebody go about performing this job, under arctic vortex conditions? (and after dark?)
the SHTF armorer/gunsmith is going to be almost as important as the SHTF medic/doctor. how is she/he going to get paid in the coming dark age?
one chicken in exchange one thorough BCG cleaning?
There would no no combat in an arctic vortex. Besides that the military has a different protocol for cleaning rifles in the field.
I have a colt ar 15a3 tactical hbar , i learned from my father a vietnam vet to keep the “mickey mattel”, clean and lubed, not surgically clean, but clean. Its the best investment i made. With proper hand loads and some good factory pmc 55 gr fmj ammo i get sub 1/4 groups at 100 yds.
Great write up! The only thing I will say is that IF you buy an AR from a high quality manufacturer and IF you use a silicone based lubricant like EWL 2000, you will not need to worry about cleanliness or buildup. I run dirty and wet ALL the time with no malfunctions whatsoever. Cleaning is super easy and I never need anything more than a toothbrush to remove debris. Check out BCMs write up on their “filthy 15”, an ar that has gone more than 15,000 rounds without cleaning or malfunction!
There’s a lot of people who have bought Lower Parts Kits, trying to figure out the details. And there are those of us who want to take apart our Bolt Carrier Group.
I think if you offered classes through gun shops, gun clubs, rifle ranges, etc., you’d find lots of people willing to pay $20 for a simple class to teach people how to assemble a lower – or replace a bolt assembly on a bolt.
Can’t just go down to the local Community College or police station and ask for a class. Often the stopping point is lack of a particular simple tool. It would be great to have group classes (more people = more money) led by people like the shtfblog Writer(s).