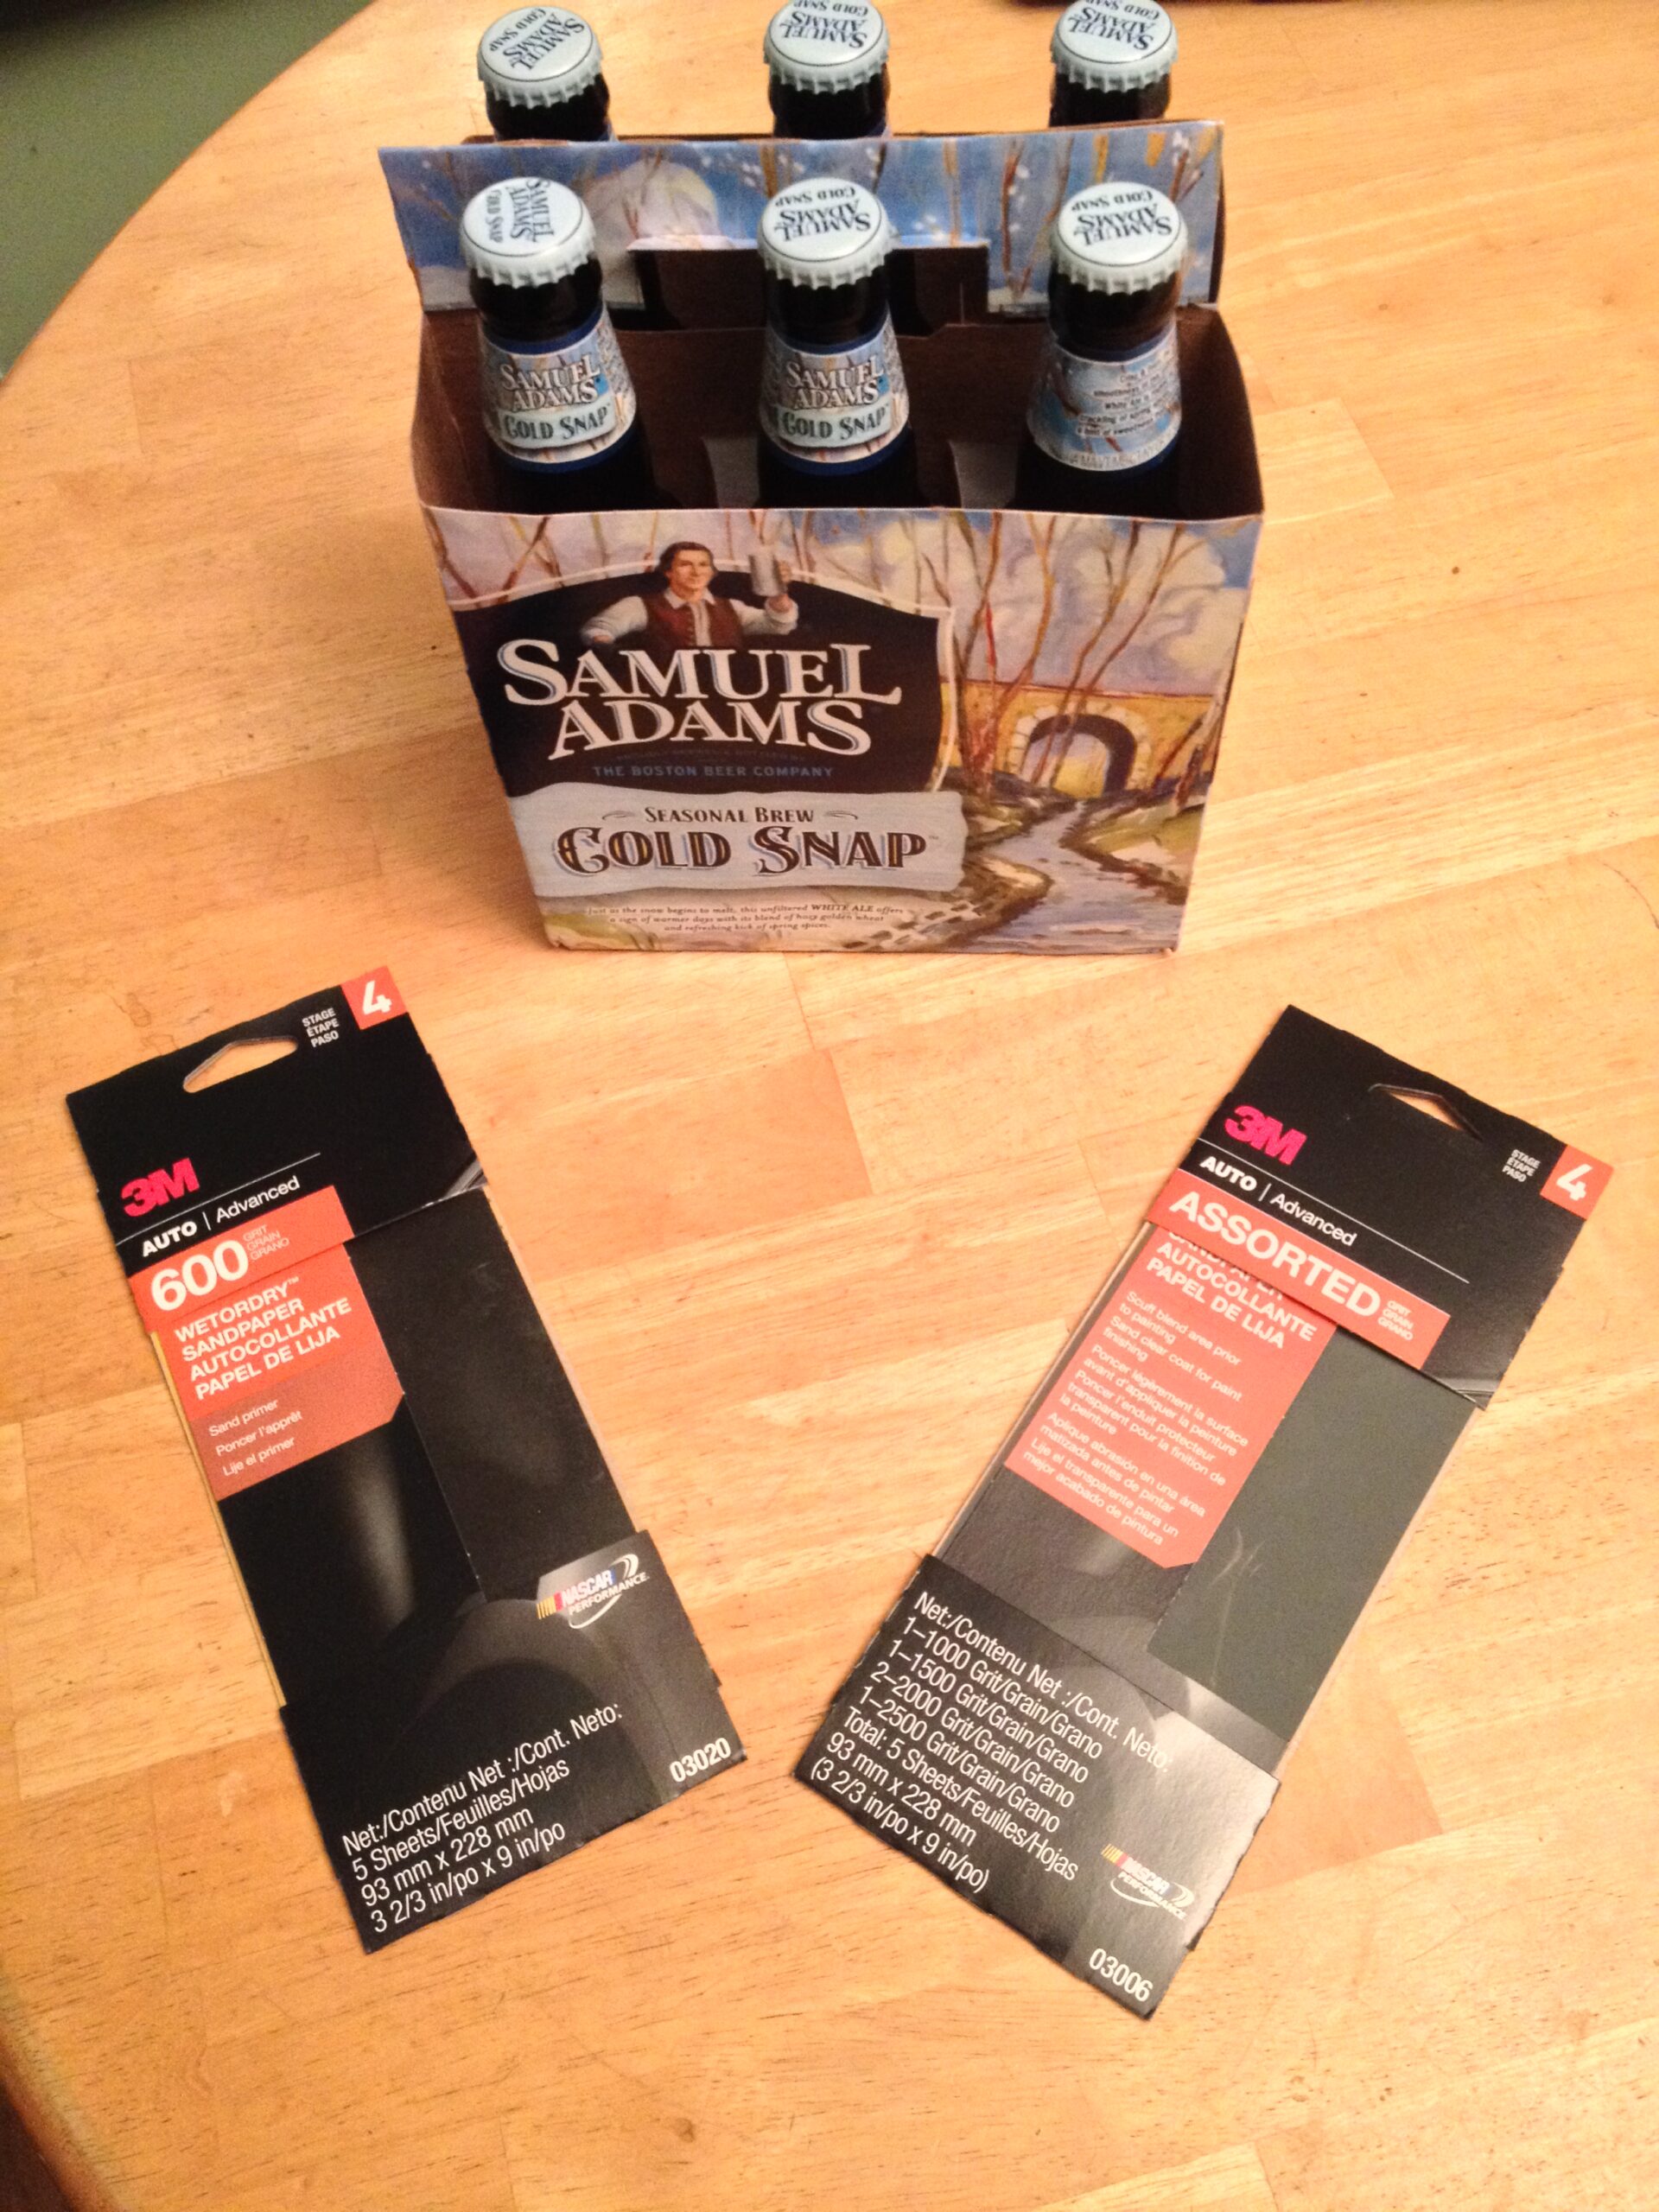
*Price includes a six-pack of a delicious frosty adult beverage.
I’ll admit, I’ve been an AR-15 fanboy for many, many years… even before the crazy modular tacti-cool rush of insanity made the AR-15 the hot-rodded Model A Ford of firearms. I’ve owned a few and shot many; and the one thing I can consistently say I really hate about it is that the box-stock AR-15 trigger sucks.
I mean really, truly sucks. Meant to be a utilitarian, reliable system, it was never designed with glass-rod-breaking-at-three-pounds-of-pressure trigger pulls in mind. However, there are a couple easy tricks we can perform to get the pull at least acceptable.
Improving AR-15 Trigger Pull
Improving trigger pulls usually works as one of, or a combination of three methods:
- Reducing friction between parts where they interact, usually by polishing
- Reducing spring tension, so there is less pressure to overcome for the parts to function
- Changing the geometry of parts and/or surfaces so there is less metal to metal contact. Less contact means less friction.
What we’ll be doing is the first method: polishing certain areas of parts (the trigger, hammer, and disconnector) to reduce friction between them. It’s the easiest method of the three to get a major improvement in any gun’s trigger pull. But it’s also easy to go too far and remove too much material! This can make the gun potentially unsafe or non-functional. The first time I did this on an AR-15 trigger, I polished the disconnector and hammer mating surfaces too much, and the trigger pull off reset could be measured in ounces, not pounds. The gun double-tapped occasionally when I was really trying to work the trigger reset.
Luckily, I was able to go back in and rough up those surfaces a bit with 400 grit sandpaper. It works beautifully (and safely) now. So, if you attempt this, (at your own risk!) go slowly. Take your time. Test your work. If you go too far, replacement parts are cheap. Better to get new parts than use something that could be unsafe or have too light of a trigger pull.
If you HAVE to have a 2-pound trigger pull, the better way of going about it is to order a match trigger from Timney, Geissele, or one of the many other makers. What we want to do is just clean things up a bit, make it smoother.
AR-15 Trigger Gunsmithing
What we’ll be doing is very simple. AR-15s are notoriously easy to work on if you have just a touch of mechanical skill and patience. If you don’t have that, and would like a better trigger pull, bring the gun to a local gunsmith and he will be very glad to help you get your gun safely back in your hands with a great trigger pull.
The Tools You Will Need
To engage in this fun, you’ll need just a few basic things. First, you’ll need sandpaper. I bought a pack of 3M 600 grit sandpaper from Wal-Mart. A variety pack has 1000, 1500, 2000, and 2500 grit sheets. These are under $10.00 per pack. You’ll also need a brass or steel pin pinch of 1/8″ diameter (buy a 9-piece gunsmithing set), a hammer, and some light gun grease. The beer is for afterwards and entirely optional.

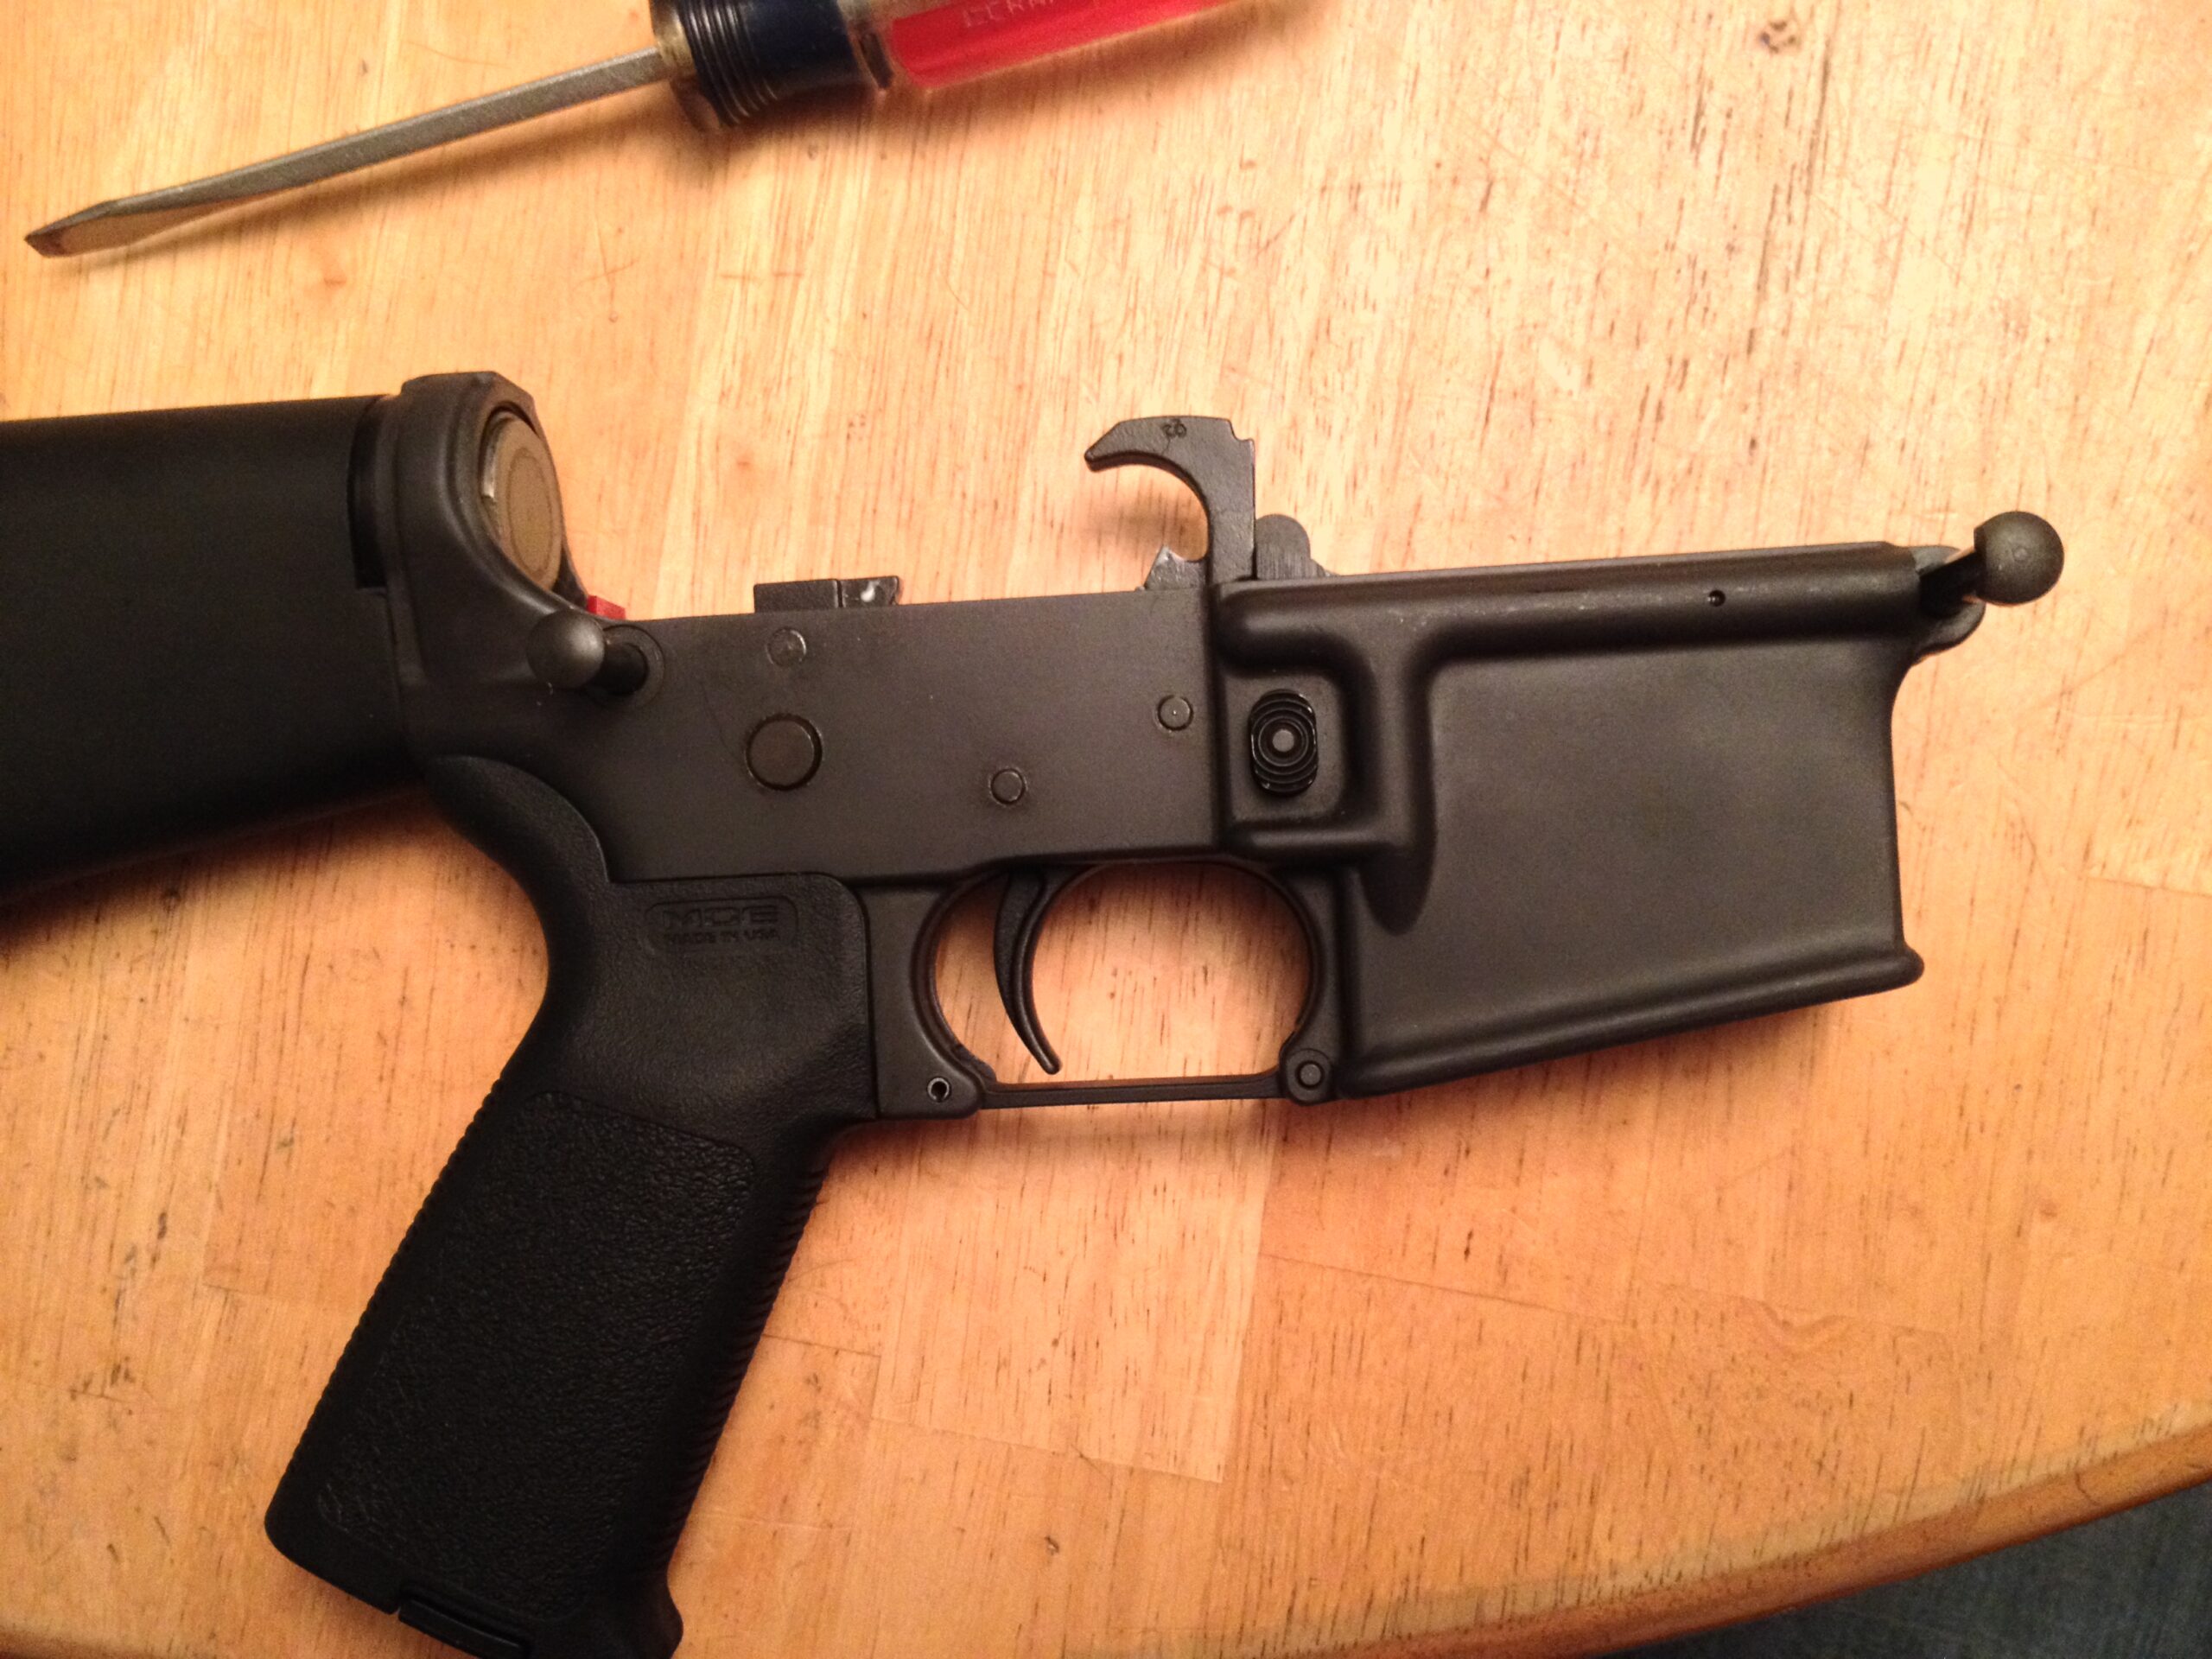
To begin: MAKE SURE YOUR GUN IS UNLOADED. You’ll need to separate your upper and lower receivers. To do this, simply push the forward and rear takedown pins out, left to right (viewed as if you’re holding the gun as you would shoot it).
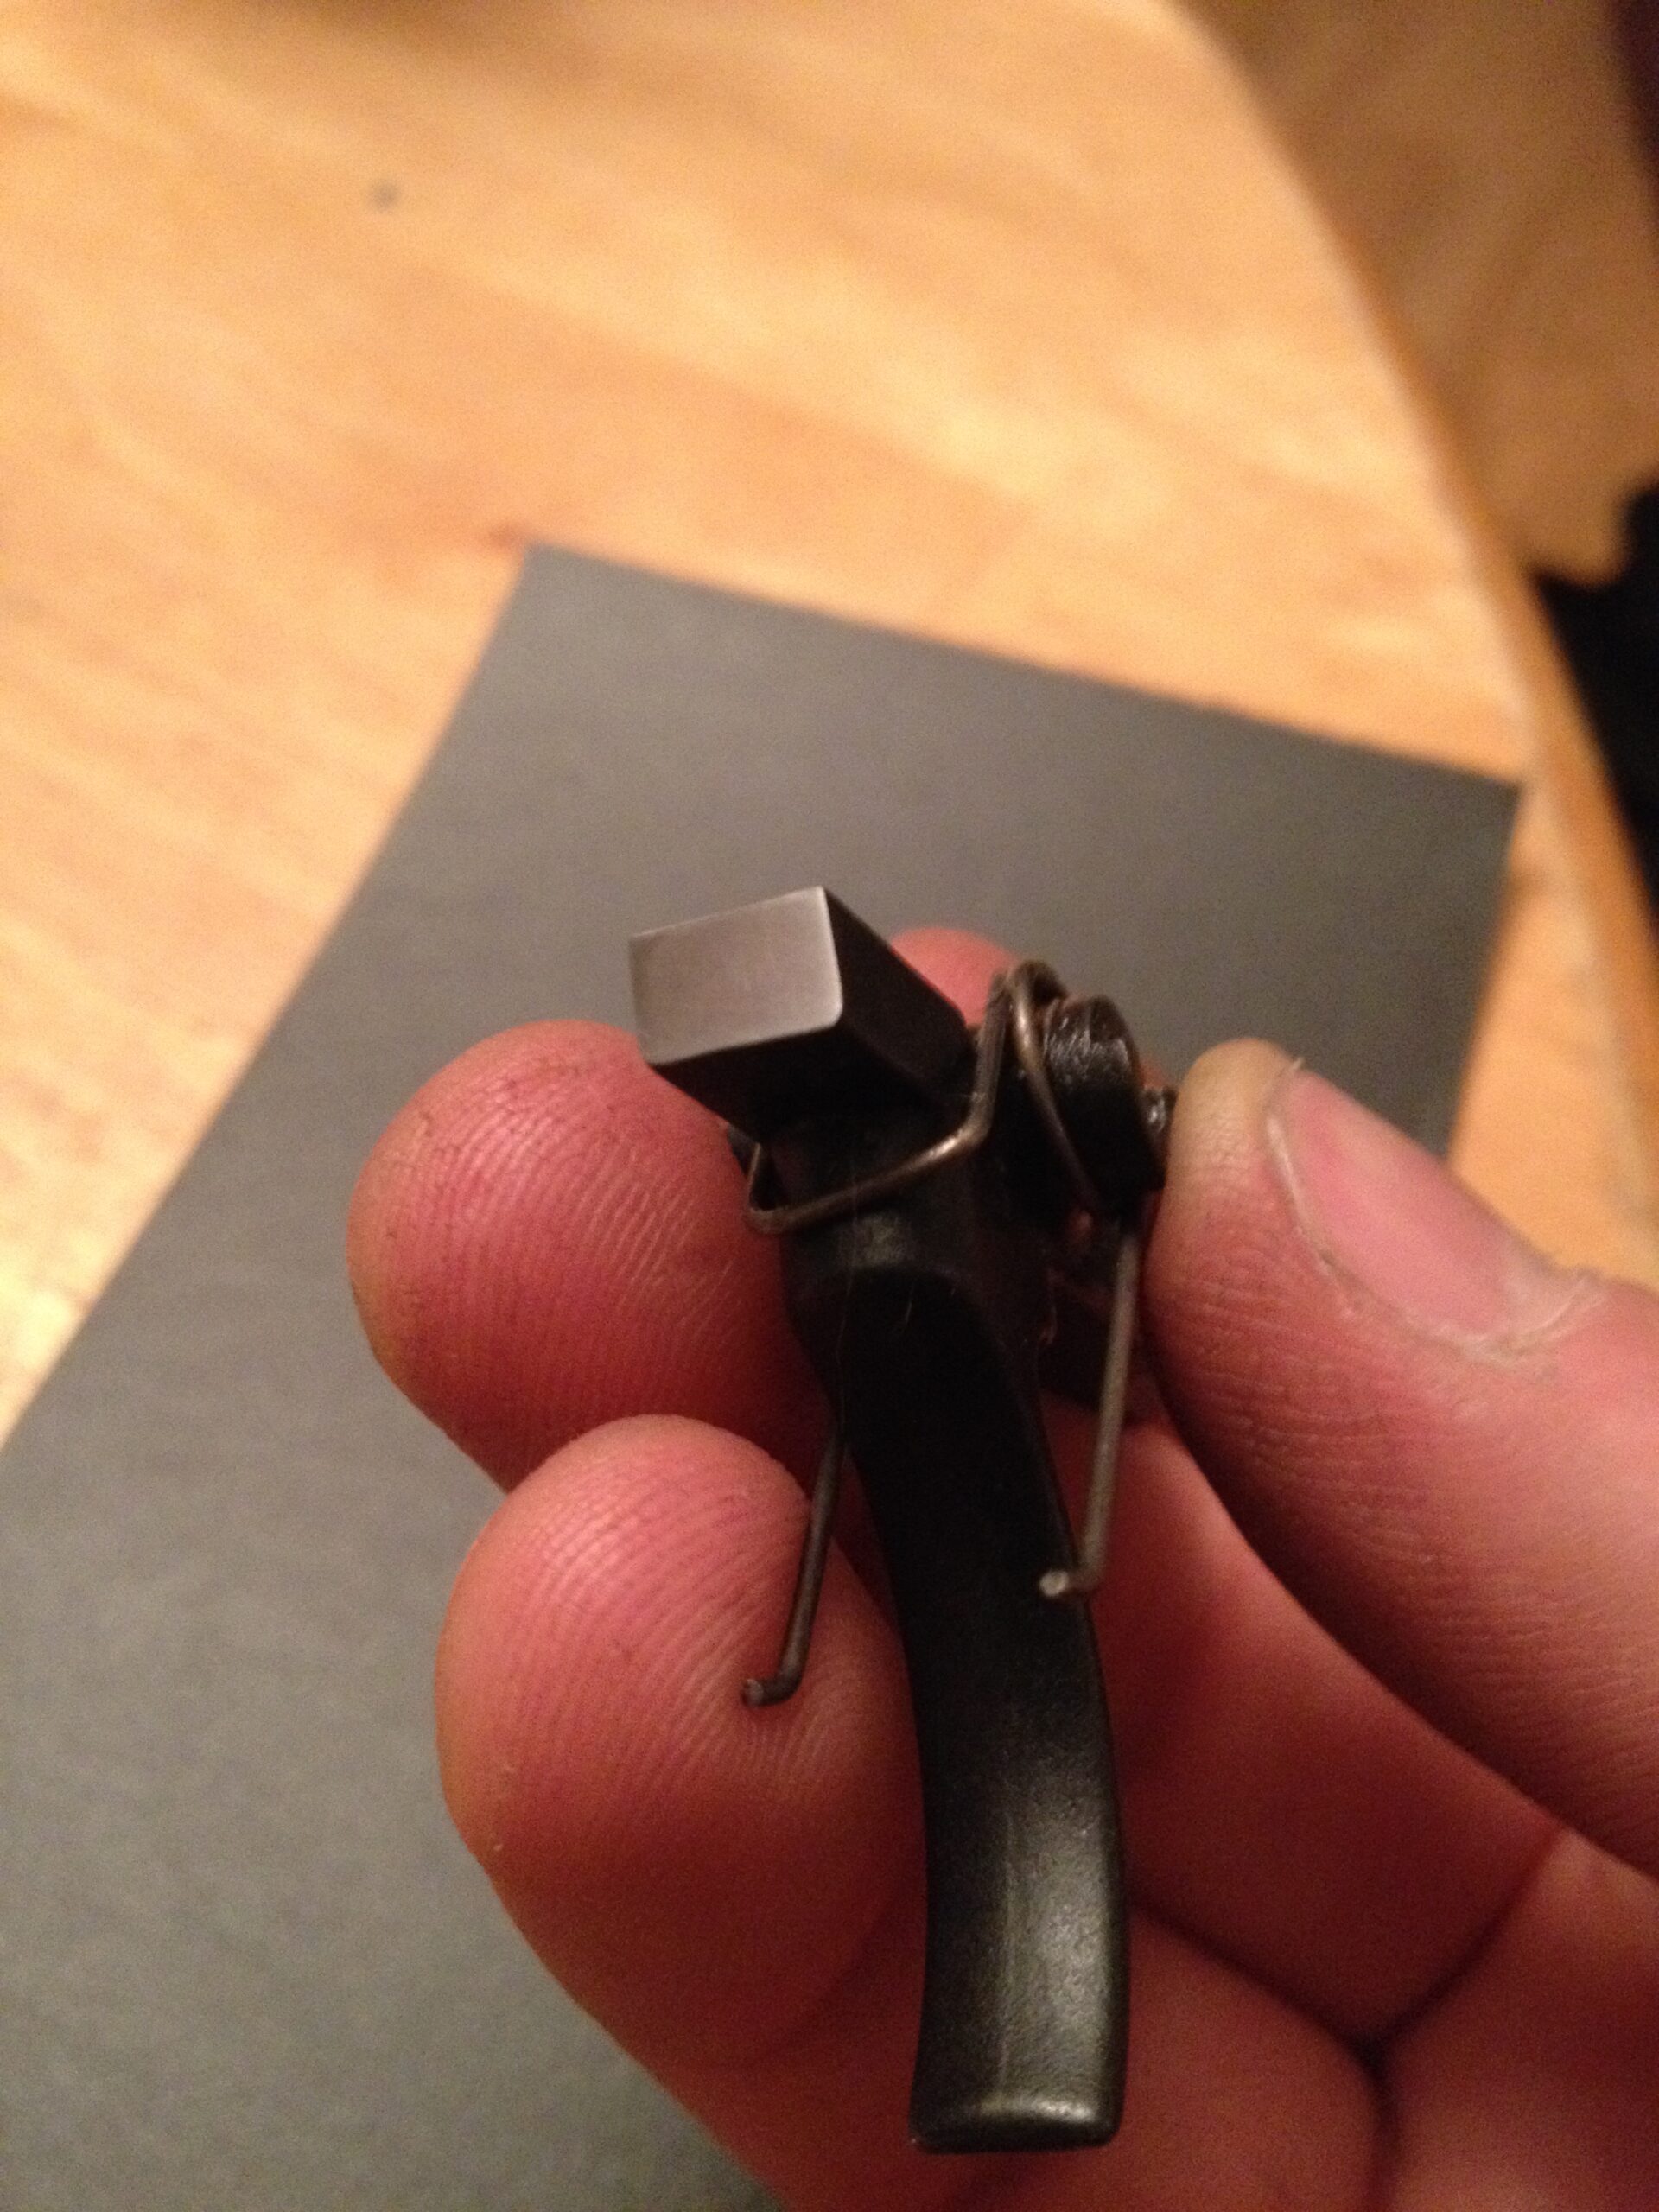
Set aside the upper receiver. Next, hold your thumb on the hammer (you can see it sticking out at an angle in the above picture). Keep pressure on it, and pull the trigger to de-cock it. Let your thumb control the hammer as it rides forward to its un-tensioned state. Don’t just let it smack forward; it can bang up your receiver and possibly crack it.
Here, you can see the hammer fully forward.
Related: Do You Really Need an AR-15 WTSHTF?
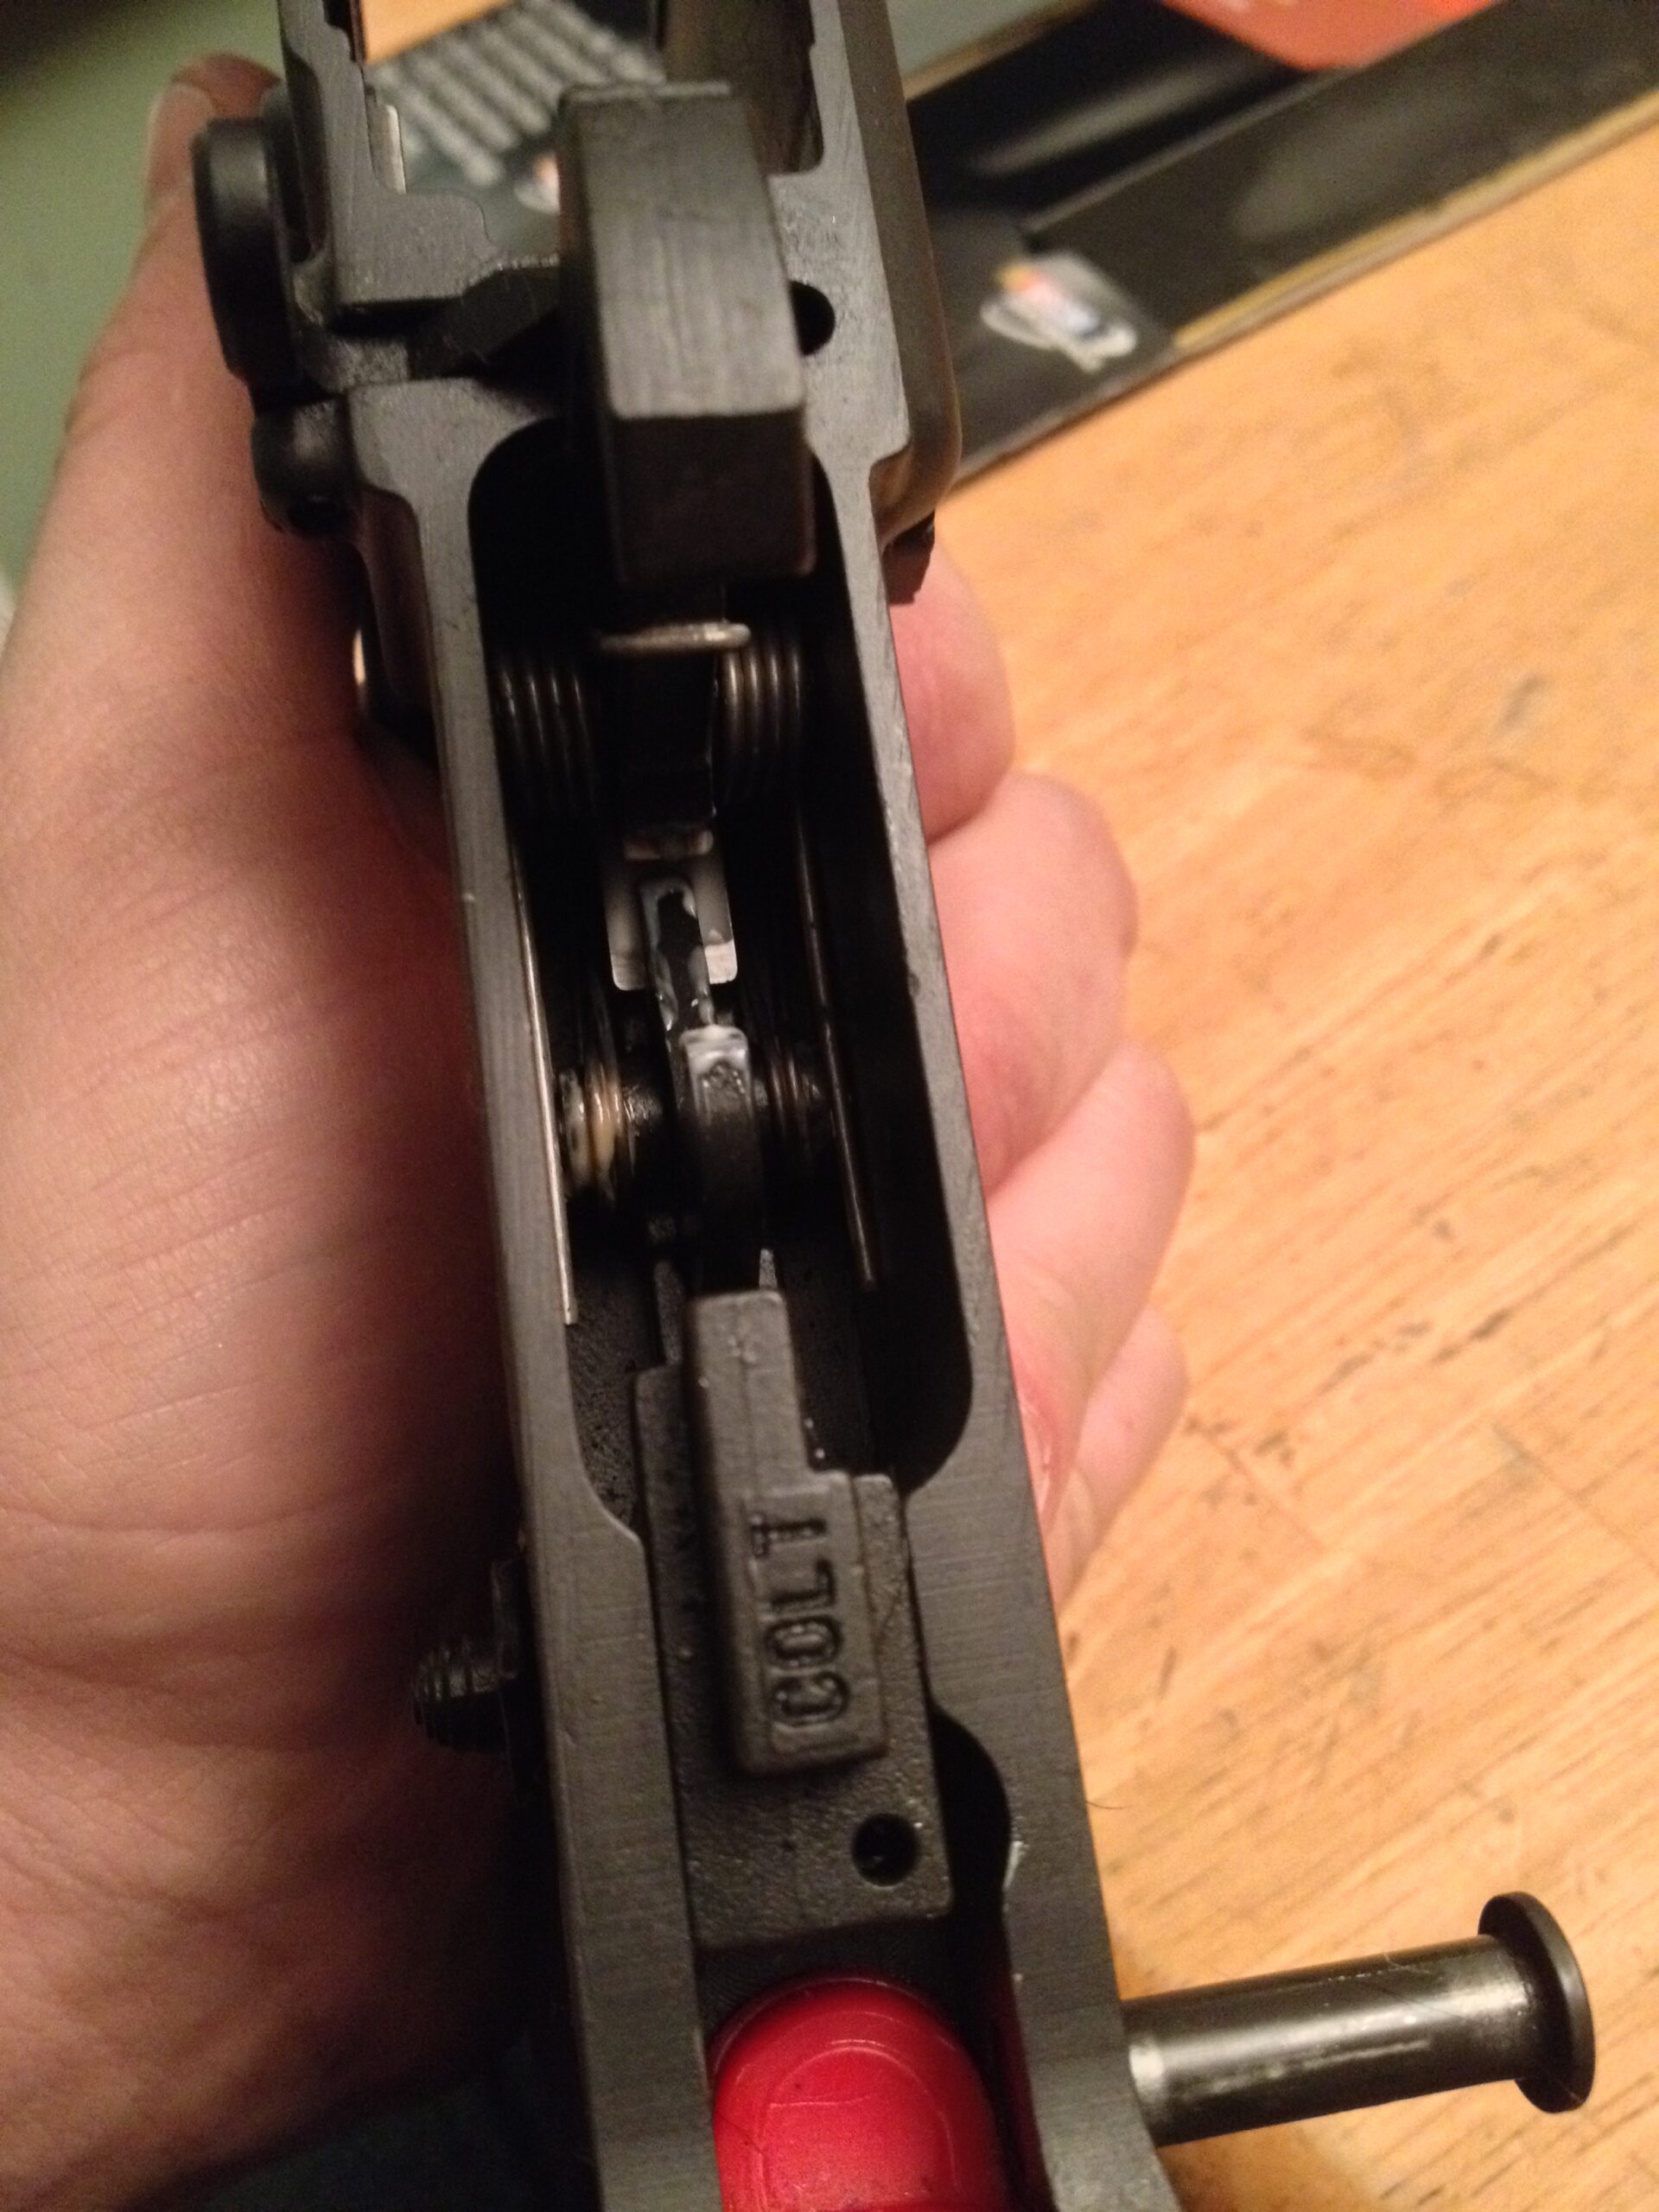
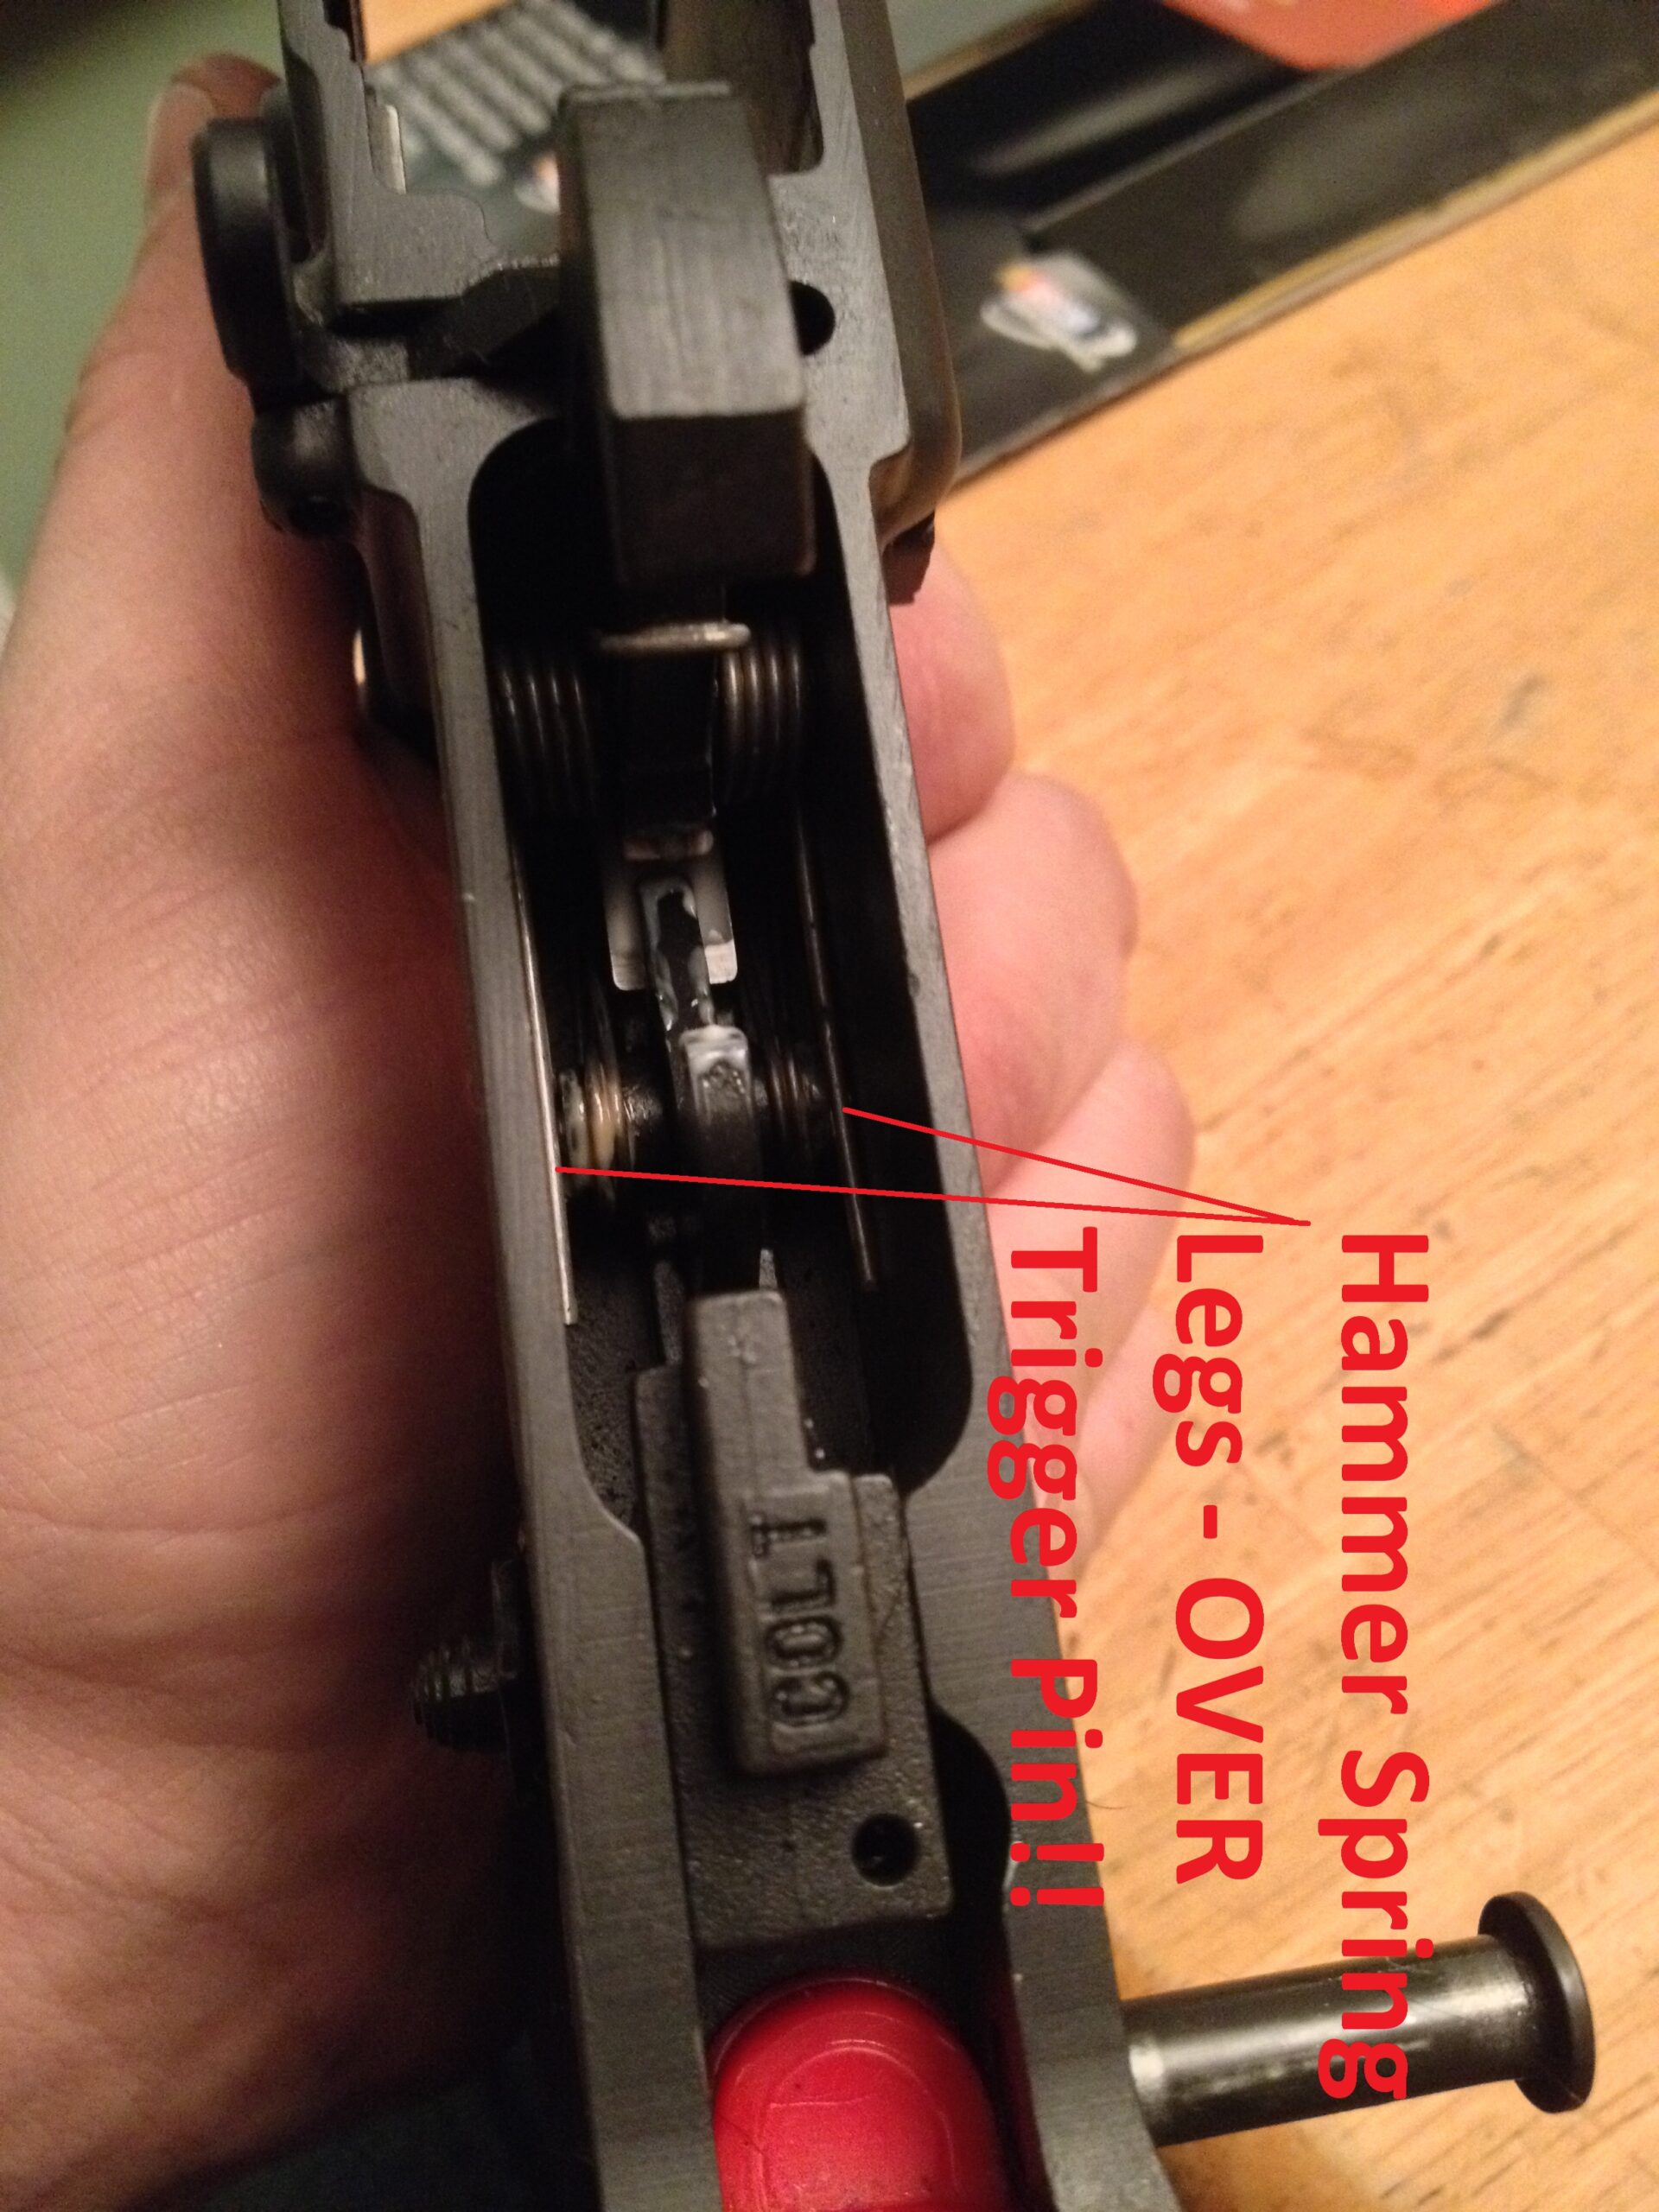
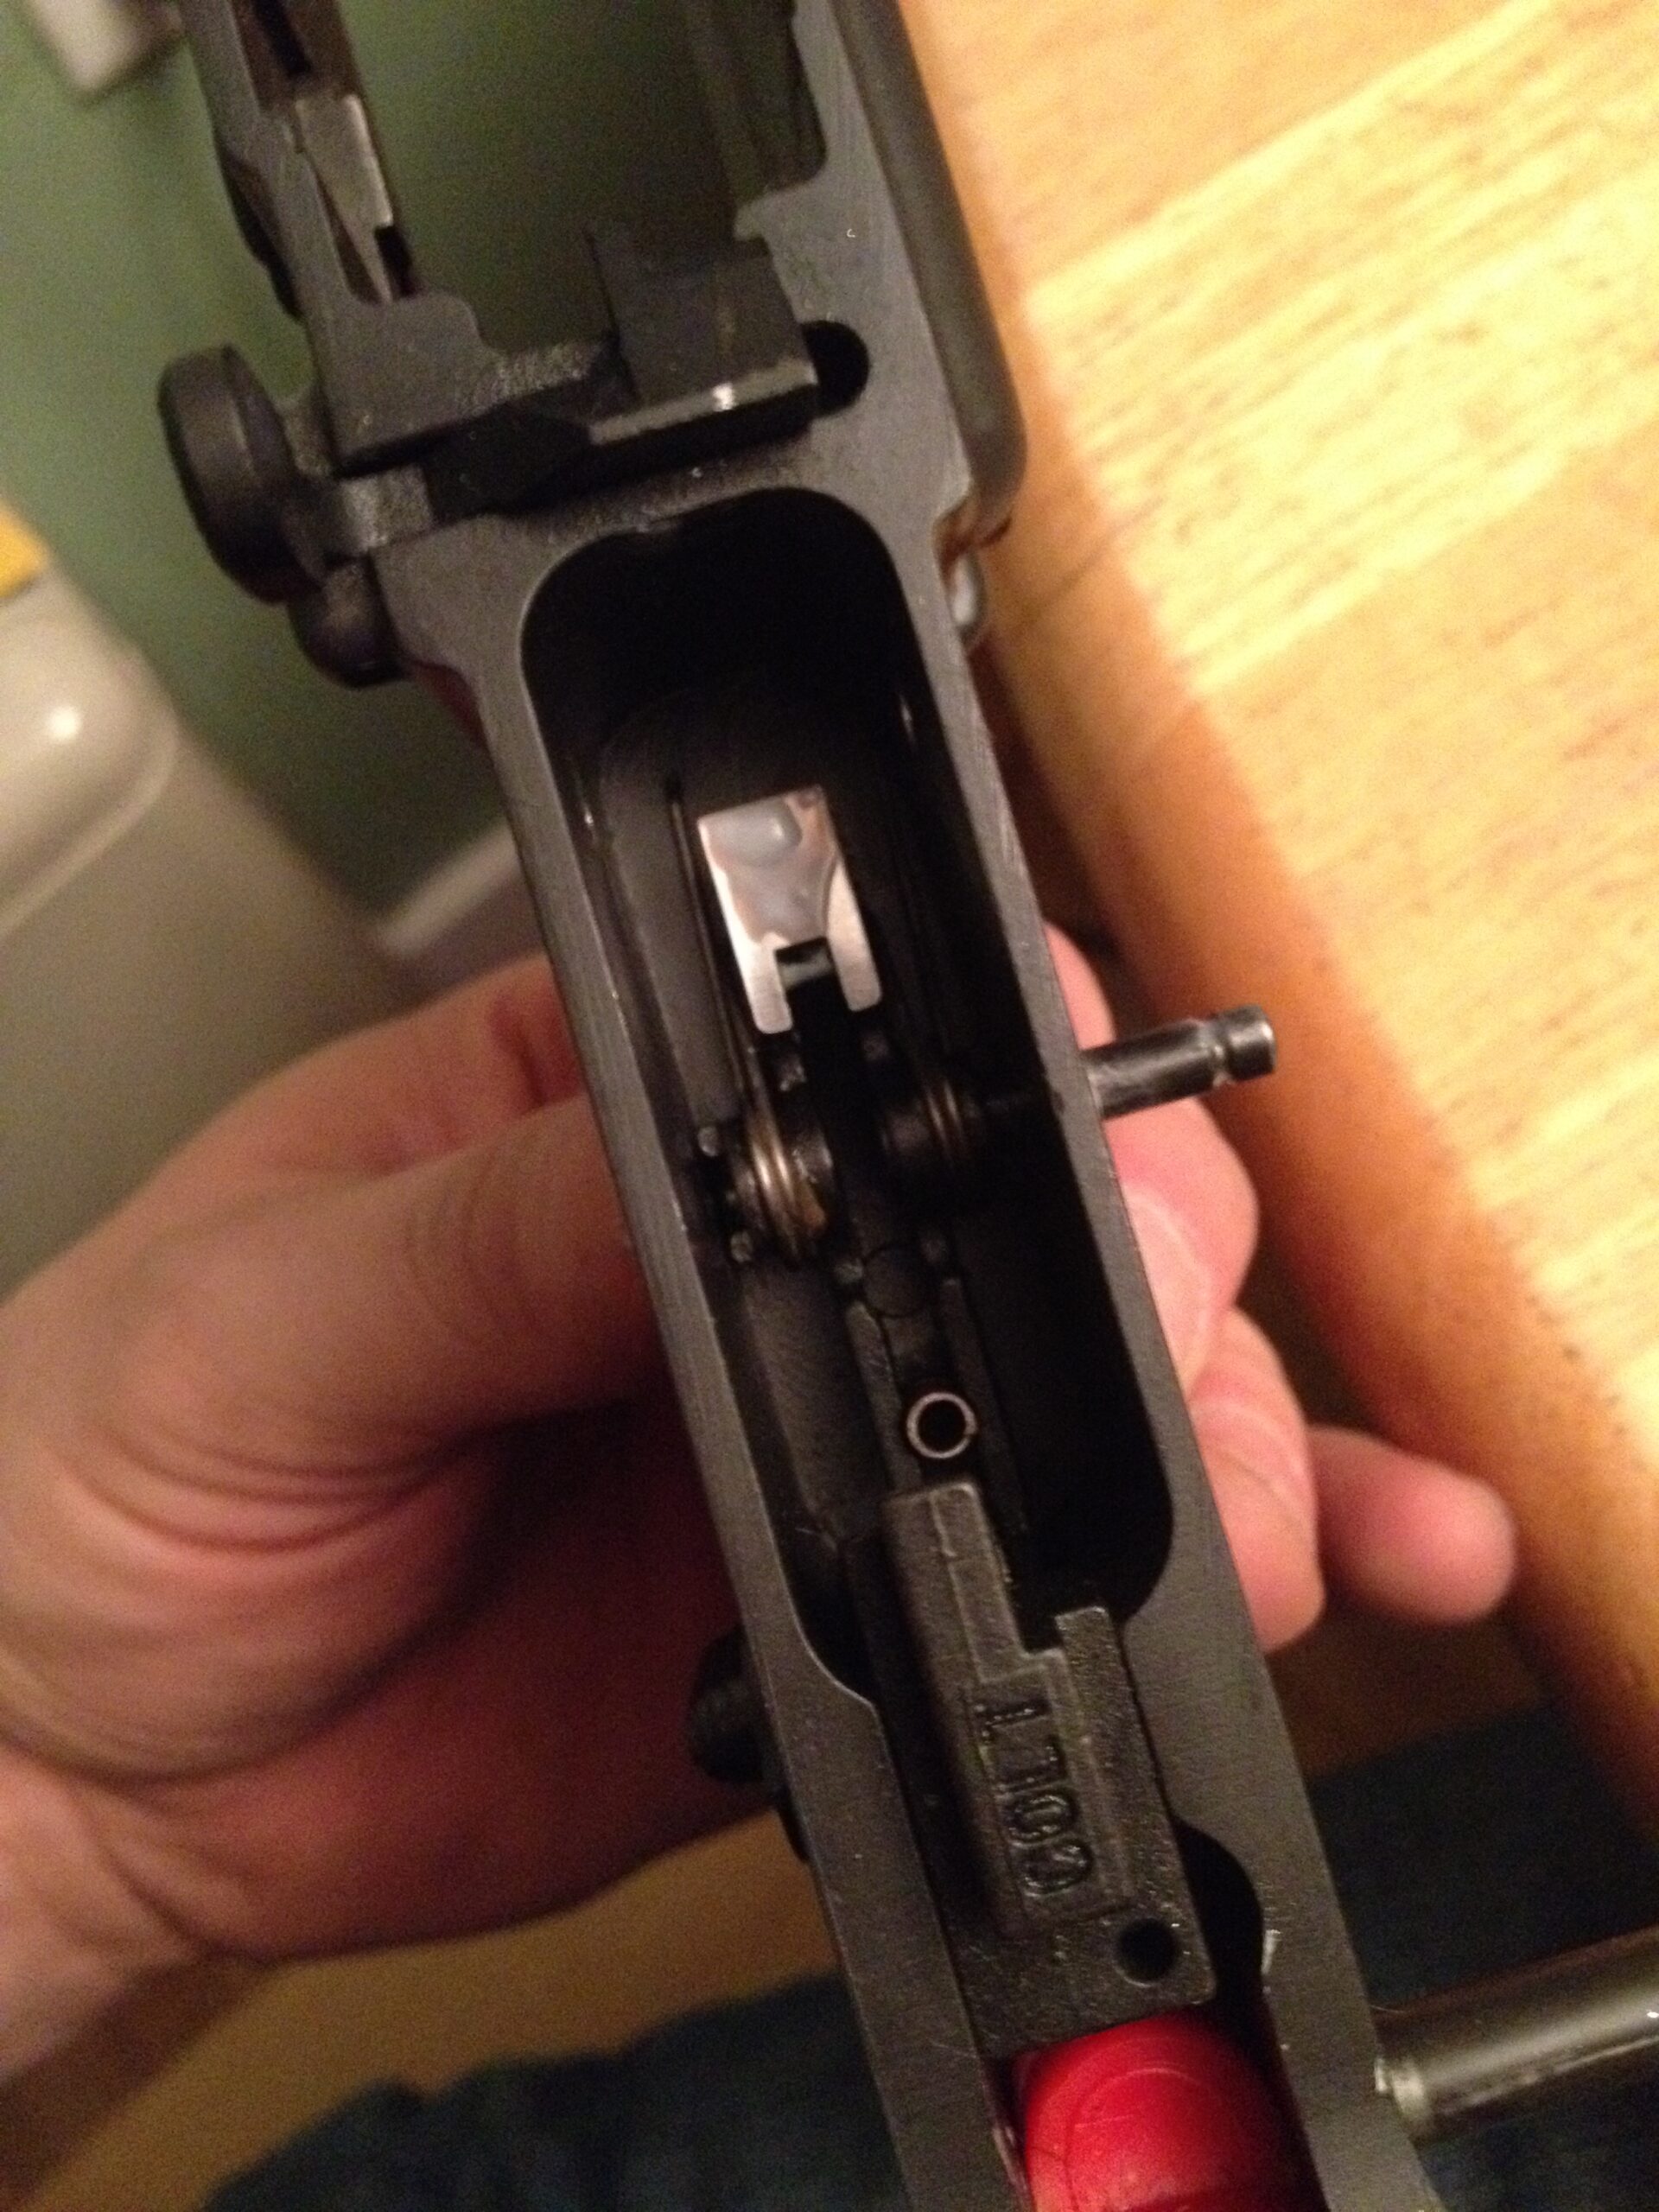
This is where the fun begins. Carefully study the picture below and note the orientation of the springs, etc. I’m including this picture so you can use it as reference. The hammer springs must sit ABOVE the trigger pivot pin when re-assembling the parts: this is pretty important.
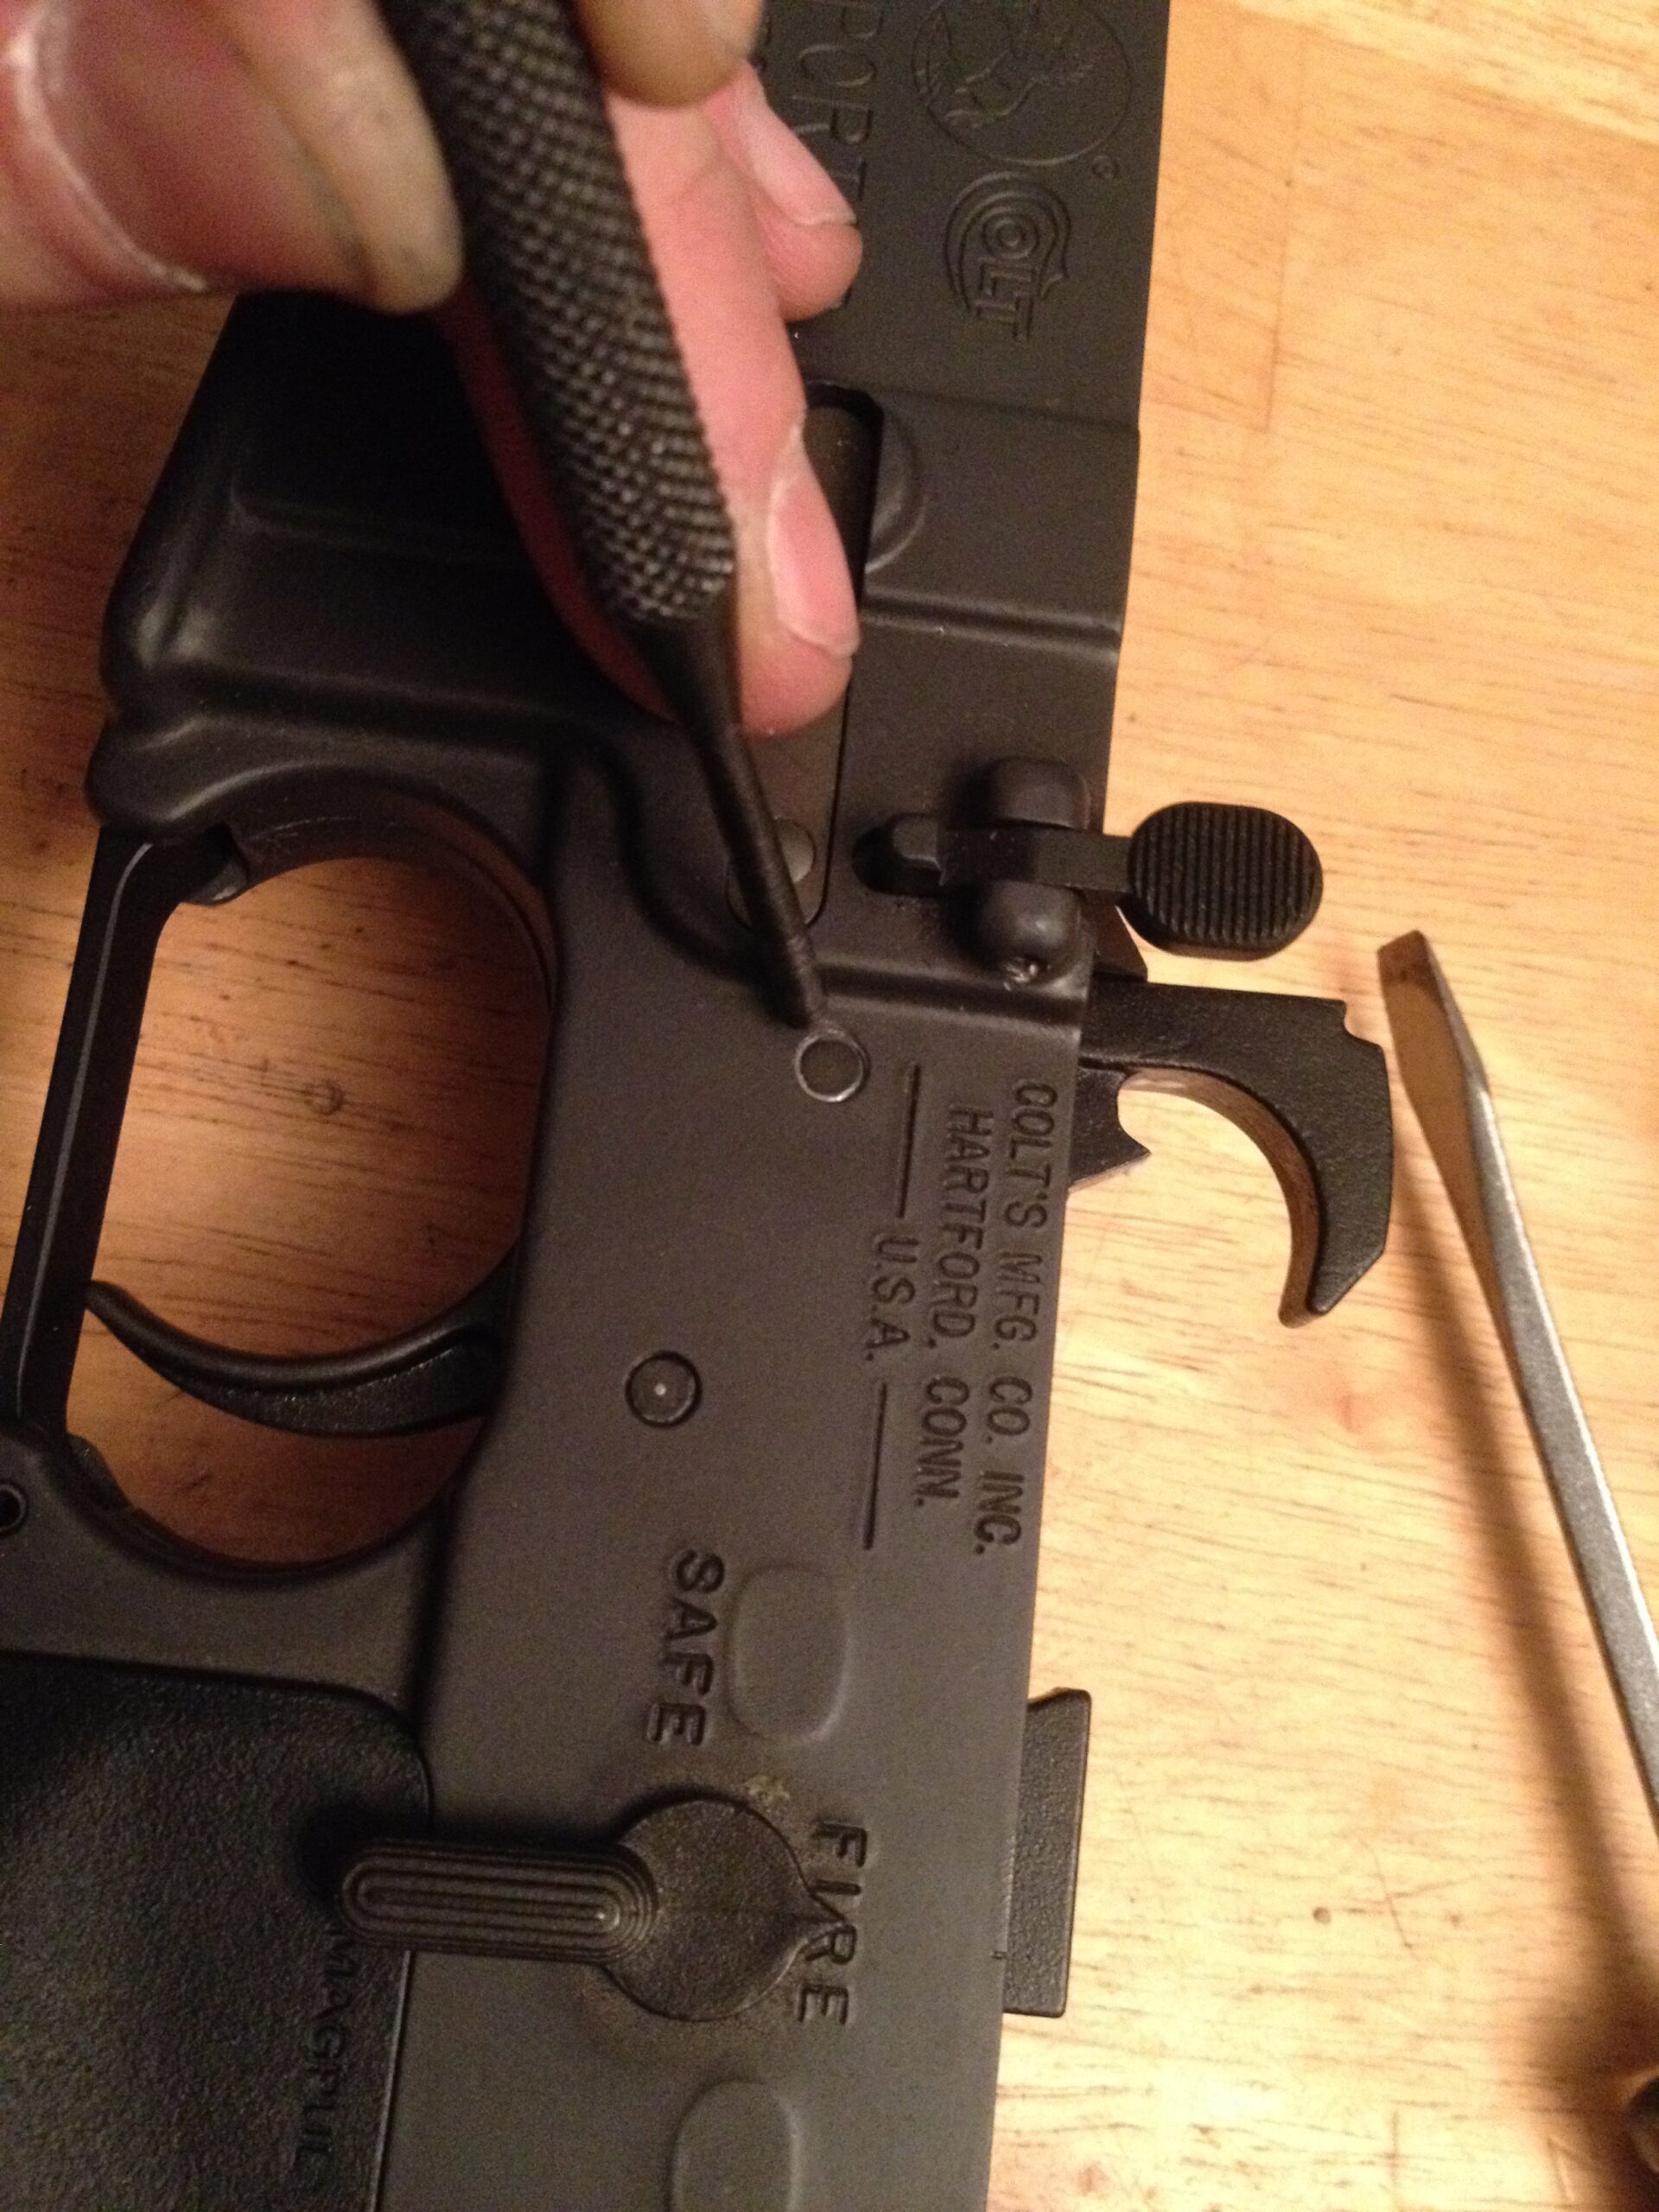
Now grab your punch and hammer, and gently drift out the hammer pivot pin. Be careful! The hammer is under tension and may launch right out of the receiver. Just be ready for it… safety glasses are always a good idea.
This is the guy you want out first:
When you get the pin out, here’s what the hammer will look like:
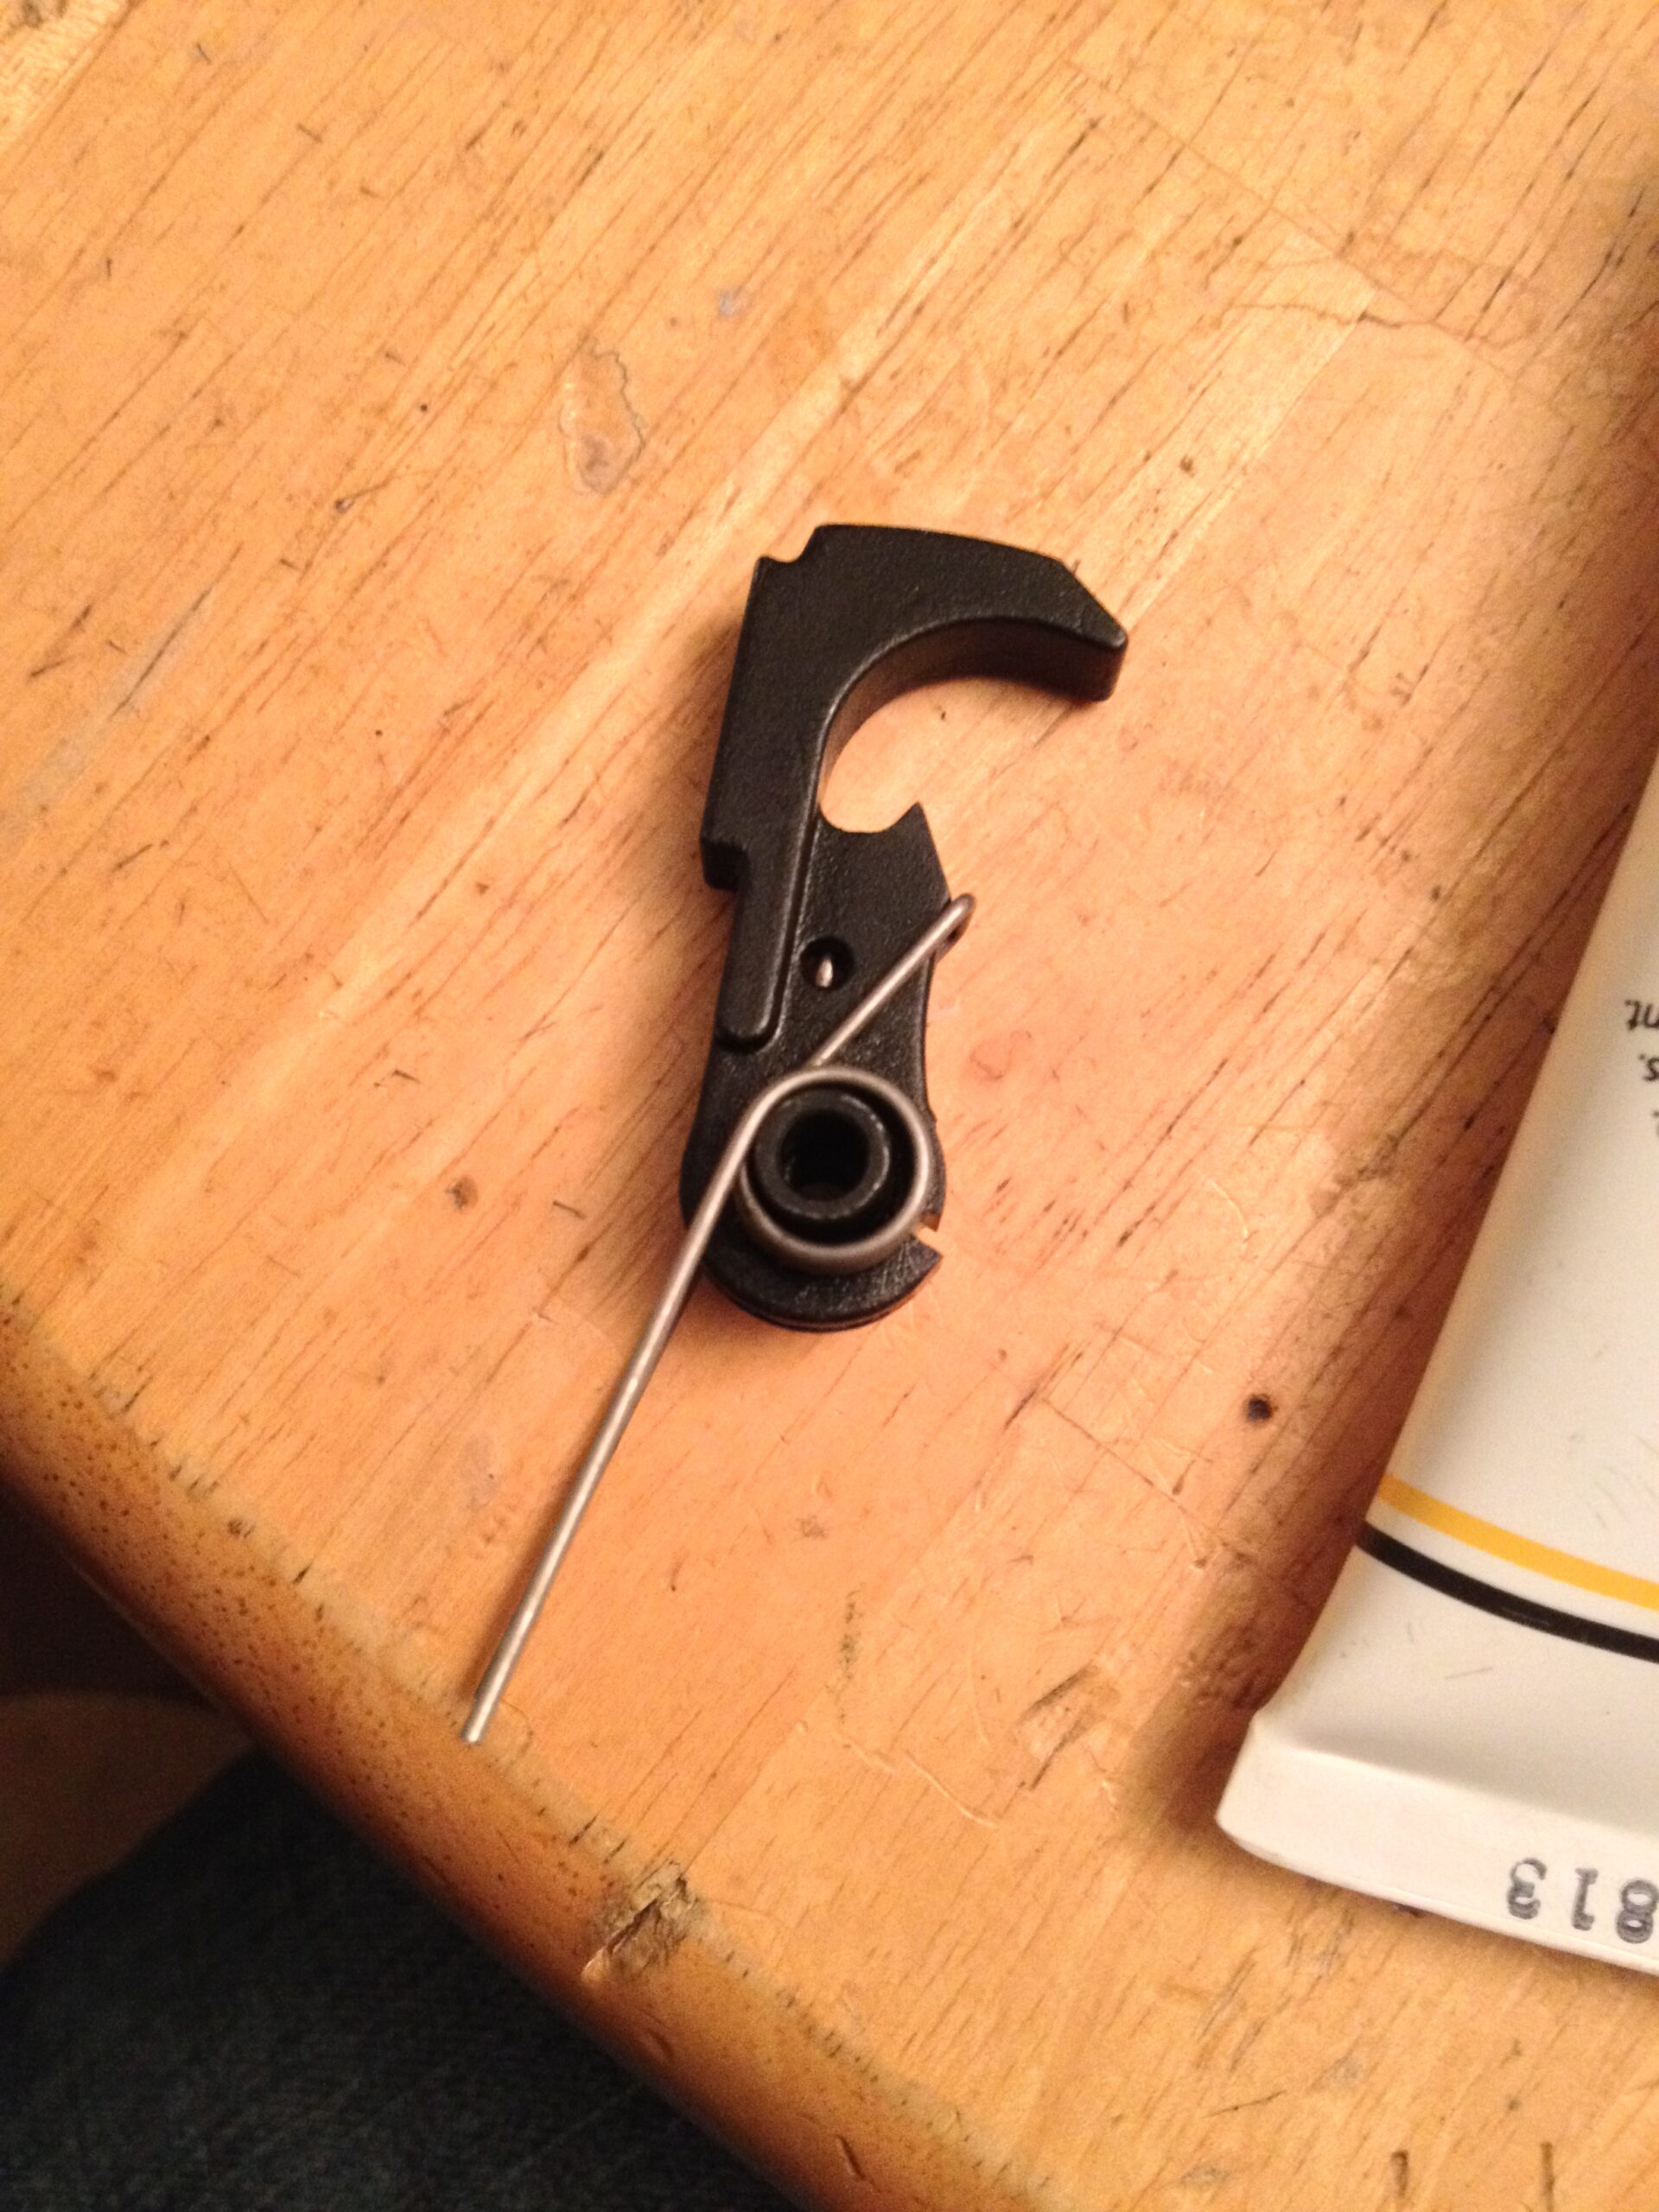
There’s no need to remove the spring. It will move around and you can get it out of the way as you work. Keep it on… it can get twisted and messed up during removal. It won’t hurt anything keeping it on.
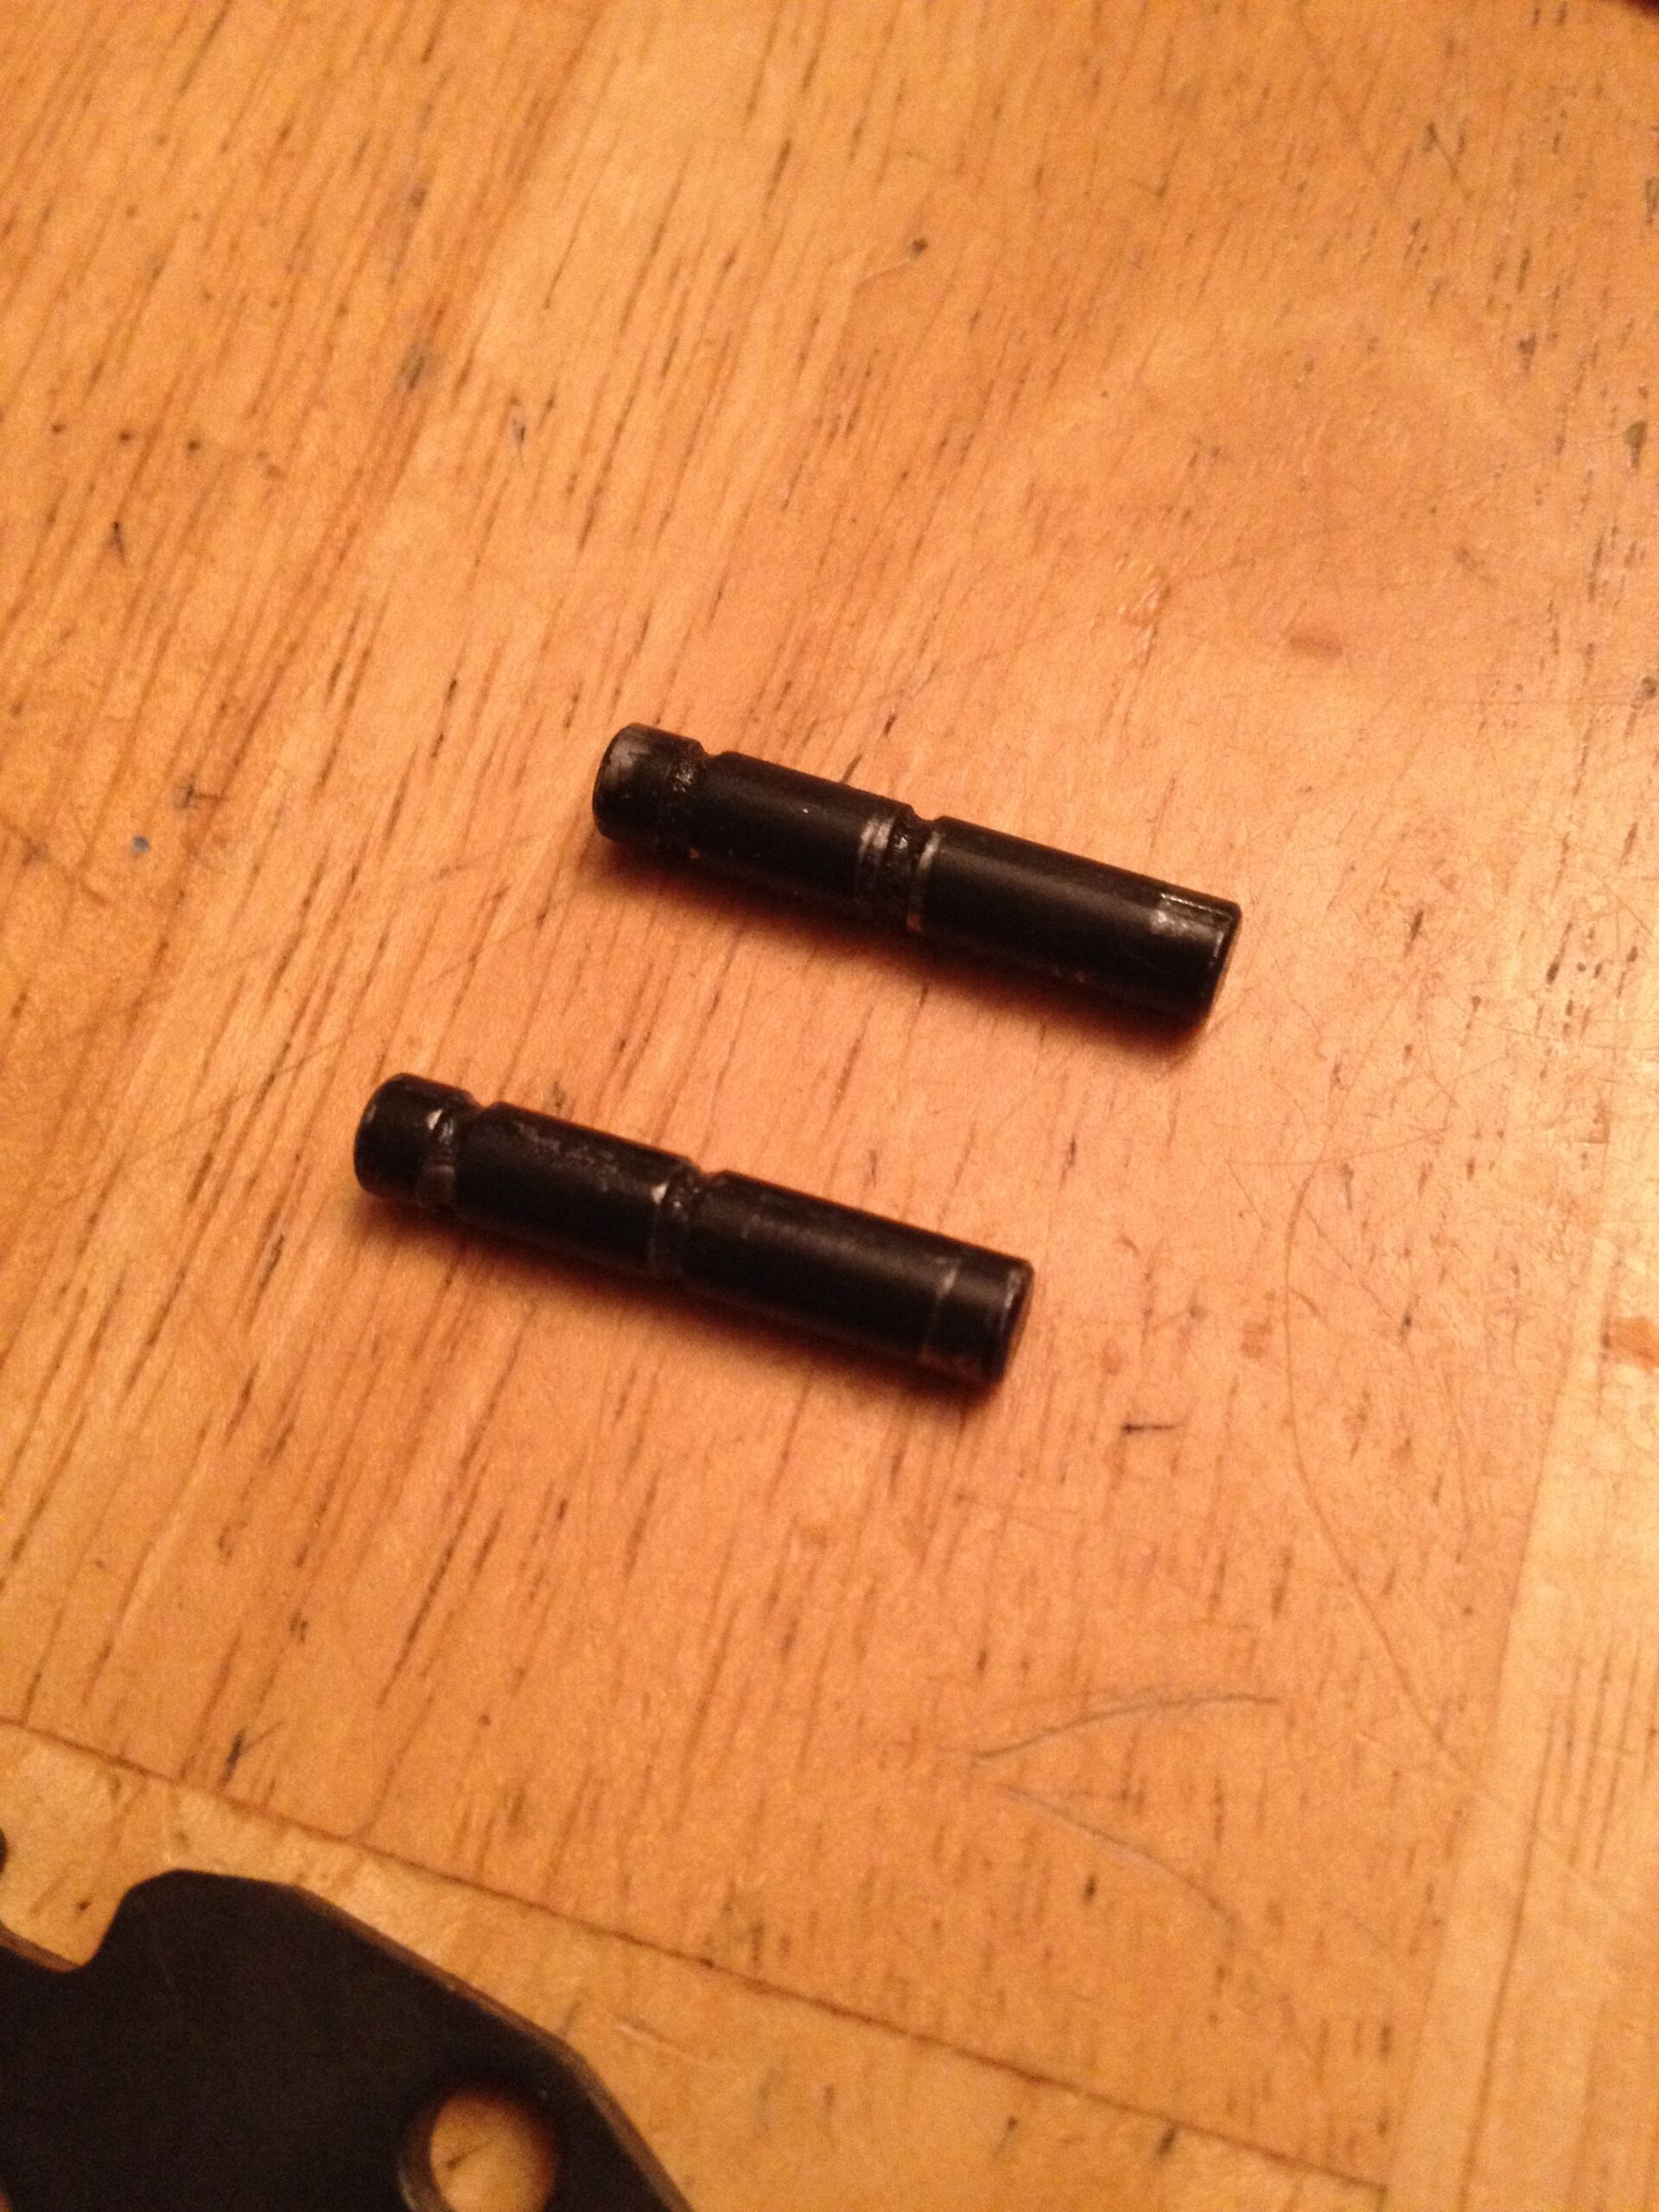
Next, we want to drift out the trigger pivot pin.
Again, gently tap it out. The pins don’t require a ton of force to push them out of the gun. The trigger pivot pin holds in the trigger and the disconnector. Both of these parts will fall out when you remove the punch, so don’t be alarmed. Again, don’t remove any springs. It is best to work around them.
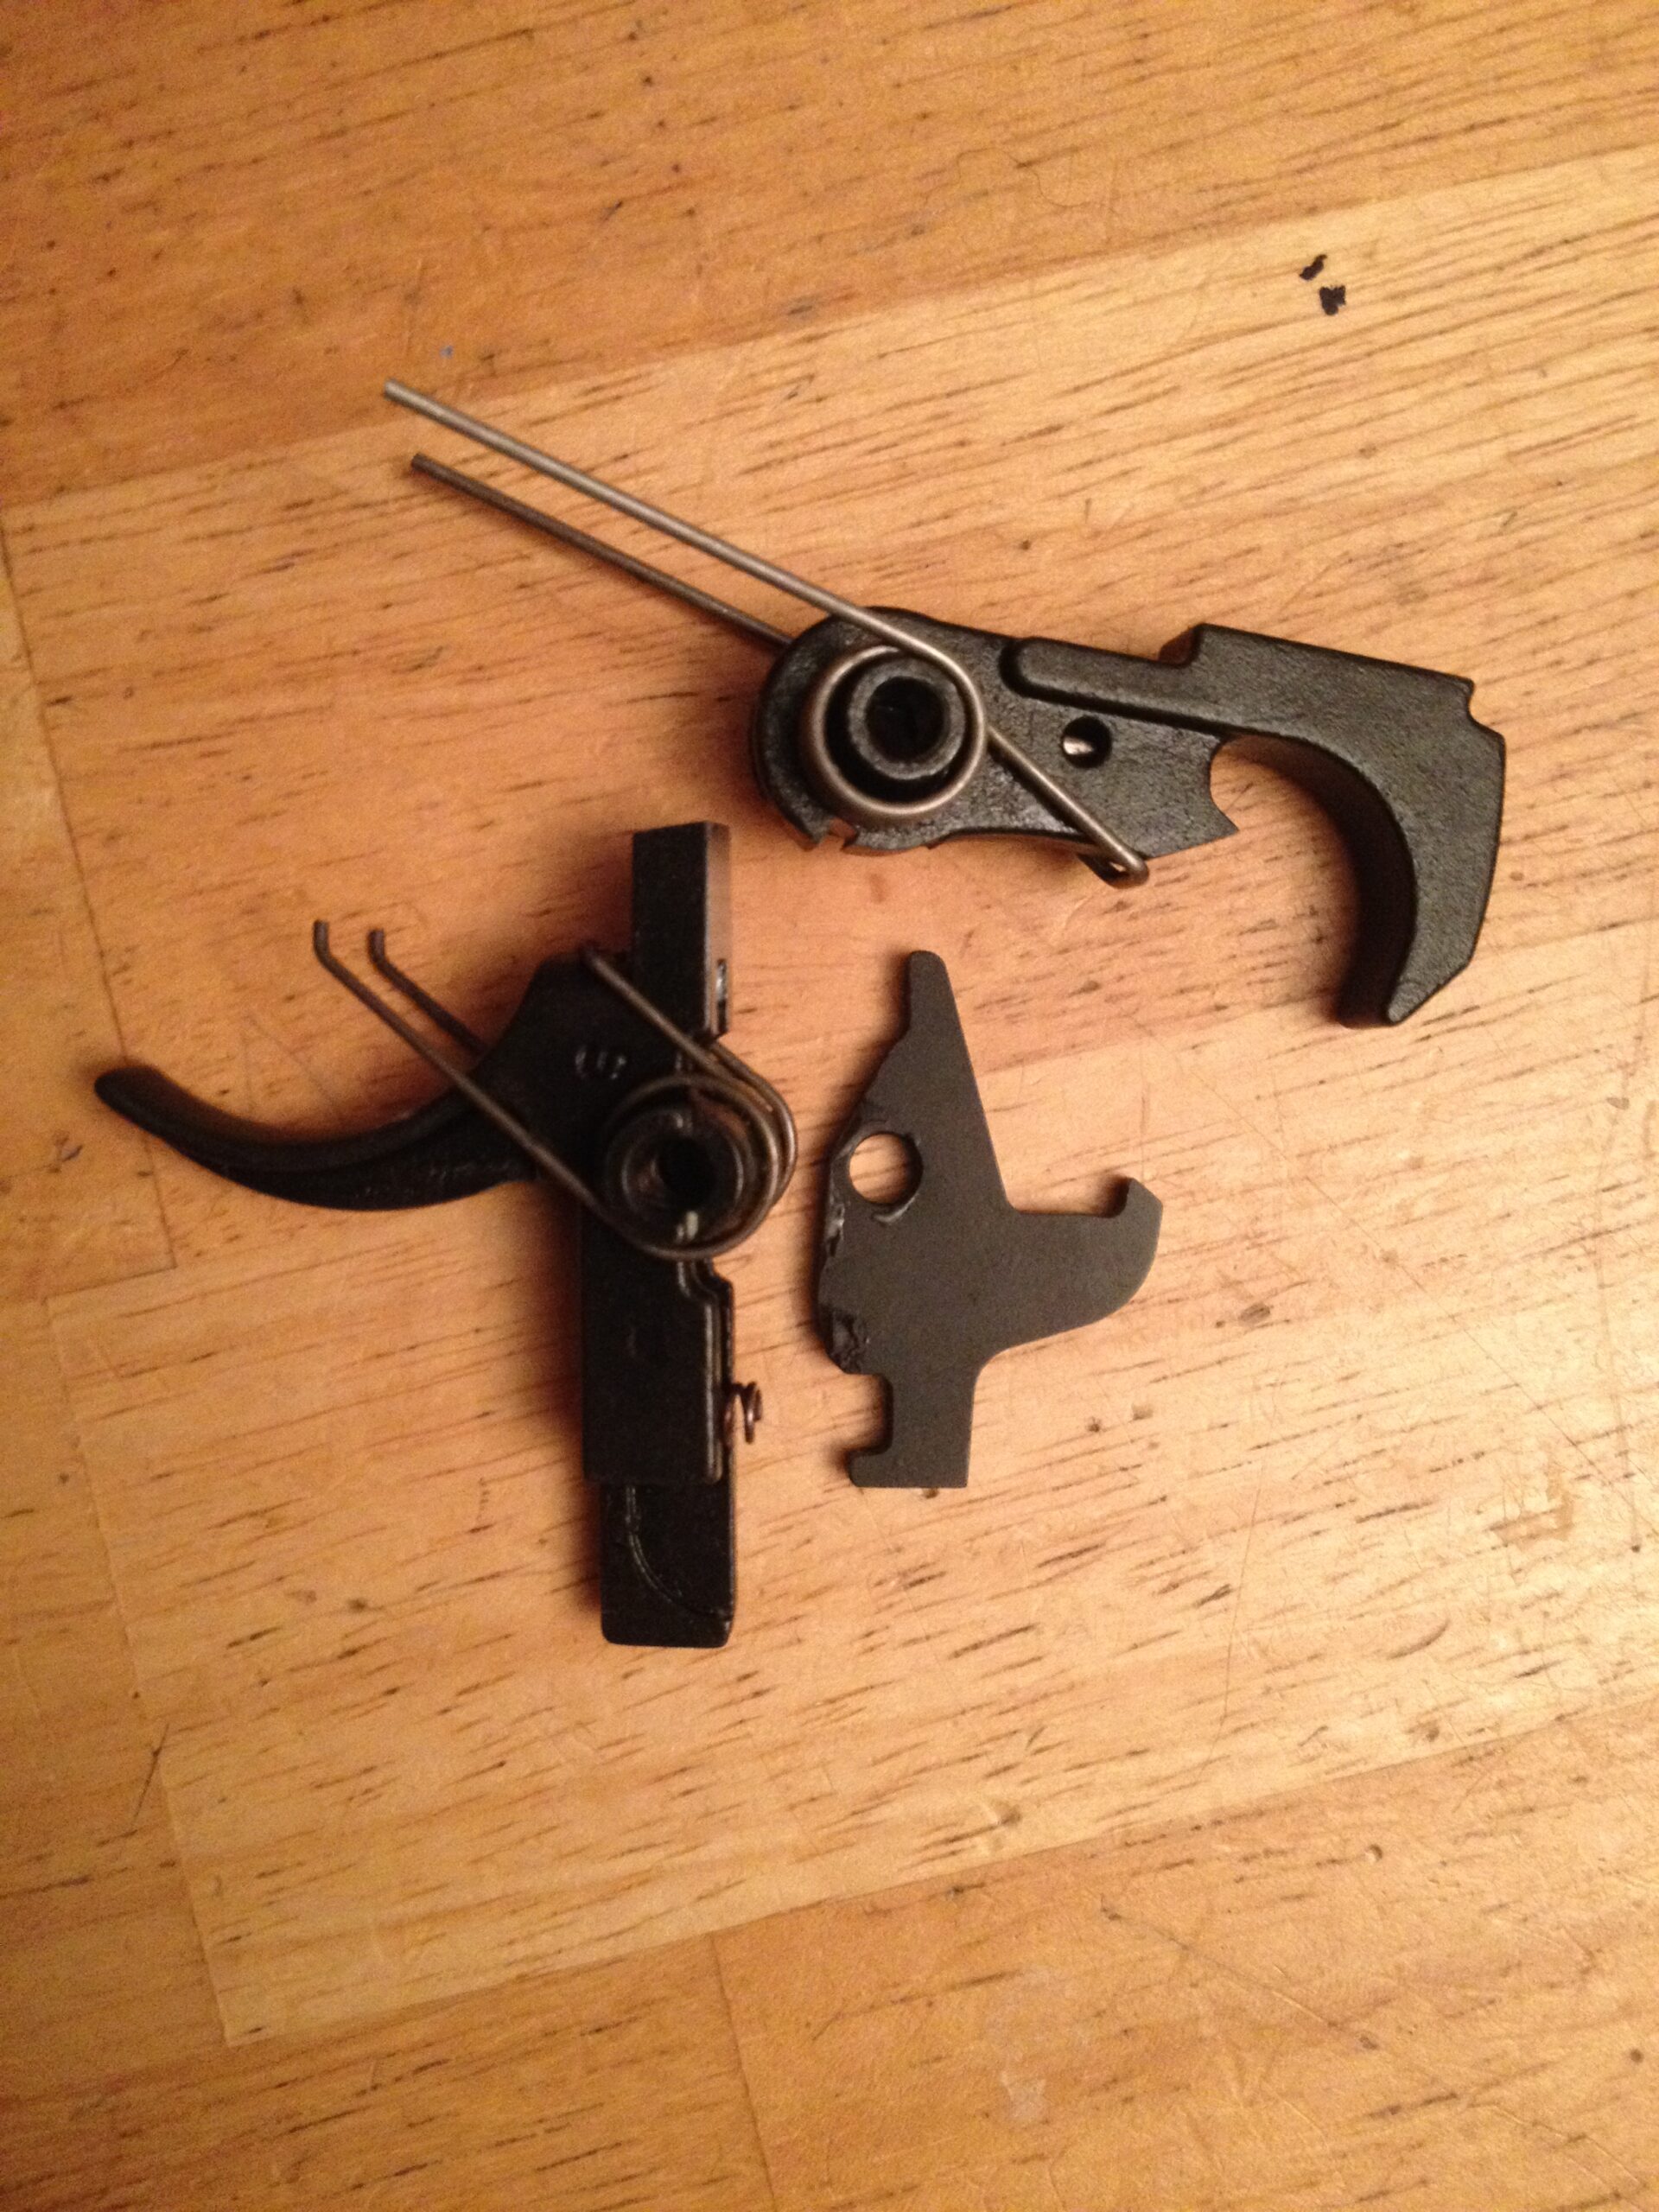
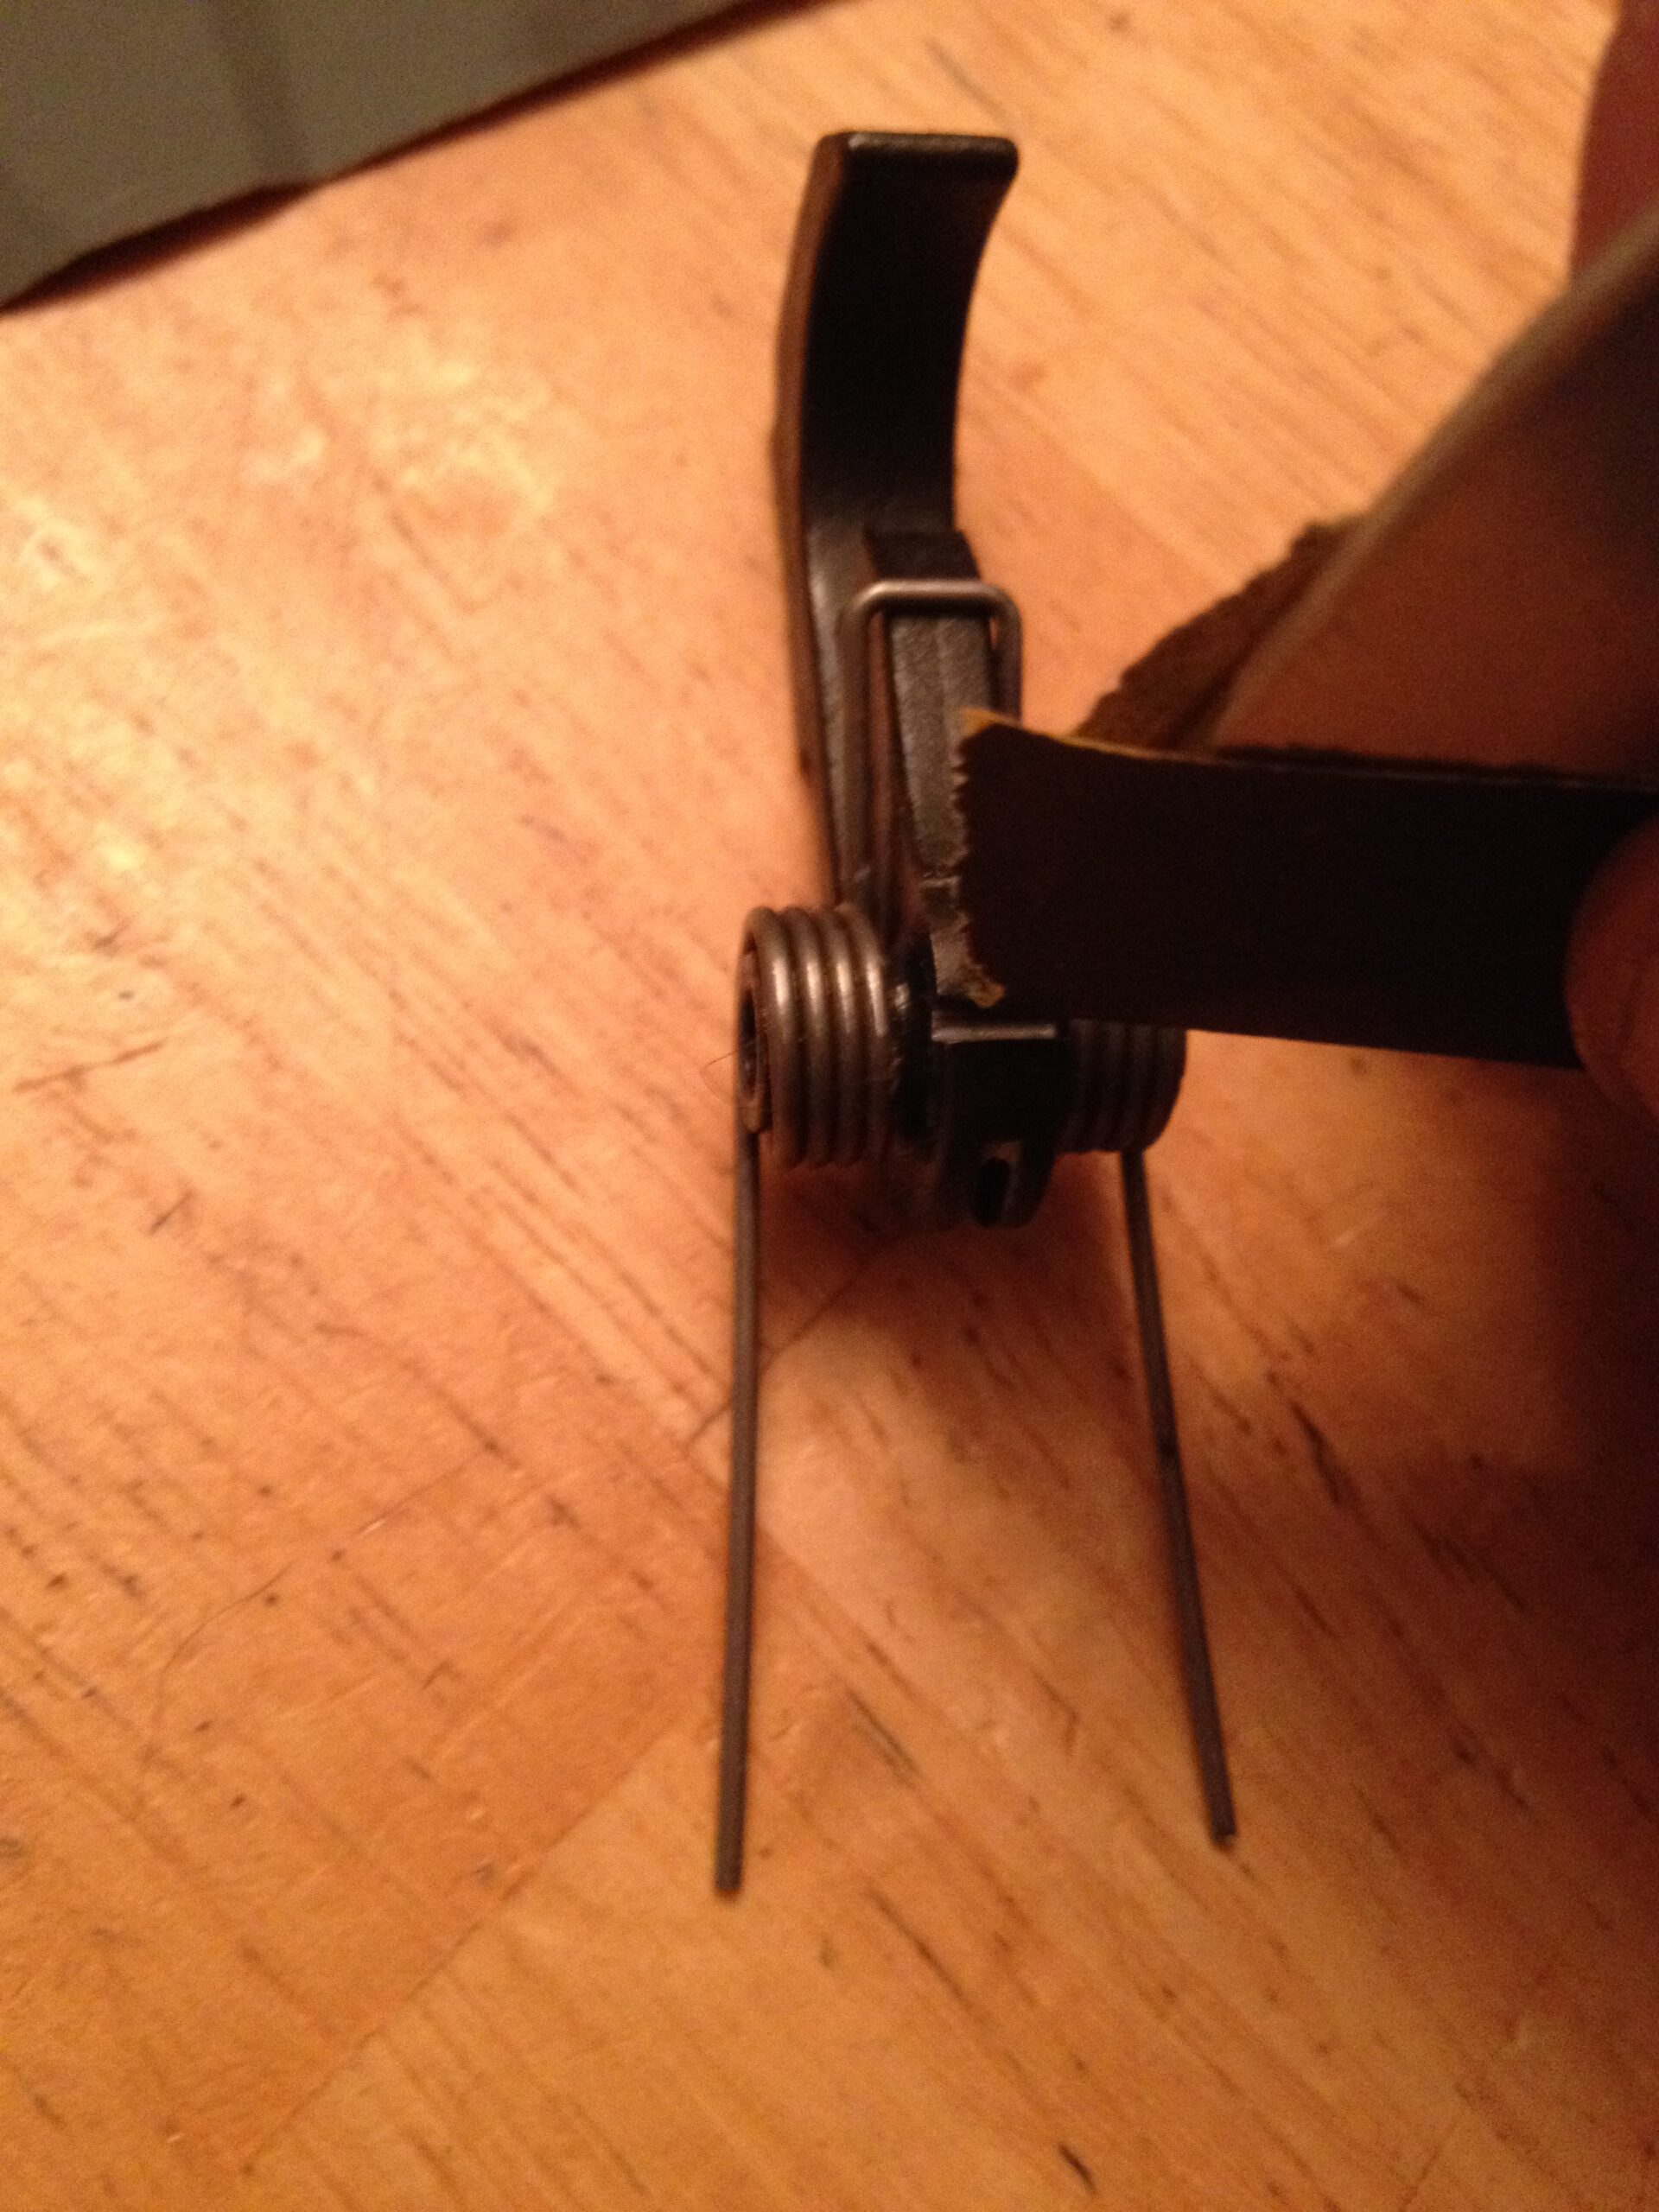
Here’s what we’re looking at for parts that we’ll be working on:
Polishing the AR-15 Trigger
Dig out the sandpaper! The areas we’ll be concentrating on are the following:
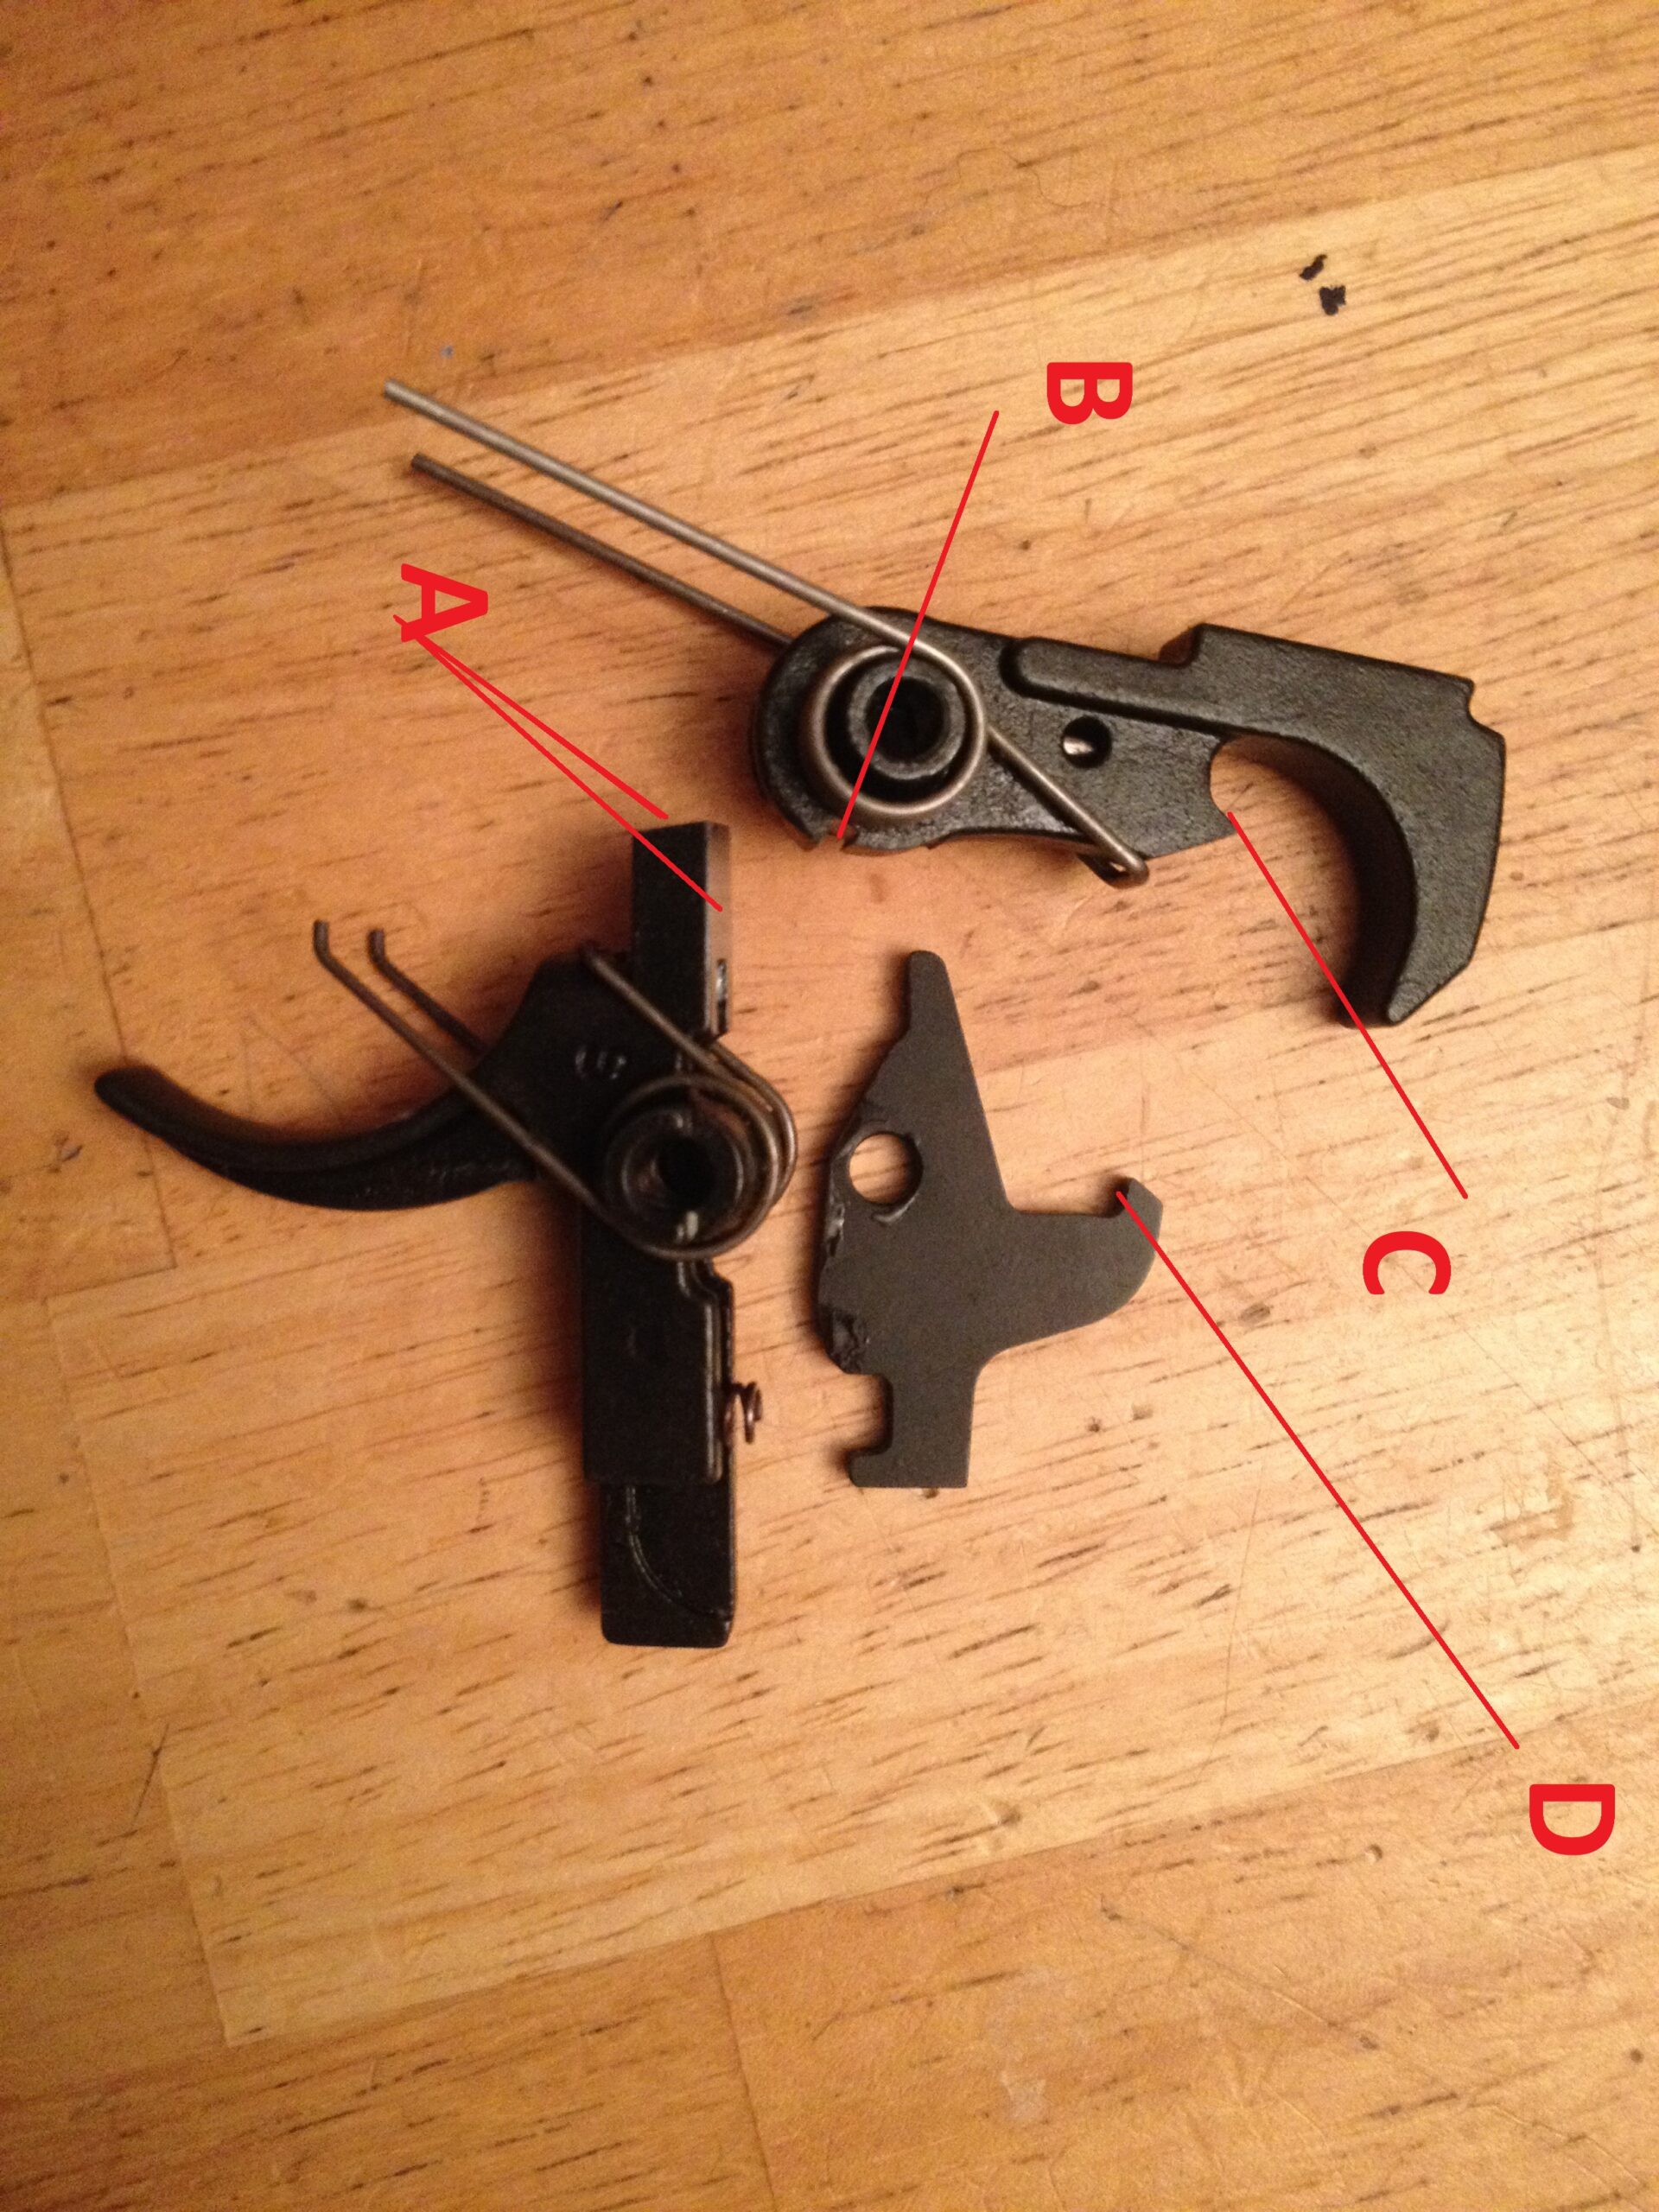
Really, Points A and B are the ones that we’re mostly concerned about, as these are the contact points when the trigger is fired most of the time. If these two points are polished up, is will smooth that famous gritty AR-15 trigger substantially.
Points C and D are where the disconnector interfaces with the hammer and it affects trigger pull off the reset. If you decide to polish those (optional) Do so very gently. A little is a lot on those areas.
Let’s deal with the trigger. We want to polish both sides of that square lug in the front of it. We’ll use the 600 grit for this initially. As they come from the factory, most AR-15 triggers have very roughly (yet precisely) machined surfaces.
You can see that here, in the silver area in the front of the trigger. What we’re aiming to do is to remove those machining marks, yet keep all these surfaces square and true. Any rounded edges, burrs, and “oops”es can ruin a trigger pull faster than you can blink. The squarer and sharper you can keep the edge of that lug, the crisper your pull will be.
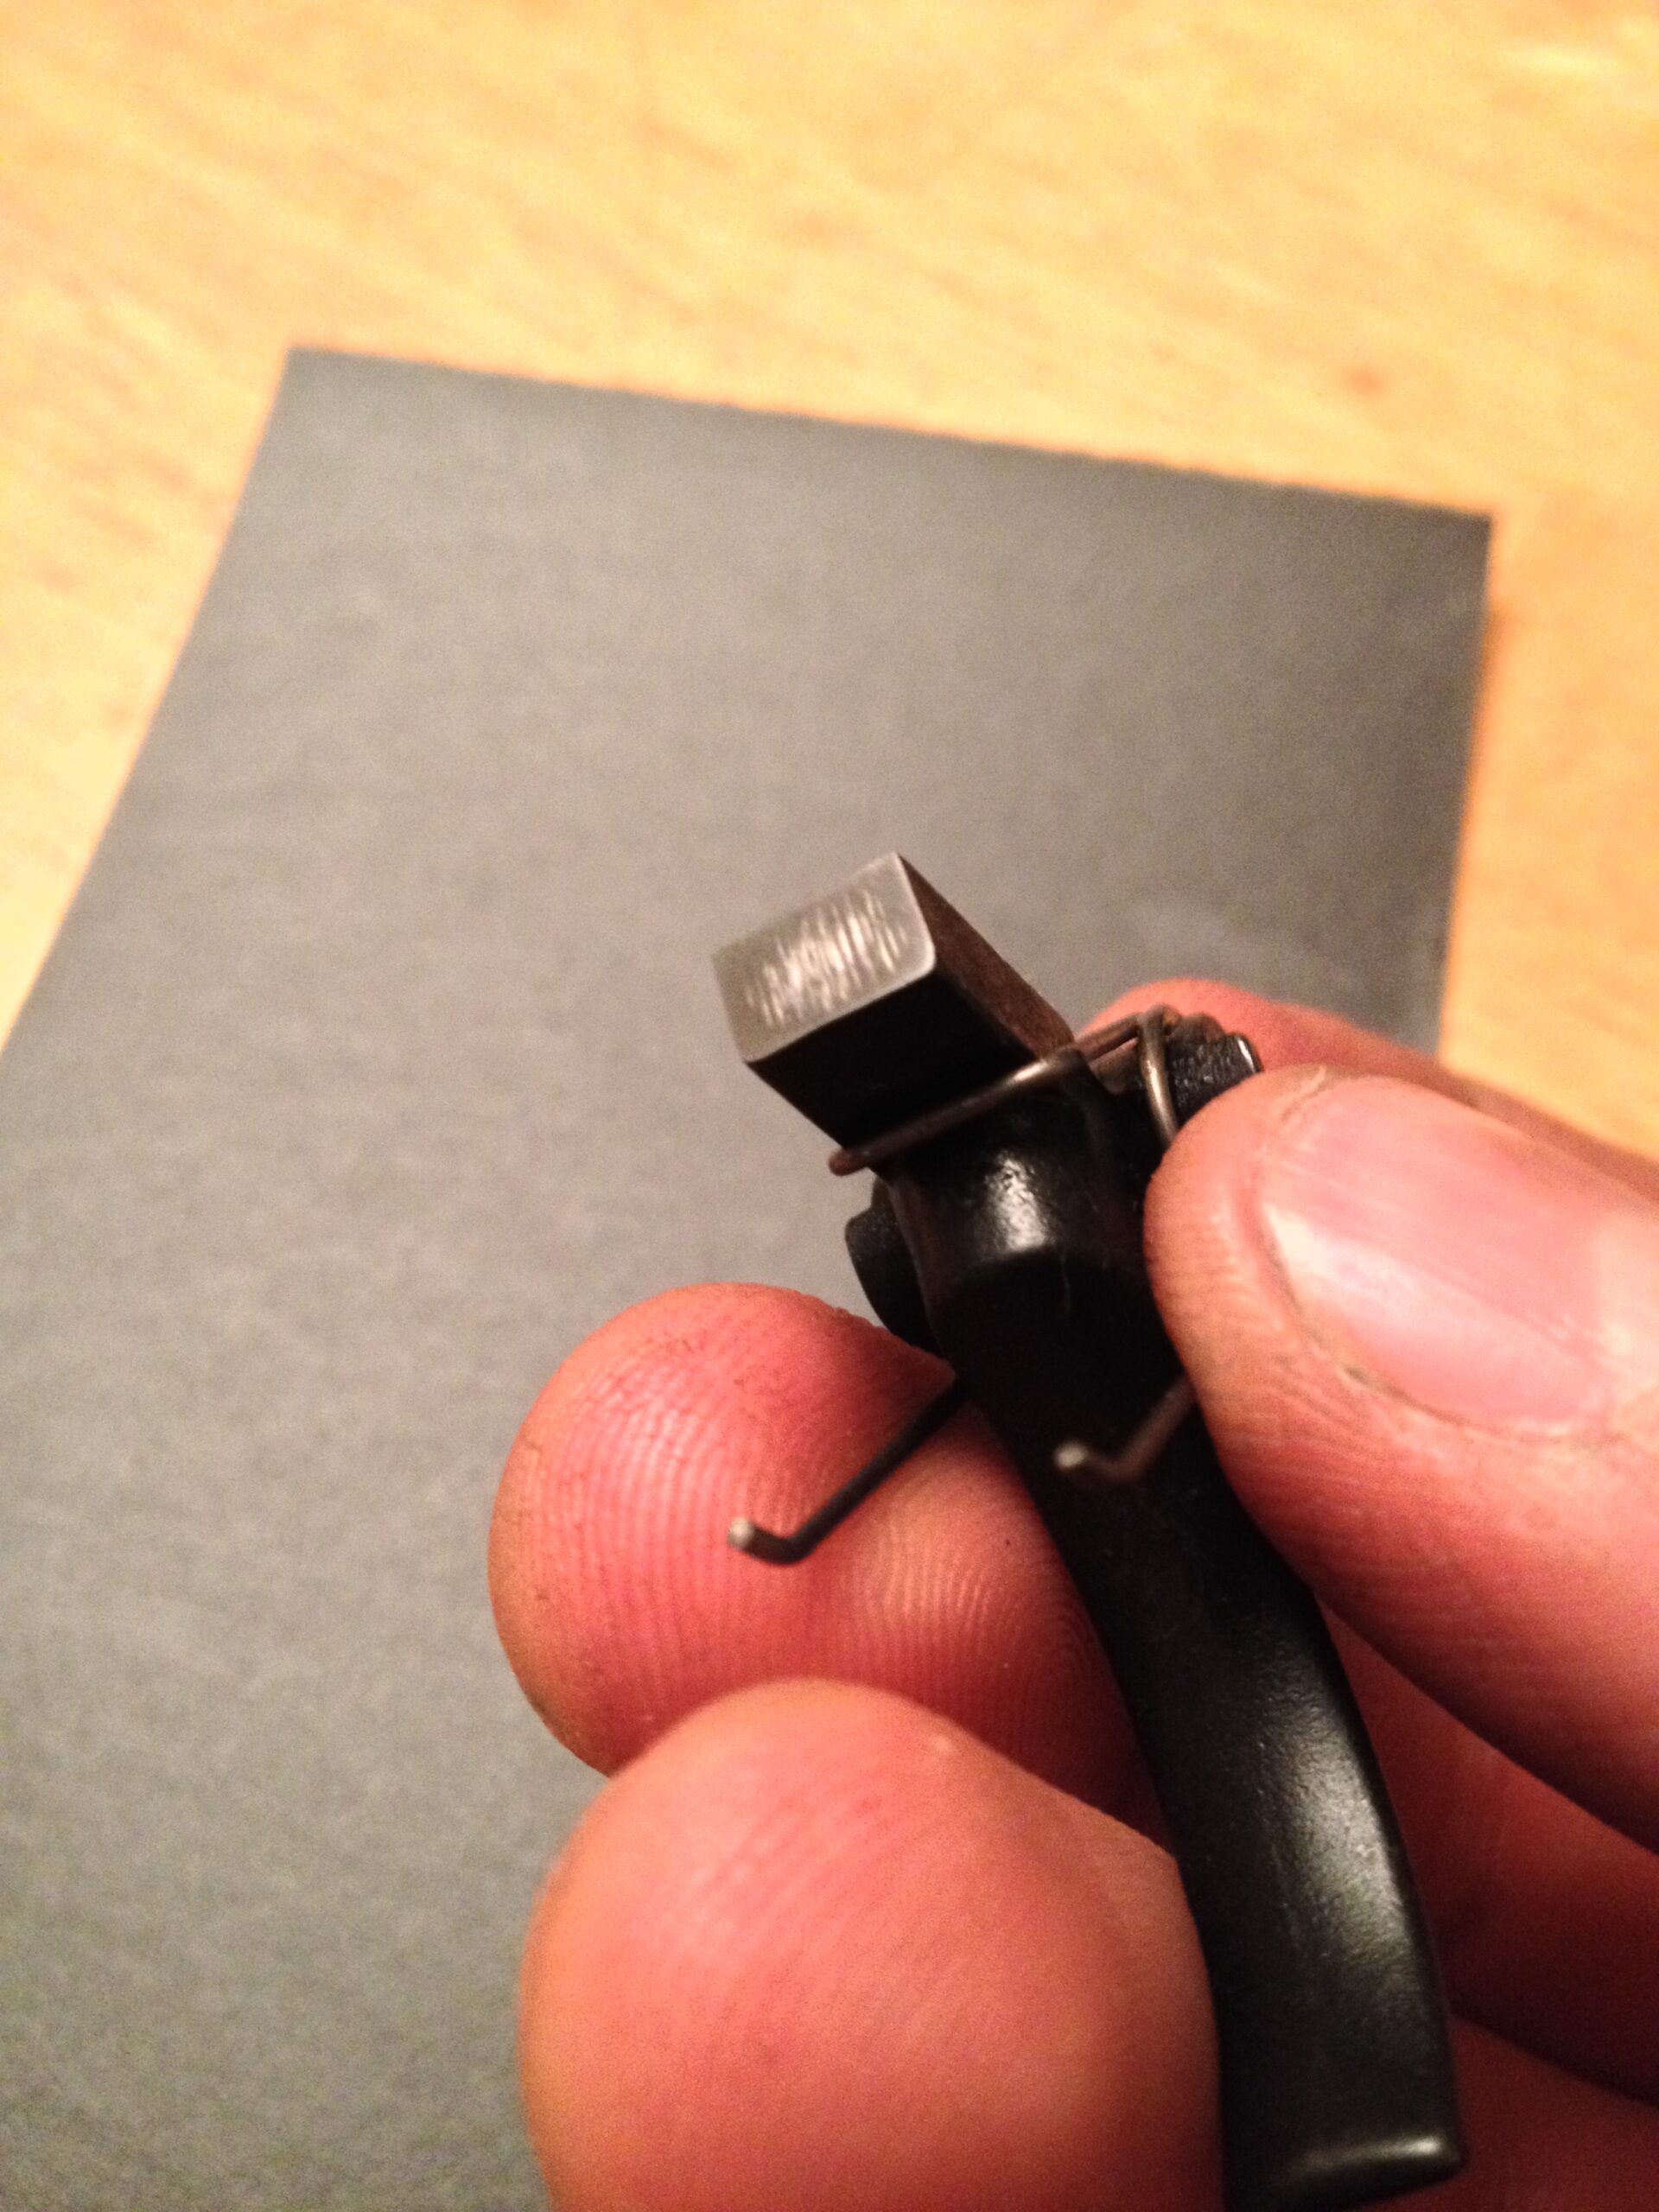
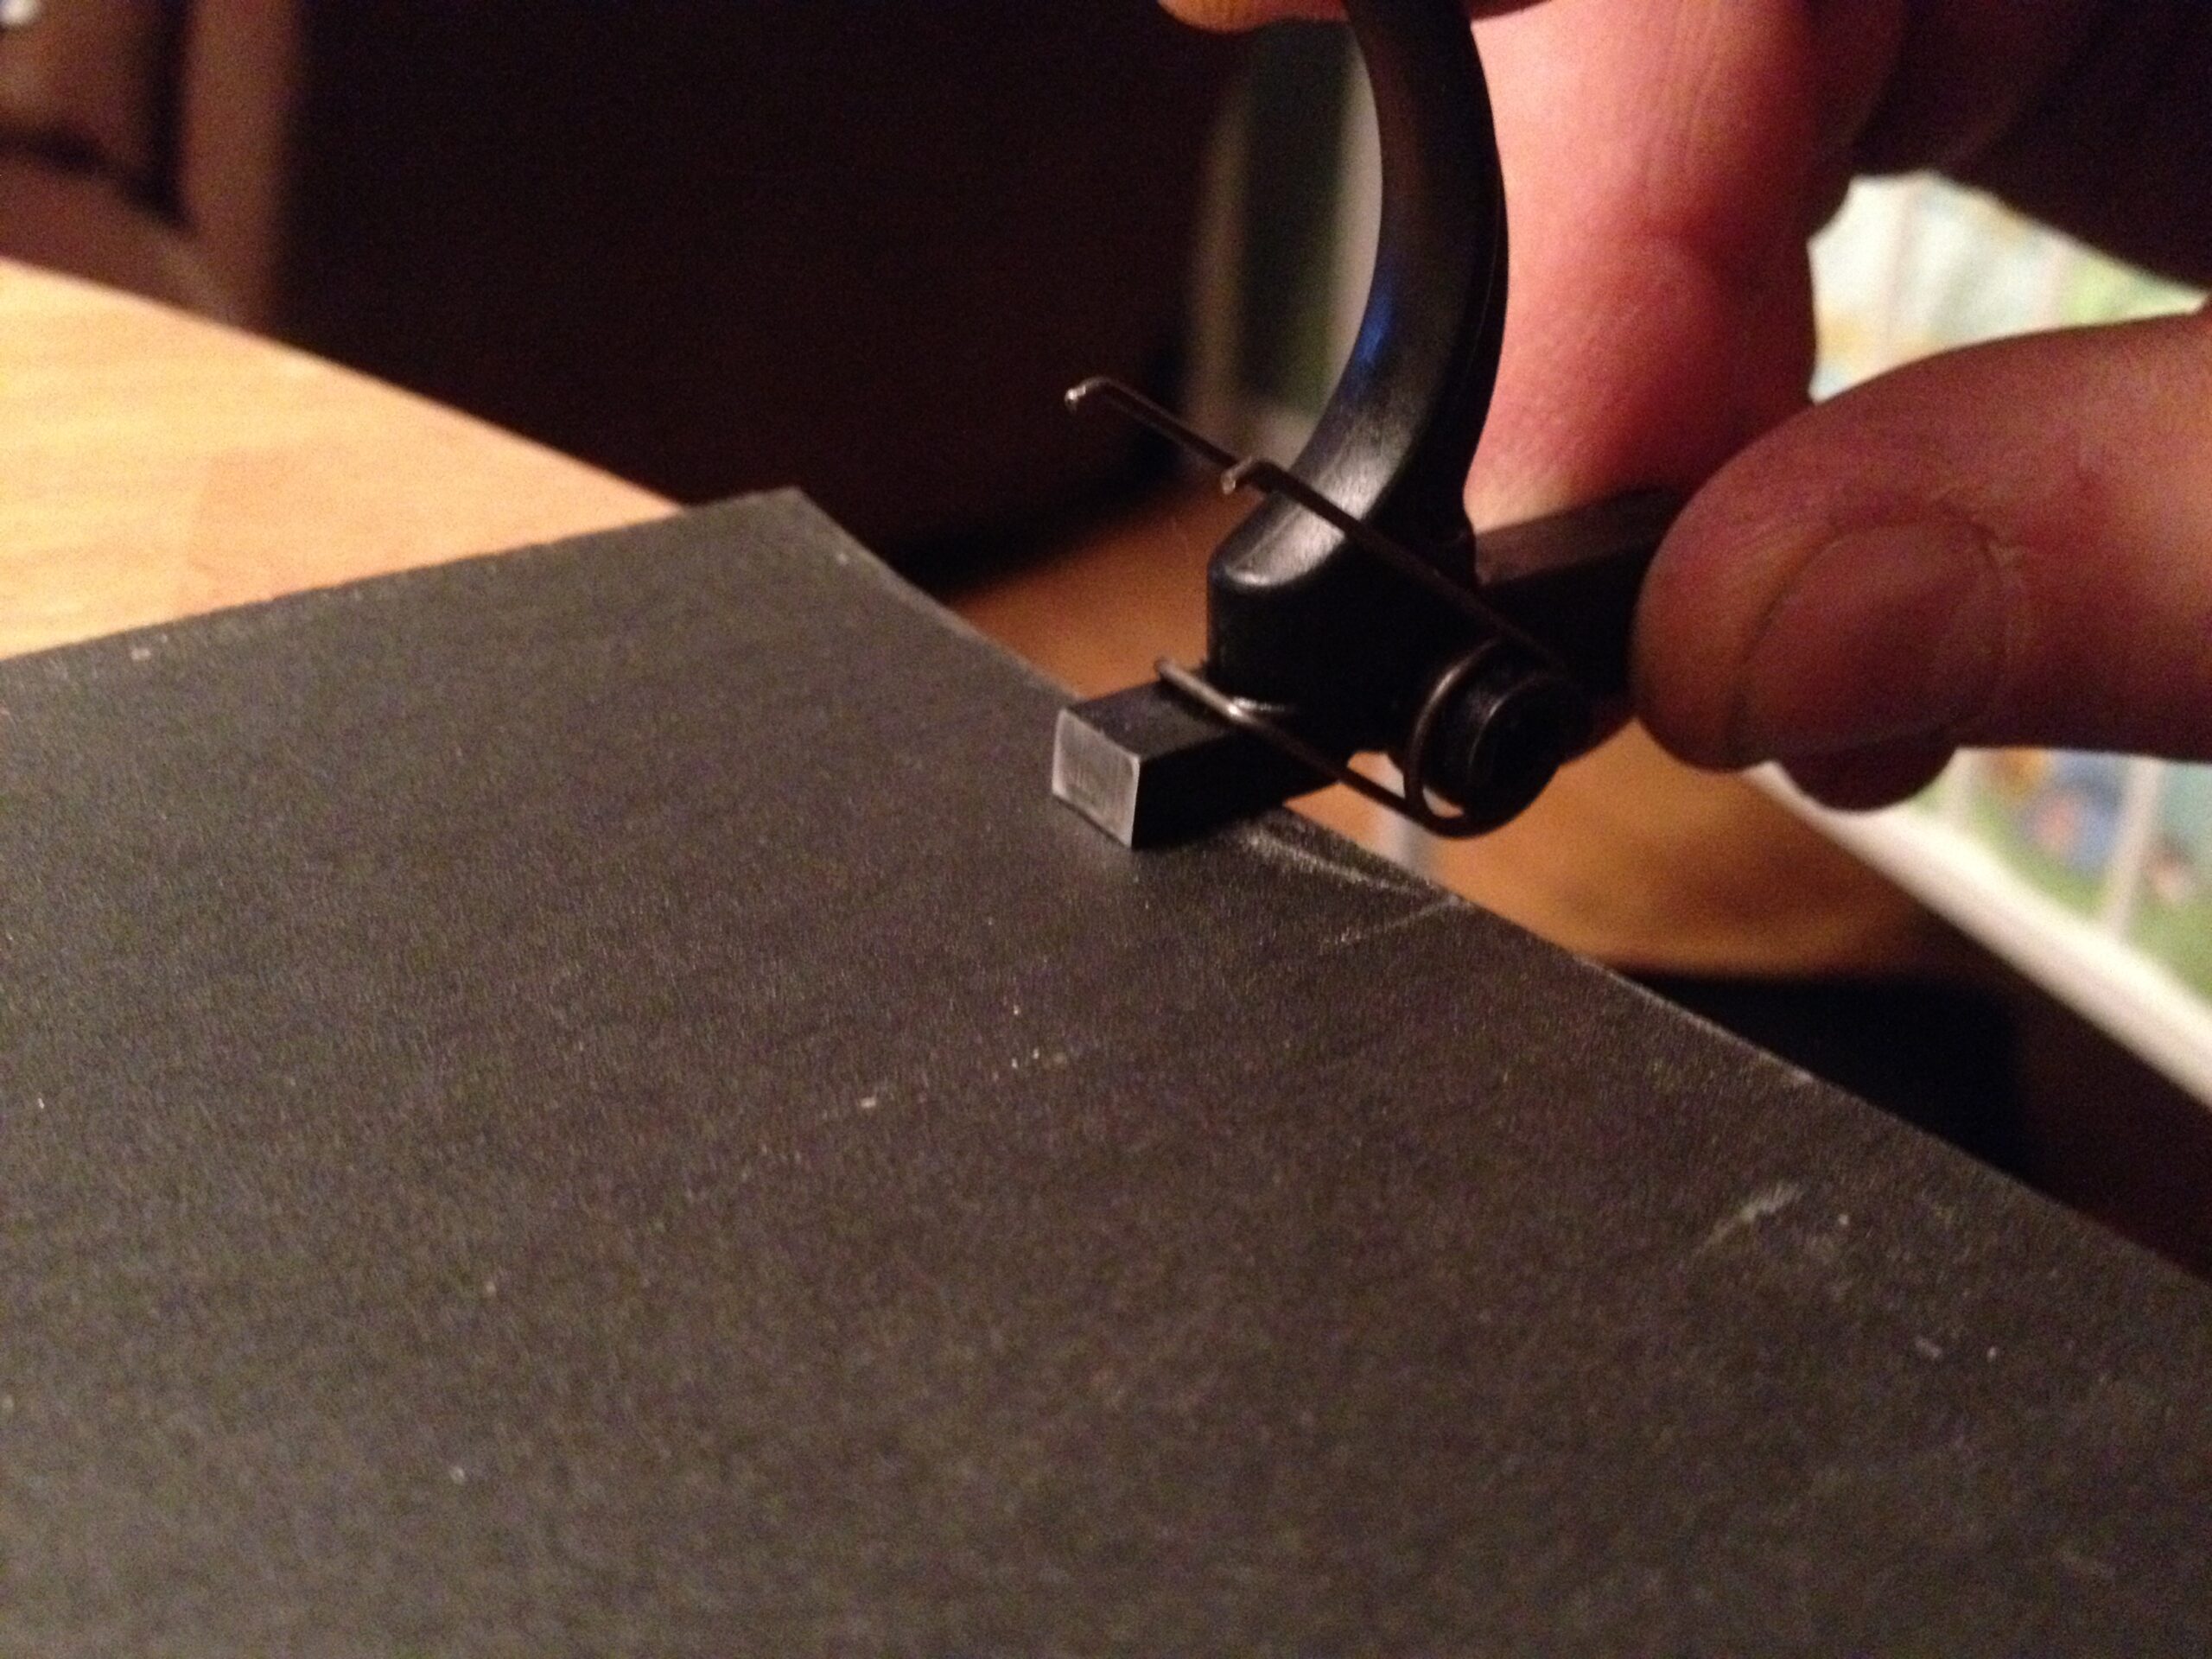
To polish these, put the sandpaper down on a flat, steady surface. Tape it stationary if need be. Put the part down on the paper CAREFULLY, and take the time to ensure the part is truly flat, and not rocking around. Move it back and forth in 1/4-inch motions…this will help keep it flat. Longer strokes may have you rocking the part up on the edges, and we can’t have that. Go slow, and only polish until you see the machining marks gone. Do this on the top and front of that square lug of the trigger.
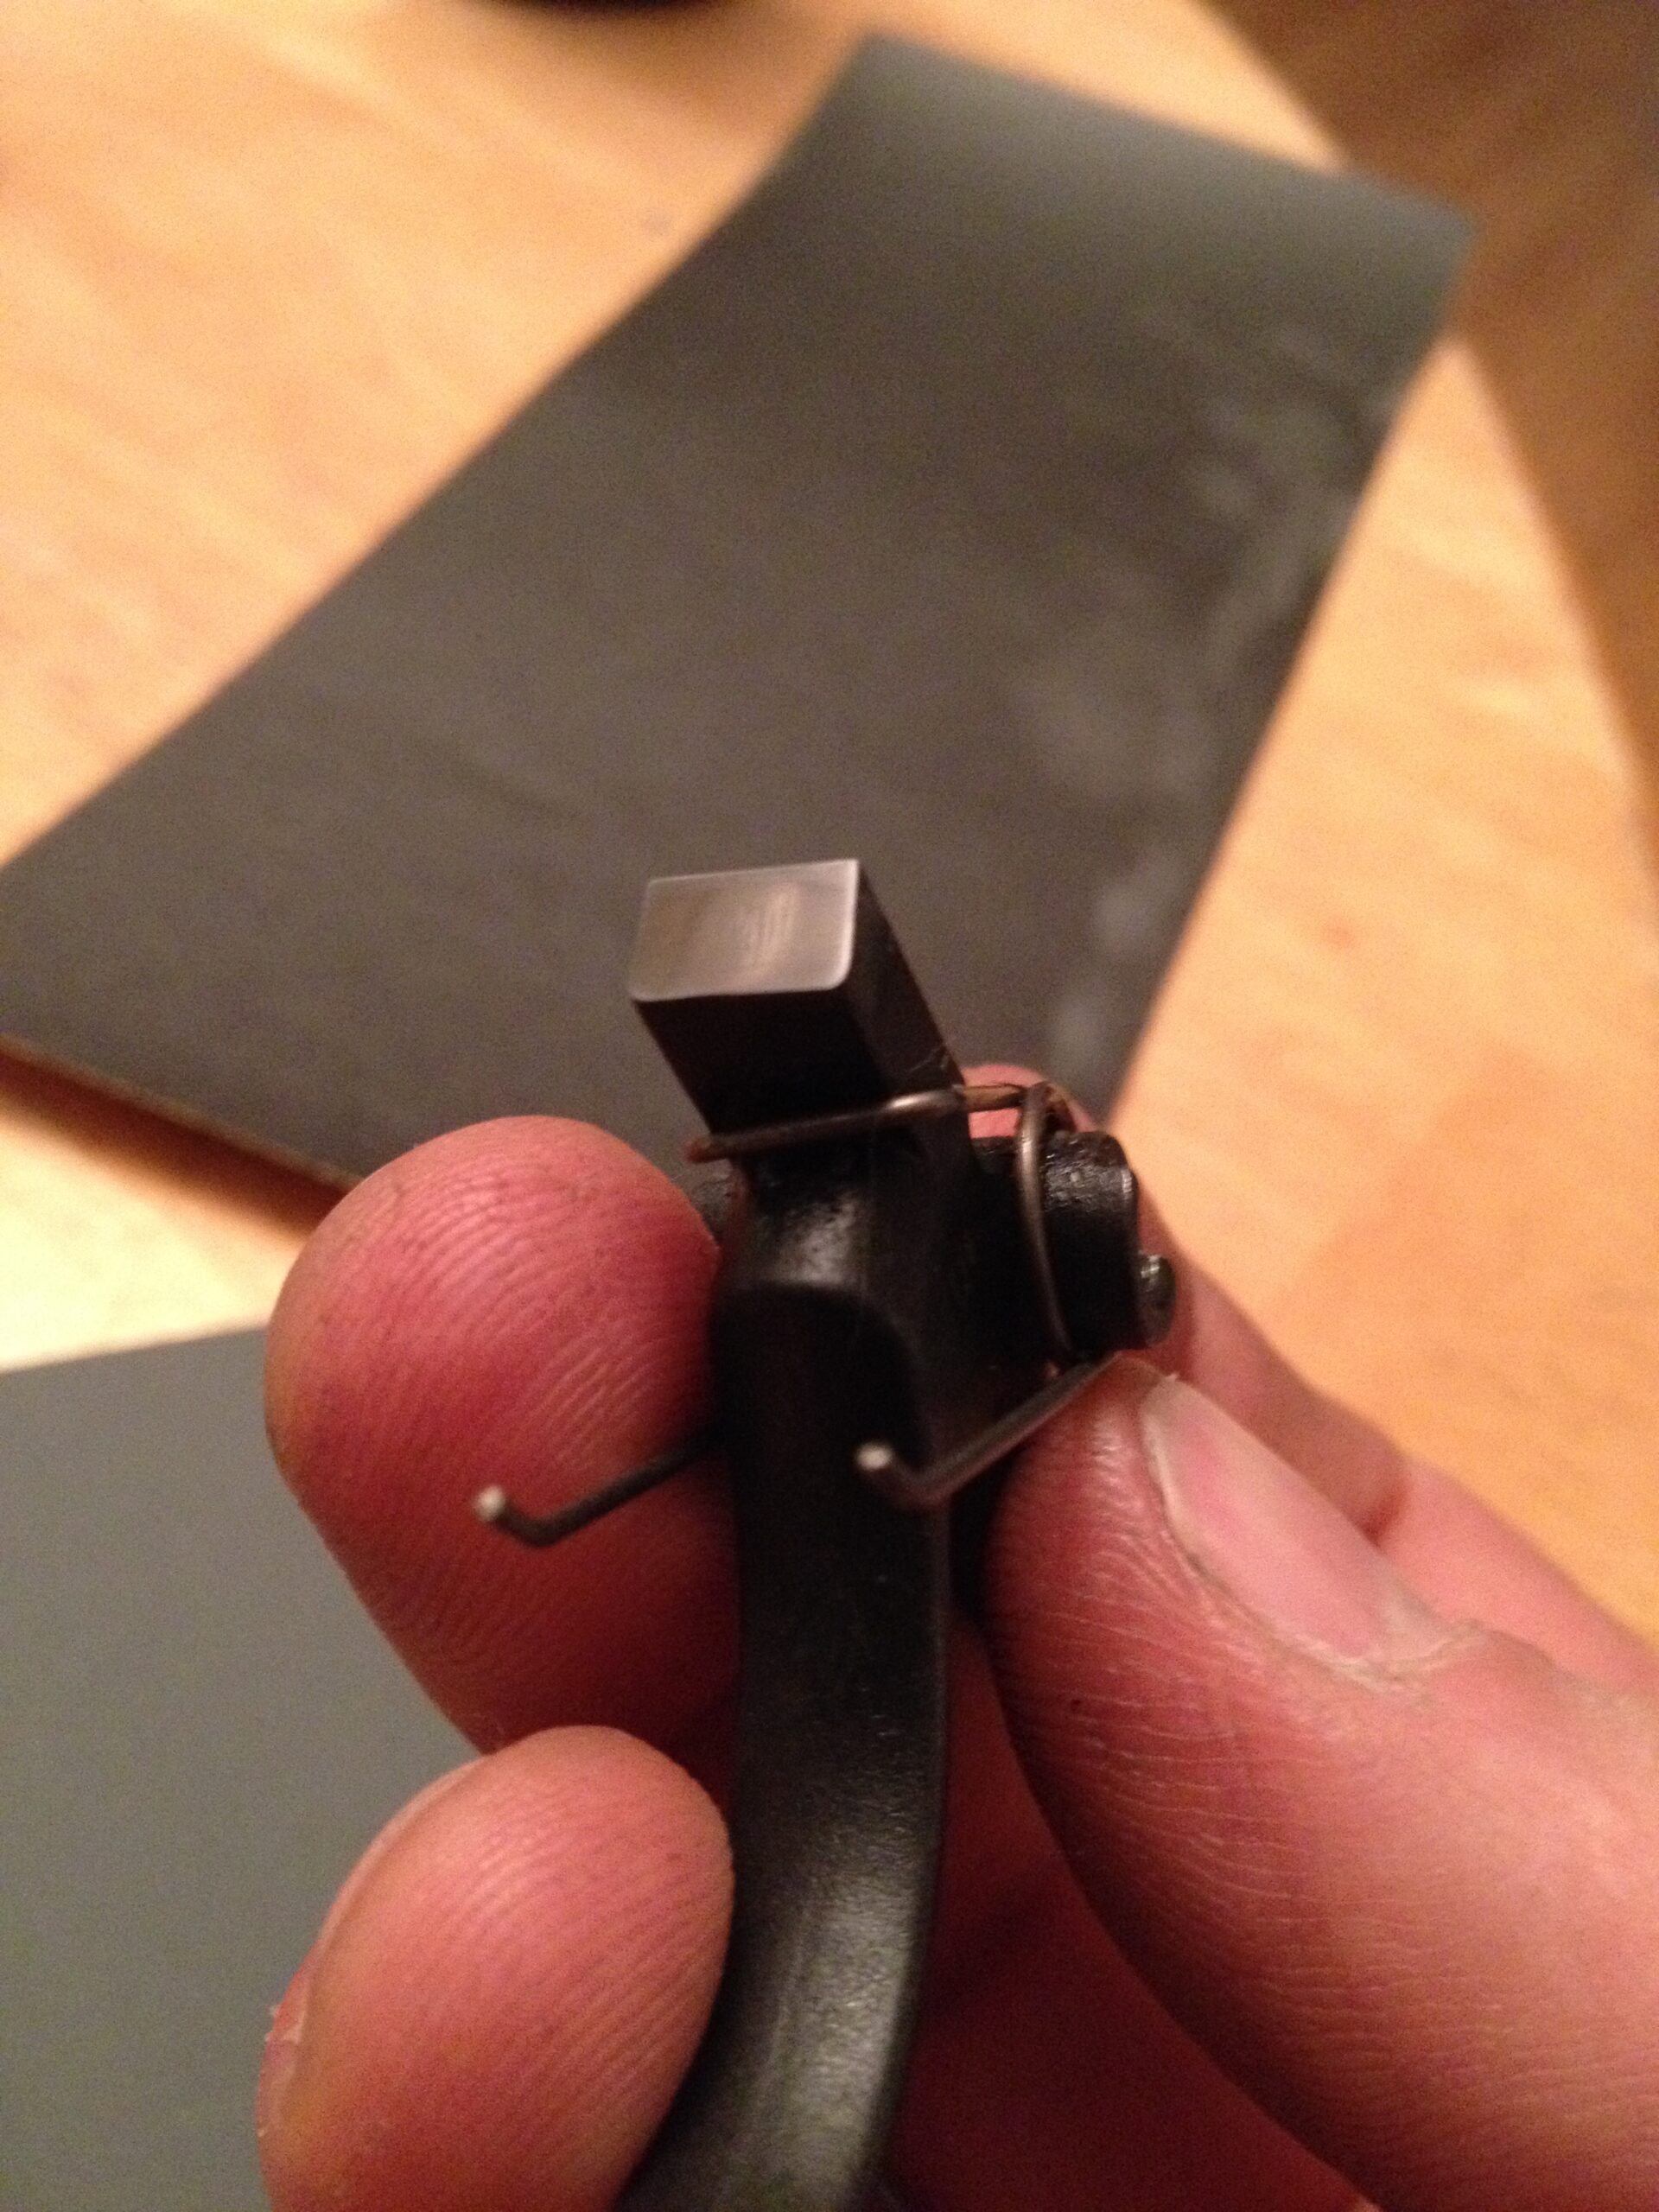
You want to just polish until you see the machining “scratches” gone. Once you have it done with the 600 grit, move to the 1000 grit. This will start getting a “mirror” effect on the parts. Keep care to keep the edges nice and flat!
Related: Building an Inexpensive and (Probably) Effective AR-15
What I recommend is to polish to a 1,000 grit surface. Re-assemble and try the pull, make sure it’s all safe. If you’d like a touch more, you can attempt 1500 grit…but 1000 is usually pretty darned good.
For the hammer, it’s quite a bit trickier. That liiiiiiitle sear notch in the back of the hammer is where that square lug on the trigger interfaces. I usually wrap the sandpaper on a thin nail file and gently work the bottom of the notch. This is the hardest part to get right and the easiest to screw up, so I’d like to tell you to just gently polish the area with a few strokes of 600 and then 1,000 grit paper.
If you take too much metal off, the trigger may not catch and the gun won’t work. That would be a bummer. Again, less is more. Stay straight and even in the sear notch and things should be good for you.
That right there, polishing those two areas, should make a world of difference in your trigger pull, just reducing the grittiness of the pull. It won’t make it actually lighter, but it will give you the illusion of a lighter pull through smoother trigger/hammer interaction.
If you feel saucy and want to polish the disconnector areas, go for it. Just, again, go easy. We’re not removing metal, just polishing it. You don’t need a gun that’s potentially unsafe… you just want a nicer pull off the reset for when you’re really concentration on working that trigger for accuracy. You’ll want to polish the inside of the “claw” of the back of the hammer and the underside of the hook in the disconnector.
If you want to go crazy, use the 600 grit and gently polish the hammer and trigger pivot pins. This will reduce friction on the hammer and trigger just a tad.
Reassembling the Trigger Components
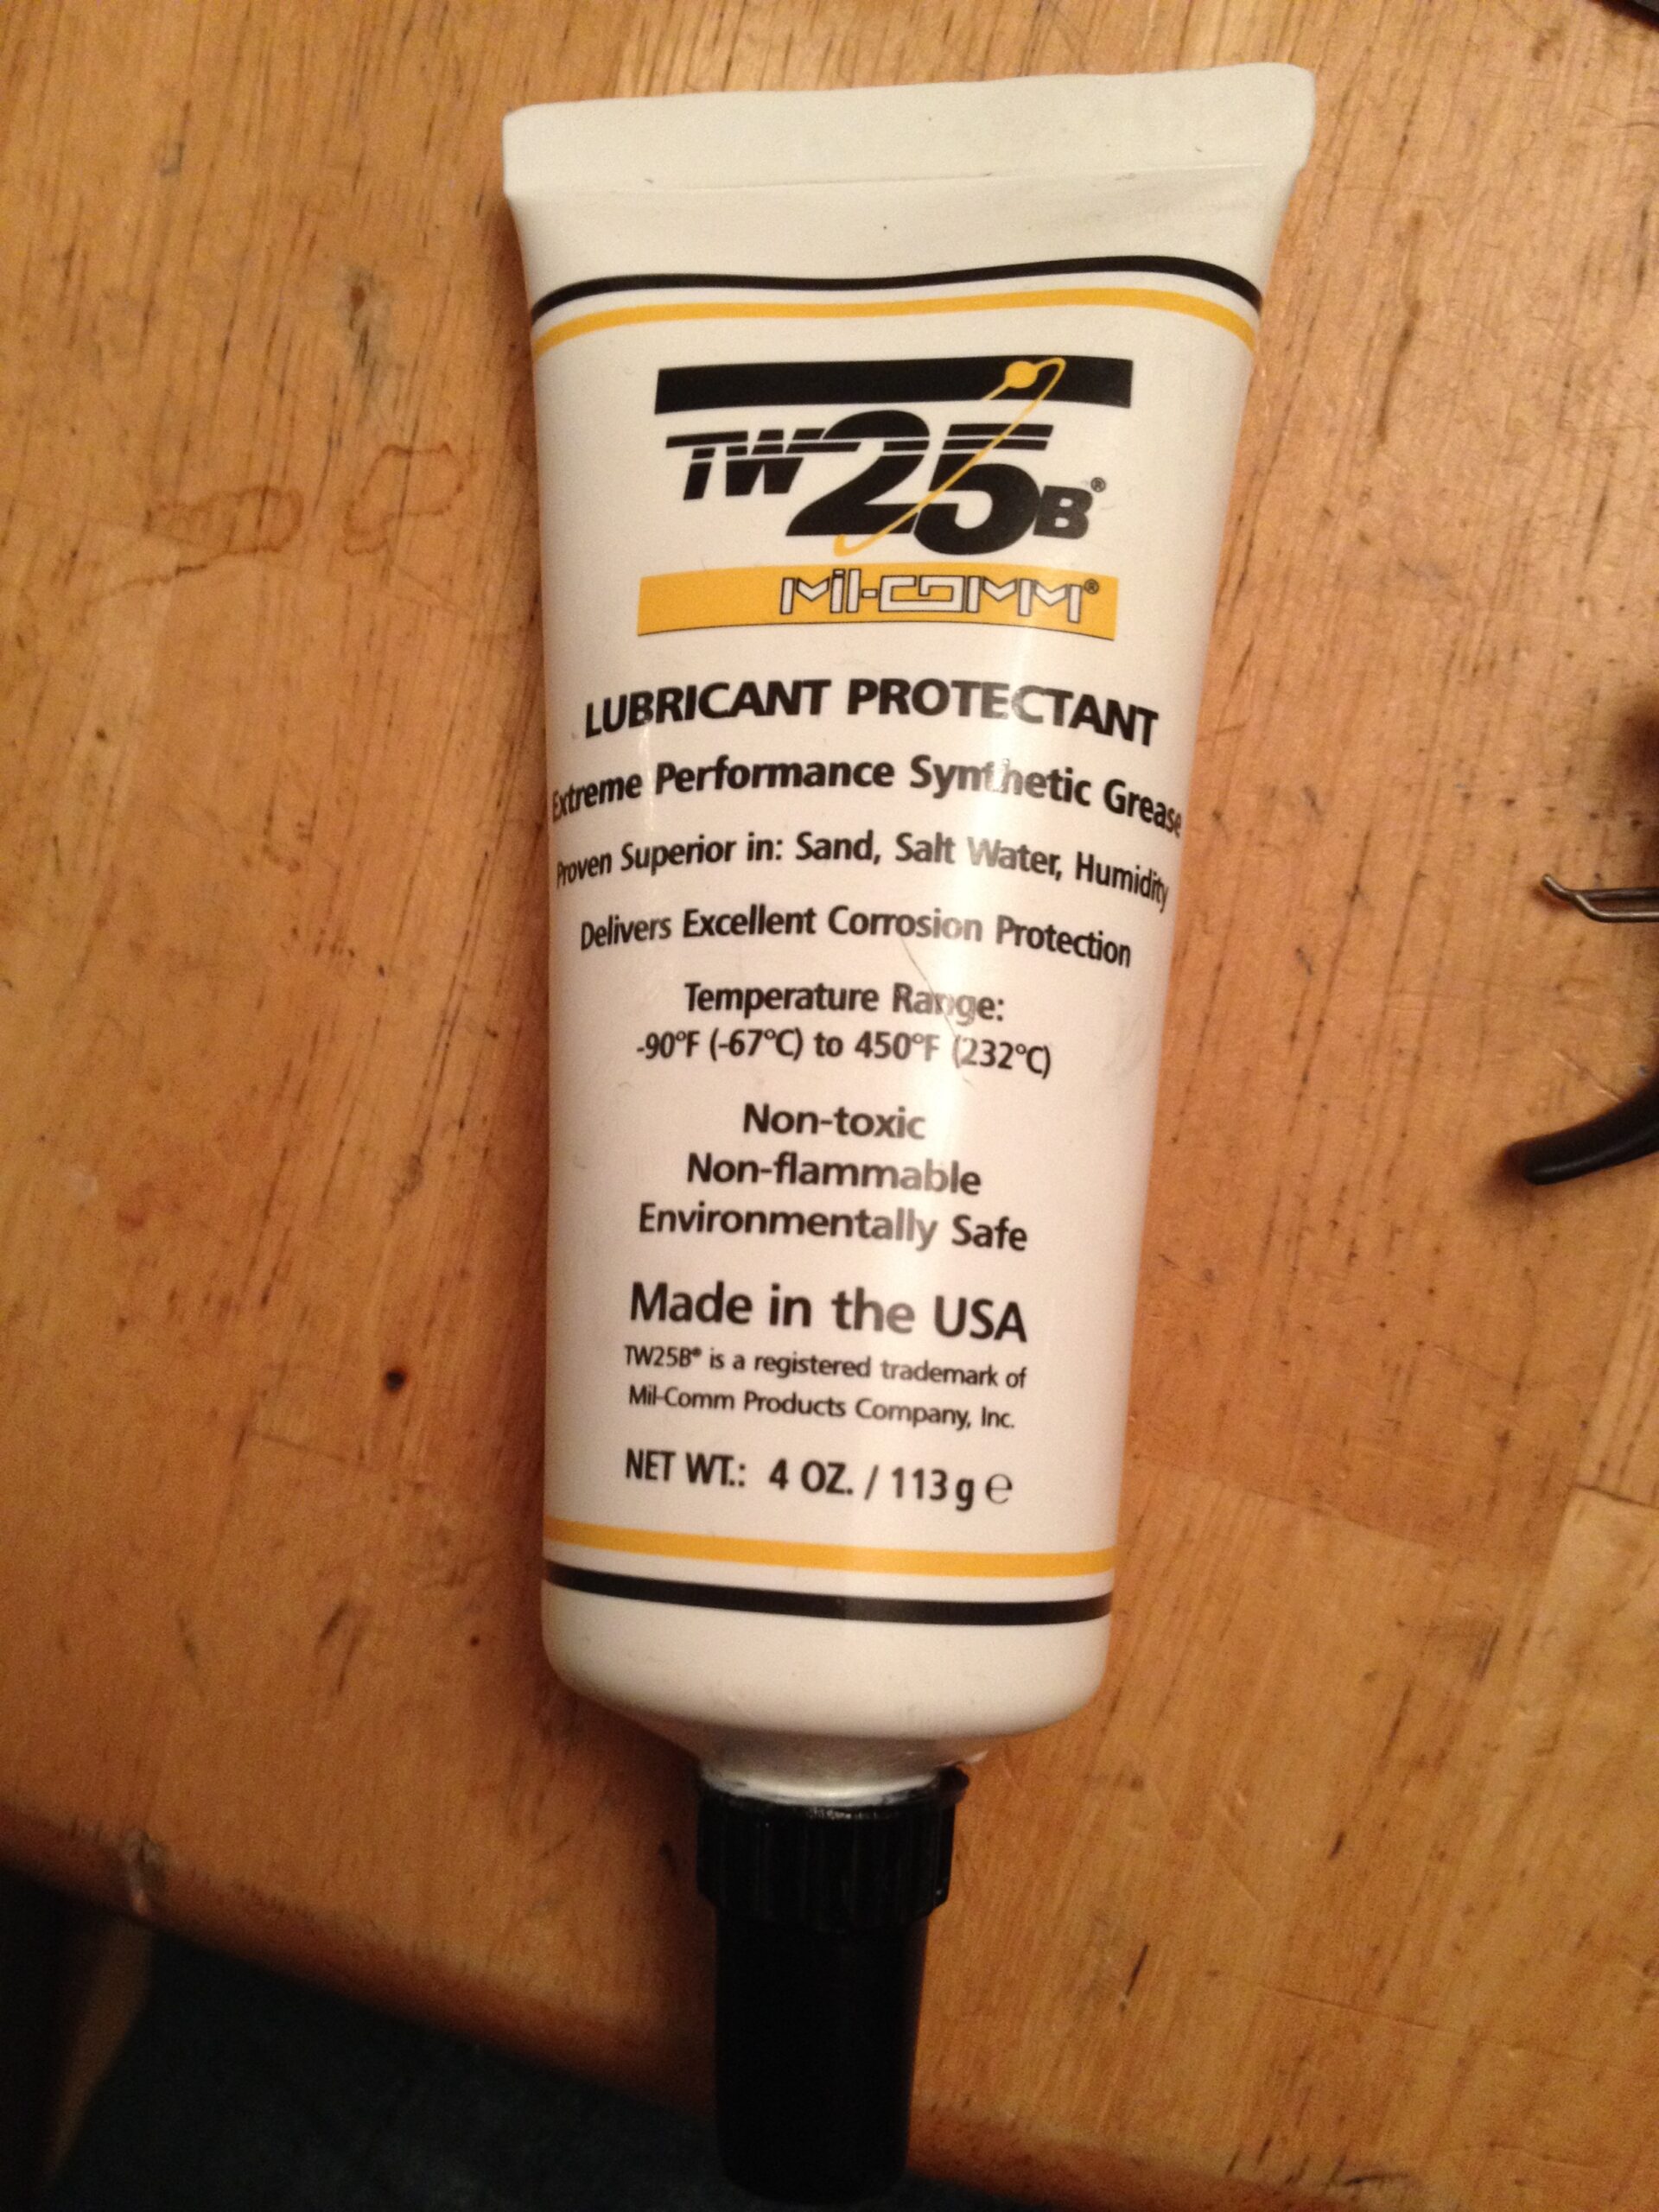
Now that the fun is over, time to get it back together! I LIGHTLY grease all the points I just polished before re-assembly; this will help the parts slide apart better. You’ll see the grease in the pictures as white smears. I like TW-25B (it’s the stuff SIG Sauer sends with all their guns and it’s like a trigger job in a tube.). Amazon has it.
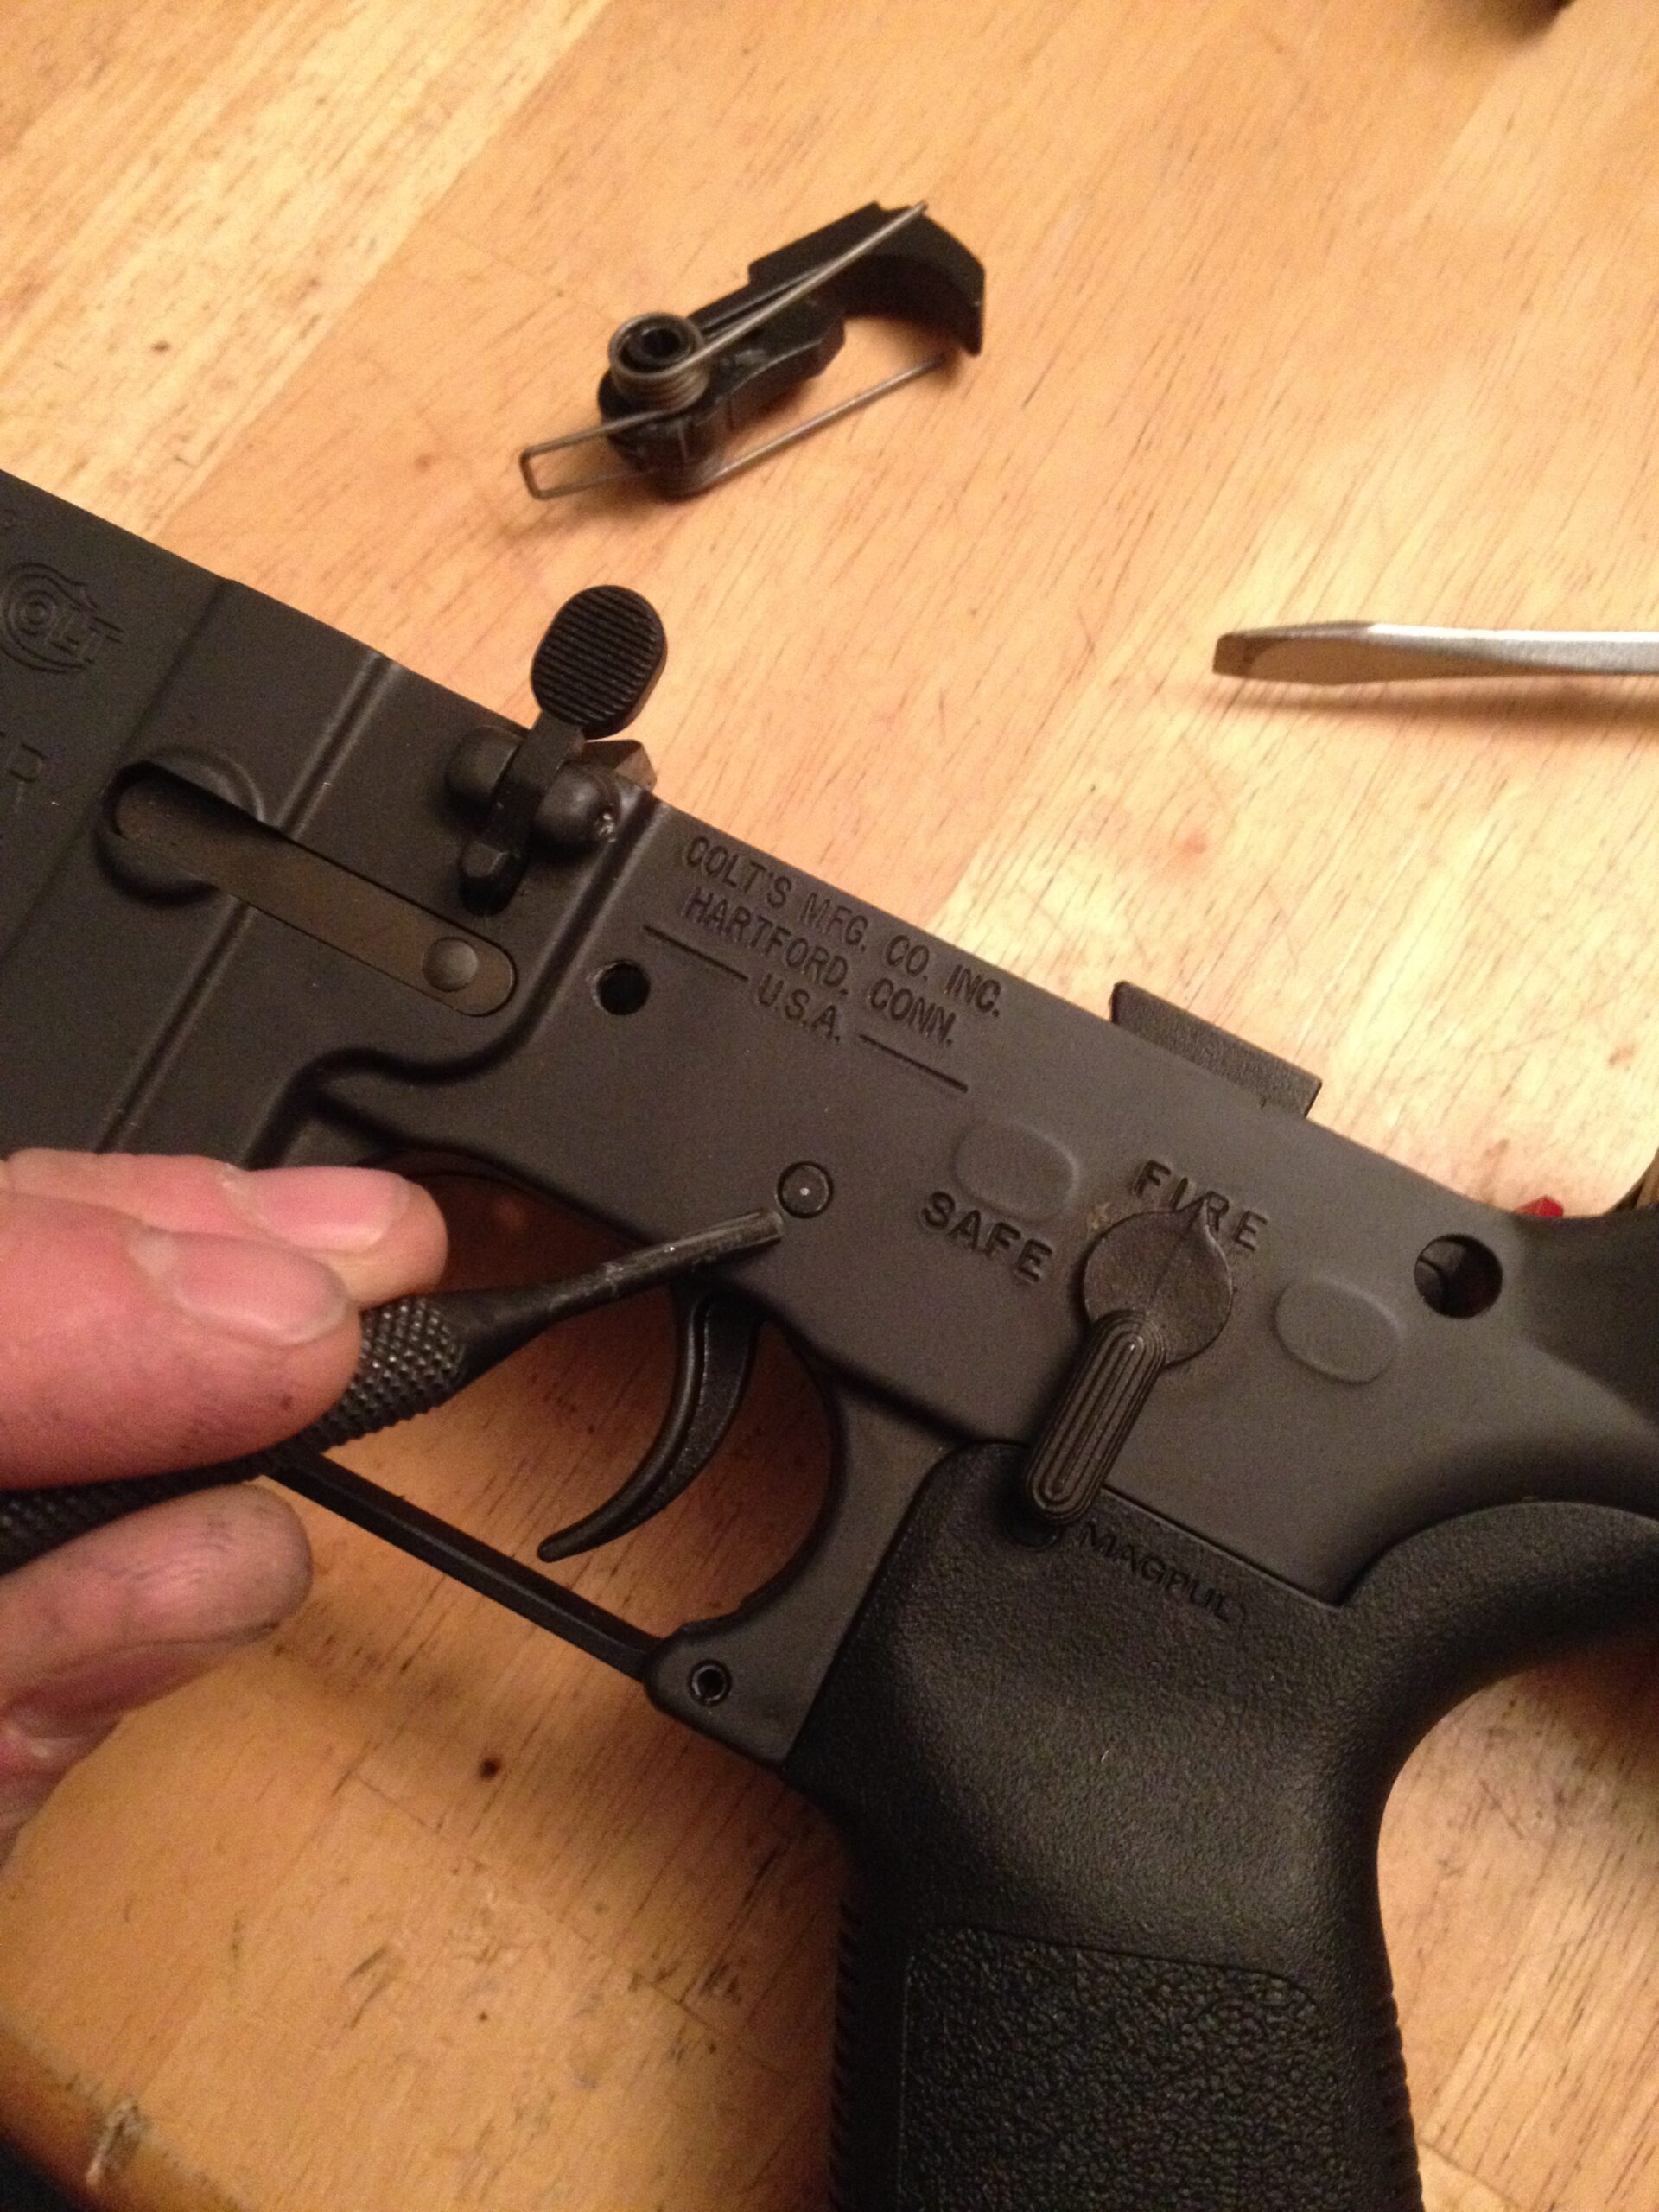
First, the trigger goes back in the gun. Work it back into the receiver, and push it down through the hole in the lower receiver. To keep it in place while you work on it, push one of the pivot pins (they’re identical) in JUST FAR ENOUGH to hold it, but not so far that it will keep you from getting the disconnector back in.
Next, push the disconnector down (see the polishing points picture for proper orientation) against the small round spring’s tension, until the hole lines up with the pivot pin hole in the trigger. Gently tap the trigger pivot pin through. Using the punch through the opposite side of the receiver can help you line things up as you push the pin through.
Note the orientation of the spring on the hammer. This is critical if you want your gun to, you know, WORK! Now, lay those two legs of the spring down on TOP of the trigger pivot pin (see the picture at the beginning of the post) and push the hammer downwards, against the spring tension, until it aligns with the holes in the receiver for the pin. Push the pin through (the punch through the other side of the receiver as a “slave pin” will be a godsend here) and keep wiggling the trigger until the pin is aligned and properly through the other side. They should fit flush.
There are a million YouTube videos that detail disassembly and re-assembly of the AR-15 if you have trouble.
A Trigger Job Well Done
Re-assemble the upper receiver on the lower, and try it out! Dry firing the gun is fine (MAKE SURE IT’S UNLOADED!!!) for testing. Hopefully everything went according to plan and the pull has been moderately improved. Always take it to the range and test-fire it under safe conditions to make sure it works well, and safely. If it doesn’t, spend the $25 and get the new parts from Brownell’s, Amazon, MidwayUSA, or your local gunsmith. It’s not worth the possible headaches and heartaches.
Now go enjoy your beer!
The basic premise of this (polishing moving/interacting parts) will work on many guns if you’re careful – just a little tip from your buddy TRW! Does anyone else do these DIY trigger jobs, or any other easy mods to your guns?
Enjoy your new trigger pull, and as always – stay safe!
22 comments
Nicely illustrated and great explanations of where to work and not work – Thank You!
Awesome step-by-step! Thank you!
One of the things I like to do when putting a “finish ” on any action job is to polish the bearing surface with red emery (crocus) or at least with “Flitz” to give that “mirror bright” old school finish.
Ray, I’ve used Flitz many, many times as a great polish. If I have to go crazy mirror finish, I’ll sand up to 2000 grit…mostly because it’s easier to find sandpaper than Flitz! 🙂 But that stuff is the BALLS for polishing stainless steel to looking like nickle plating.
Never tried the Sammy Scottish Porter! I’ll have to grab it when I see it next. I liked the Cold Snap pictured quite a bit…a nice white ale that was quite delicious! I’ll pick up their limited-production run beers like Cold Snap, Porch Rocker, etc., because they’re always outstanding.
And I really like the Sam Addams Scottish porter or Cream Stout.
Great tutorial but I can’t afford Sam Adams.
Ray, I’ve used Flitz many, many times as a great polish. If I have to go crazy mirror finish, I’ll sand up to 2000 grit…mostly because it’s easier to find sandpaper than Flitz! 🙂 But that stuff is the BALLS for polishing stainless steel to looking like nickle plating.
Never tried the Sammy Scottish Porter! I’ll have to grab it when I see it next. I liked the Cold Snap pictured quite a bit…a nice white ale that was quite delicious! I’ll pick up their limited-production run beers like Cold Snap, Porch Rocker, etc., because they’re always outstanding.
R.W. As you know I’m not known as an AR fan BUT; I was wondering why you don’t polish the bearing surface on the roll pin? I consider Flitz to be a nice polish but if I go crazy I get out the “sticks”(1000 grit-10000 grit buffing compound) my mops and buffing weels and leathers. Rust blue (or any other blue) on a mirror is just scary nice. My brother has been teaching me how to do straw color and case hardening (burnt bone) . When I grow up I might even be a gunsmith. My current project is a 6MM Walther barrel on a ’98 action with double phase double set triggers and a P+++++++ ABW stump wood stock (burl) cut from a 200 year old tree on my family farm, Trimmed with birds eye rock Maple end caps and checkered 20LPI. I haven’t settled on a scope yet. I also haven’t decided whether or not I want to have it engraved. I guess I’m just not an AR kind of guy. You really can’t have them banknote engraved.
I’ve tried going without, a few times. the beer is not “optional”…
(unless I have whisky)
What’s the black plastic colt block that is behind your trigger component assembly? Also how much do you like the Accu-wedge?
Thanks, Wes
P.s. This is a great instructional and way more detailed than others without too much reading!
Wesley, the trigger block is something Colt puts in to prevent installation of full-auto trigger parts. I just happened upon this page on the Geissele site that illustrates the variations:
https://geissele.com/colt-rifle-users-guide/
Since most triggers and sears are only surface hardened, are you concerned that the use of 600 grit sandpaper may remove the hardened surface of the parts in question?
Not likely with just polishing out machining marks. The case hardening goes deeper than the machining marks and with how case hardening works the outside of part is the hardest while the material gradually gets softer towards the center of part.
Not likely with just polishing out machining marks. The case hardening goes deeper than the machining marks and with how case hardening works the outside of part is the hardest while the material gradually gets softer towards the center of part.
I like what Ray said. If you polish the roll pin and the inside of the hammer where the roll pin sits, you will create less friction. Couldn’t that in turn lighten the spring strength needed?
Good question. Any thoughts? ?
I don’t see a roll pin in this assembly. Only solid pins.
Let it go! You are that guy!
There is no roll pins. They are solid pins.
Great tutorial, time to get started on mine!
Thank you, Gentlemen.
I would like to know more about alternative procedures for the sear block.
I don’t have to tell my reason.
Anyone know where I can find info on this topic?
I just did the trigger work as described above. I had to remove the pistol grip and the saftey shaft/lever to get the trigger out but otherwise, things went just like described. I used 600 and 1500 grit paper because I didn’t have 1000. I also used Frog Lube since that is what I had as well. Things went back together and I do believe it pulls better than before, even with my lack of “fine feel”.
Thanks for the very understandable instructions.