After the continued and quite satisfying success of my Epic Pure pitcher-type filter, I decided to look to Epic again when it came time to upgrade my home water filtration. I wanted an under-sink water filtration system to hook into my home plumbing to free up some refrigerator space (pitcher filters can be bulky), and also to ensure that all the cold water that comes through my kitchen tap would be filtered.
Off to Amazon I trotted, and found the Epic Smart Shield under-sink water filter. After reviewing the specs on Amazon, I found it was just what the doctor ordered. And speaking of ordering, I was delighted to find the Smart Shield on sale for $99.95. I ordered one up on the spot, and the smiley Amazon box showed up on my doorstep a couple days later.
WHAT’S IN THE BOX?!?
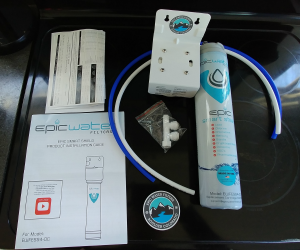
Having never tackled an under-sink filter installation before and having but a rudimentary understanding of plumbing, I had a bit of trepidation when opening up the box. What sort of witchcraft would be needed to conjure to get the contents of this box working its filtration magic?
An inspection of the contents was gratifying, only a few parts resided within. Inside, I found the filter cartridge itself, a mounting bracket/filter head, a couple of flexible plastic water feed lines – one white, one blue and a plastic manifold in a baggie with a couple of mounting screws for the mounting bracket. Of course, there were all the accompanying instructions and information that are apropos for this sort of application. They even threw in a vinyl sticker, too, if you want to proclaim your water filtration system’s origins to the world.
That’s it. Nothing complicated, nothing daunting. The instructions are reasonably clear, and easy to understand.
You’ll personally need to source a few items for the install: all I needed was a drill with an ⅛” drill bit, a #2 phillips head screwdriver or driver bit for the drill, an adjustable wrench, a tape measure, a pencil or similar marking apparatus, a utility knife, and a towel to absorb moisture. Of course, safety glasses should be worn during installation.
Installation – Not Just For Experts Anymore
Though Amazon offered to have a “professional” come install at my home to the tune of 140 bucks, I opted to push my plumbing comfort zone and install myself. I was fortunate that we had done a recent kitchen renovation to my 100-year-old house, including the kitchen plumbing. All my plumbing was modern braided plastic line and Pex-type plumbing.
If your under-sink plumbing needs are handled by soldered copper pipe, you’ll need to look into possibly calling a plumber or researching the correct fittings to be soldered in. Encouraged by the fact that I (somehow) had the easy way out on this project, I soldiered on. I pulled out the under-sink denizens, cleaned the area up, and steeled myself for the plumbing undertaking I was to tackle.
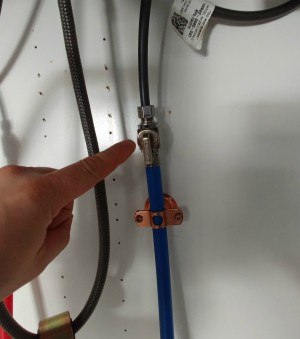
First thing I did was to locate the cold water shutoff valve. The Epic Smart Shield only filters cold water, so you need to plumb it into the cold water feed. The cold water shutoff valve was easily identified in my situation due to the blue piping heading to it. I shut the cold water off via the valve.
Next, I located where I would be installing the Smart Shield water filter. According to the instructions, the filter really needs to be installed vertically if at all possible. The mounting location for the Smart Shield should be wood or a similar solid substance; if you have to mount to drywall or plaster, you’ll need to source toggle bolts or drywall anchors.
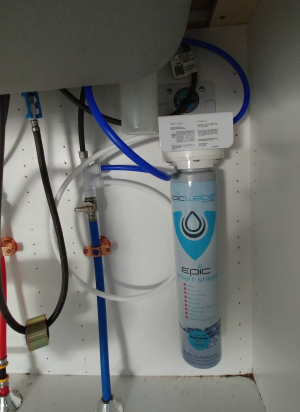
You’ll need enough room around the filter mounting head/bracket to allow the white and blue water feed lines to loop around and plumb into filter head without kinking. You’ll also need 2 inches (or more) below the filter body to allow removal of the filter cartridge from the filter head/bracket. To remove the filter, you turn about 90 degrees and pull down.
If you don’t have two inches of clearance underneath the filter body once assembled, you’ll never be able to remove the old filter without pulling the whole works off the wall – so be sure to leave yourself ample space. I had room to give myself about 3 ½ inches underneath the filter, and a couple inches to the inside wall of the sink cabinet. A tip from hindsight: 2 inches to the wall was barely enough room – give yourself more if you have it.
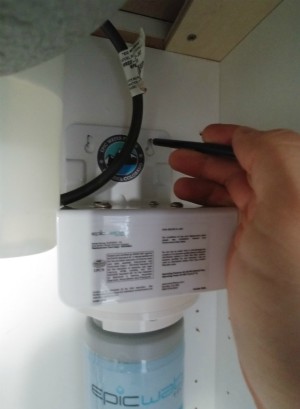
I shimmed the filter and bracket/head assembly up to the level I wanted it to be, and used a felt-tipped pen to mark out the screw locations for the bracket. I then pulled the whole assembly out, and used the drill with a ⅛” bit to drill pilot holes in the marked screw location pilot holes. The supplied mounting screws were then installed, leaving ¼ inch of thread sticking out so I could slide the bracket on and off as needed while I made my adjustments and installed the water feed lines.
Next, I took a deep breath and used my adjustable wrench to break loose the fitting from the house water feed line above the cutoff valve (I double-checked to make sure the valve was off!) I then carefully separated the cold water feed line to my sink from the cutoff valve. Some water leaked out, be sure to have a towel below.
Next, I screwed the white plastic manifold to the cutoff valve. This manifold diverts the water from the main cold water feed to the filter, then runs the filtered water back to the water line to the sink faucet. It’s a simple plastic affair with very fine plastic threads – take care not to cross-thread anything! Ask me how I know! In full disclosure, I’ll tell you how I messed this up.
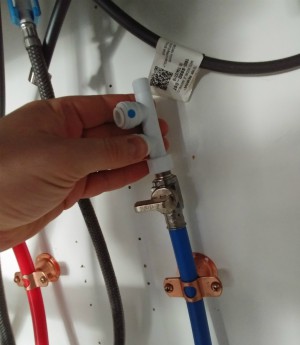
After I screwed the manifold into the fitting at the water cutoff valve, I then installed the water line from the faucet to the manifold. I had a weird visual angle on the parts, and didn’t notice that the metal water line fitting had gone onto the plastic manifold slightly crooked, very effectively cross threading the manifold’s plastic screws.
Once I’d assembled everything, the setup leaked heavily from that junction. I took the works apart and figured out what had happened.
Luckily, Epic included plenty of threaded area, so I was able to take a fine hacksaw blade and some sandpaper, and cut the threads off just after my goobered cross-threaded area. I made sure the new surface was smooth, flat, and correct – and the water feed line threaded on beautifully the second time.
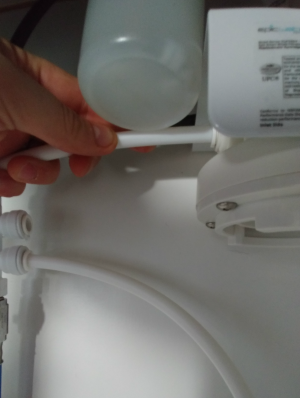
Once the manifold was installed, it’s a simple affair to push the new water feed lines into the manifold and filter head’s orifices.
If you’ve never worked with plastic Pex-type fittings before, they’re amazing; wet the ends a bit, and then push them forcefully into the appropriate openings. The pieces lock together and seal beautifully. The manifold and filter heads have blue dots on them to show where the supplied blue feed line gets routed; the white water feed line goes in the unmarked holes.
Very simple and straightforward. Make sure the lines push in all the way; about ⅜”-½” or so. I found it easier to push the lines in with the filter head/bracket off the cabinet wall – you have more flexibility and ease of moving things around for leverage if needed.
Once the white and blue water feed lines are installed properly, the install is essentially done!

I carefully placed the bracket with the filter installed (make sure you REALLY turn that filter cartridge onto the filter head – mine leaked until I realized it needed to be turned more.) onto the screws on the cabinet wall, taking care to place the water feed lines where they needed to go, with no kinks. I tightened the screws up, and turned the water back on. Success!
I ran the cold water for a few minutes per the manufacturer’s recommendations, then enjoyed my new crisp, clear, contaminant-free water. The whole process took me about 20-25 minutes, including fixing the manifold threads.
Why a Water Filter Is Important To Me (and You)
The benefits of an advances in-line filter for drinking water cannot be ignored. Contaminants abound by countless numbers, all provided by unseen catalysts that (usually) cannot be seen or predicted by the person drinking the water. Families dependent on city water (such as myself) can only take the word of the water district that the water at the source (water treatment plants) has been tested, treated, and meets federal standards for drinking water.
However, the water that reportedly is safe to drink still must travel through miles and miles of old pipes and can certainly pick up contaminants along the journey to your faucet. Homeowners with wells are not immune from these maladies either: wastewater seepage, pesticides, MTBE (Gasoline Additive), Cysts, and other nastiness will find its way into well water – and aside from a screen for sediment, many wells don’t have any filtration accommodations at all, leaving the user completely at risk for imbibing anything in the water supply.
While some may view me as an alarmist or fearmonger for the previous paragraph, I choose to do what I can to provide safe drinking water for my family. Yes, the town mails me bi-annual reports on water tests – but these tests are run at the source of the water. With the water being tested and reported only on an annual or bi-annual basis, how quickly would any contaminants or issues be caught, and more importantly – how much contaminated water would my four-year-old drink before we were notified?
I was recently shown the EWG website; it’s a great database where you can enter your ZIP code and see the results of testing from user-end water in your town. I entered my location, and was “lucky” enough to only have two items found above safe or reported levels – however, these were both cancer-causing carcinogens: Chromium (hexavelent) and Total trihalomethanes (TTHMs); these are caused by industrial pollution and water treatment, respectively. It’s highly recommended you head to the EWG site and check out your local water supply.
What The Epic Smart Shield Does For You
The Epic Smart Shield is an American made, direct-connect multi-stage filter system that utilizes eco-friendly activated coconut carbon filter media to help filter out 99.99% of tap water contaminants through adsorption and depth filtration. By contaminants, we mean sediments, minerals, heavy metals, lead, iron/rust, and other nasty things that might drift through your water supply. However, contaminants you might not think about – asbestos, benzene, MTBE, chlorine, mercury, VOCs, trace pharmaceuticals, herbicides, and pesticides are filtered out of your water by the Epic Smart Shield filter.
The Smart Shield has been 3rd party tested and certified to improve Aesthetic Effects (taste, clarity), Health Effects (removing VOCs, MTBE, lead, mercury, etc.) and Emerging Contaminants & Incidental Compounds (removes pesticides, emerging contaminants, and pharmaceuticals). In short, the Smart Shield removes the vast majority of contaminants, making your water safe to drink. It has not been tested to remove Radium-226 or -228 or Radon, so if your water contains those, you might want to look into a reverse osmosis filter or water softener in addition to your Epic Smart Shield to remove those contaminants as well.
The Epic Smart Shield is certified against NSF Standards for 651 gallons of water at 99.99% filtration, meaning that gallon number 651 that has been filtered through the Smart Shield is just a clear and contaminant-free as gallon number one. Filters are easily replaced, and replacements are available through Amazon. Filters are recommended to be replaced every 9 to 12 months for a standard family of four.
Survivalists Take Note!
This is a survival site, so you may wonder how this pertains to any survivalists who may be reading this review. The Epic Smart Shield is a great in-line filter for your water supply; plumb it in and you’re looking at the majority of contaminants removed from your drinking water. Under short-term power outages, most city water still maintains pressure, so the Smart Shield will keep your drinking water in good shape.
If you’re running a generator wired into your house, your well (if you have one) should still supply safe drinking water, and you won’t need to employ the hassle of a pitcher filter just to get clear drinking water. Keep in mind biological contaminants such as bacteria may not be filtered out, so boiling the water may be a safe bet under long-term survival situations. But, for a big-in disaster, the Smart Shield will keep your drinking water free of any prevailing contaminants as long as you can keep water flowing through it.
Conclusions
The Epic Smart Shield is the home handyman’s dream. Easy to install, no maintenance required except periodic filter changes, brilliantly easy to use. The filtered water is crisp and clear, and makes damned good coffee. I’m tickled pink at the bang for the buck the Epic Smart Shield provides, and the ease of installation was the icing on the cake.
I know now that my drinking water is safe for my family, and is protected against the vast majority of any contaminants that may seep into my water supply before the town can advise me not to drink it. For under 150 bucks and an 30 minutes of your time, you can’t go wrong. You owe it to yourself to have clean, hassle-free drinking water.

5 comments
I have been looking for a way to filter the water I have saved in 55 gallon barrels since they contain tap water and whatever chemical used to keep the water. Could you use these filter for that purpose??
Hi Julie,
Thanks for reading! Yes, the Smart Shield absolutely could be used to filter your saved water; you will have to plumb it in conjunction with a hand or electric pump to get sufficient pressure to move the water through the filter.
Does it filter fluoride?
Hey Jack – it has not been tested yet with Fluoride but they are expecting to conduct that test in 2018.
there’s something awfully satisfying about soldering up copper pipes, that PEX, and crimp sleves probably can’t match. (at least until I can afford a good PEX crimper)