I contacted my survival sewing home girl, Julie Anne Eason and said, “Yo survival sewing home girl, can you dose me up with a survival sewing post on how to mend socks?”
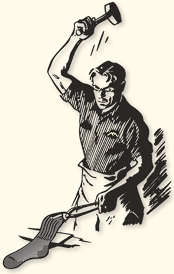
While I thought the information might be of interest to some SHTF Blog readers, the request was really out of self-interest. You see, I love Smart Wool socks. They’re warm, comfy and SHTF stylish. I end up wearing them all the time, even around the house as slippers. But this heavy use of rather pricey socks means they don’t last as long as the cheaper socks that end up staying in my dresser most of the time. Consequently, more use means more wear, and the heels of the socks go first.
Looking to extend the socks’ life, and also to extend my money, I asked Julie Anne if she’d write a post for me. She was nice enough to oblige. Now all I need is a darning egg (stocking stuffer idea?), a little wool, needle, this blog post and I’m ready to sew up my survival socks!
*******************
Guest Post by Julie Anne Eason
Wool socks are the best for keeping your feet warm and dry. And here in Maine, we need to do that practically year round. If you’re not tromping through snow, you’re wading through six inches of mud as little rivers carve canyons in your driveway. I like to hand knit my wool socks, but even my friends who buy them know the quality ones aren’t cheap. So, when they start to wear out and get holes on the heels, it’s a good idea to know how to mend them. And when the SHTF, there’s no telling how long it will be before you can just pop down to LL Bean and buy some more.
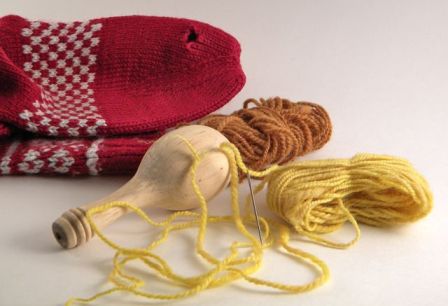
The old-fashioned word for mending socks is “darning.” I’m going to use a pair of hand knit socks in the demonstration pictures because they’re my favorites and they need mending at the moment. They were my first attempt at knitting socks, and I had a little trouble reading the pattern. Hence, the toe on one is knitted backwards. I also used the wrong kind of yarn, practically guaranteeing they’d fall apart after wearing them a few times. I’ve mended them over and over, and will continue to do so until I get tired of it and just knit a new foot onto the cuffs.
Which brings me to the first way to mend socks. If you are a knitter, or you know a knitter who owes you a favor, you can simply rip the sock back from the toe to the point where the hole is, cast the live stitches back onto a needle, and knit a new foot. If the hole is in the heel, you can carefully cut the old heel out and knit a new one in. Don’t try this unless you’re an experienced knitter, or you don’t mind tossing the socks if it doesn’t work. This technique is a little tricky.
Better Idea: Darning Sock Holes
Using a large-eye needle and some yarn of the same weight as the sock yarn, you’re going to weave new fabric over the hole. You’re also going to need a darning egg. You can find these at antique stores, in your grandmother’s sewing basket, or you can get someone handy with a lathe to make you one. Barring those alternatives, you can use an old light bulb, a baseball or other small, smooth object to help guide the needle.
You also need to decide if you’re going to darn from the inside or the outside of the sock. I like to darn from the outside because the smoothest part of the repair will be next to my foot. But the outside won’t look as good. Then again, who’s going to see it anyway? It’s in your boot.
Note: I’m going to use two different contrasting color threads, one in each direction, so you can see the pattern. But you should complete the entire repair with one length of yarn.
First, put the darning egg inside the sock so you can clearly see the hole.
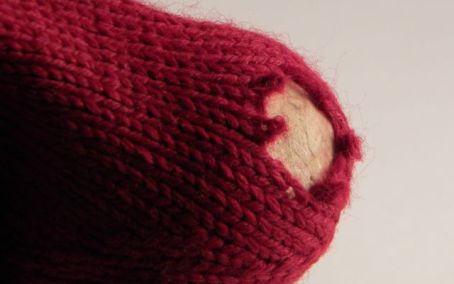
Start by taking some running stitches in the solid part of the fabric. (A running stitch is just “in, out, in, out” with the needle) Complete two or three rows of stitches before you get to the hole.
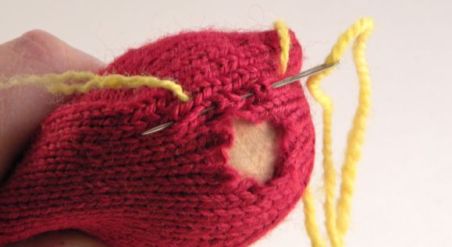
Work running stitches in and out of the stable fabric. Keep making running stitches at the bottom and top of the hole and just let the yarn float across the hole in parallel lines. When you get to the other side, continue making running stitches two or three rows into the stable fabric. Keep working parallel lines in one direction.
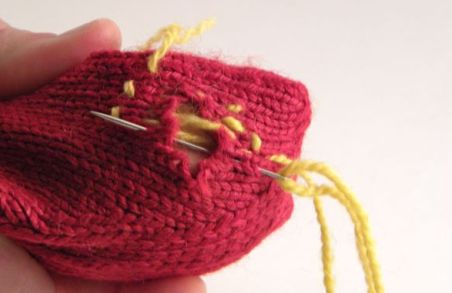
Now, turn your work 90 degrees and do the same thing in the other direction. When you get to the parallel lines over the hole, weave the needle “over one, under one…” until you get all the way across. Then take a few running stitches in the stable fabric on the other side. Turn your work and go back the other way.
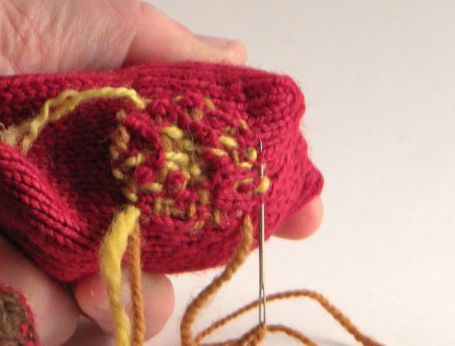
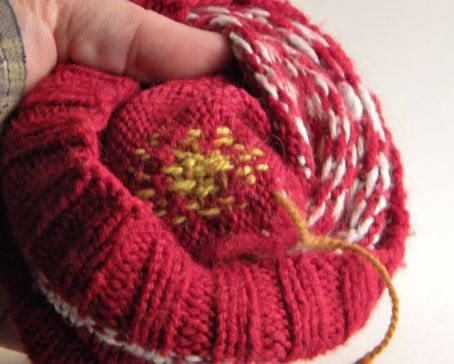
Work a basketweave (over one, under one) in the opposite direction. Continue weaving across the hole, packing your lines as close together as you can, until the entire hole is mended. This demo sock has a small hole, so it’s a little hard to see the weaving. It’s okay if you don’t get a perfect basketweave. In fact, you may end up with just a mish-mash of woven threads, and that’s fine. As long as it’s all secured into stable fabric, it will hold. Finish by cutting the starting and ending threads. And trim the excess sock bits around the repair. The inside of the repair should be nice and smooth.
Helpful Hints for Darning Socks
- Use a yarn that’s about the same thickness as the rest of the sock yarn. And it’s better if you can find wool with a little bit of nylon spun into it. The nylon helps the repair last longer. Though you’ll find once you start darning that the repaired sections are stronger than the original knitting.
- Try to match the repair yarn to the color of the sock if you don’t want it to show. I kind of like the way patches look, so I just use whatever yarn is handy.
- A darning needle is your best choice because it has a large eye and narrow point. But just about any needle will do in a pinch, as long as you can get your yarn through it.
- If you don’t have a large eye needle, or only have thin yarn available, you can double the strand you’re working with.
It’s easier to darn small holes than large ones. So, try to get to the mending before the holes are too big. Once you notice a spot getting thin, that’s the time to tackle it. Hence the saying “a stitch in time, saves nine.” This technique works with just about any fabric and any hole that has surrounding stable fabric. So don’t just darn socks, you can darn shirts, jackets and pants, too.

12 comments
Great guest post! I sew & embroider but didn’t know how to darn large holes, only small ones where I could just bring the edges together & sew them, like a doctor would put stitches into a cut. And since I love my sock collection, there are a few with larger holes that currently need darning! Now I know how.
Looks good and nice helpful suggestions. I have tried that method with a darning needle but found Knitting the repair looks very close the original knitted socks. Have you tried lifting the stitches onto a knitting needle and knitting the repair? You pick up edges as you go and it fills in perfectly. I got this method down on my first try. I really appreciate the suggestions to just unravel and reknit areas as I have some I need to fix on hubbys socks but don’t have the matching yarns.
This is a great post! I like to wear smartwool socks in the fall and winter too and find that the heels are starting to get thin. This will help extend the life of these rather pricey socks.
One question. When you cut the end of the threads do you have to tie them or is it ok to leave them like that?
Oops, I posted a reply to this below (didn’t see the reply button)…
Look 2 posts down for your answer. 😀
Great Article and Thanks. I wear these wool socks all the time. work and play. lifetime warranty with no qualms. i have returned several pairs a year and do not worry about wearing them out on the porch, etc.
my 2 cents https://www.basspro.com/RedHead-Lifetime-Guarantee-Hunting-Socks-for-Men-1-Pair/product/34713/-876269
I have had a darning egg as part of my preps for a long time. I have to admit that I have never used it. It was my grandmothers – the one who taught me how to sew. Your post has reminded me of it and I intend to use it the next time I have a sock that needs mending. In this day and age, we’ve become so affluent that we just throw the worn ones out. I suspect that may be changing soon.
Thanks for the post.
Hey, Jarhead Survivor–Thanks for bringing that up. I meant to add that to the post and must’ve forgotten. The answer is “No” you don’t have to do anything to the cut ends. Knots will hurt your feet! Over time, the wool ends will felt together with the rest of the sock and you’ll never know it’s there. If you don’t like the little ends sticking out on the outside of your sock, just finish your last stitch on the inside.
PS–I *Love* that I’m the “Survival Sewing Home Girl”! You’re awesome Ranger Man…
Awesome guest post! I have done some limited sewing but was not really sure about wool socks with large holes. Now that I know what is a darning egg, I will have to get one. Thanks!
It really doesn’t matter how large the hole is. As long as you have stable fabric all the way around. If you get a hole on the top cuff that goes all the way through one edge, you should take it to someone who knits or crochets. Ask them to chain on a new top edge and work an inch or so. Then just darn away like you normally would. Hope that helps.
Oooooh!! Thank you thank you!
I have some smart wool socks that I need to darn.
I’m a dancer so my socks always wear out on the ball of my foot before anything else. 🙂
I just started knitting this year, and I was worried about trying to darn the holes, I thought it would be hard, like I would have to cast on around the edge of the holes or something. So glad to see it’s easier than that.
Now if I can find one of my grandma’s with an old darning egg I’m good to go!
Julie, I’m definitely checking out your blog.
Thanks Jennie…
If you’re a knitter and a dancer (like me 😉 you should check out Ravelry.com As for the ball of your foot wearing out, try gluing or sewing a patch of leather across there to protect the yarn while you dance.