Need a secret bunker? Here’s an idea, what if building an underground bunkers from culverts was an option? This bunker could be for when SHTF, or even just to get away from the family when the weekends get too long! Either way, if the following applies to you, then we have you covered:
- You need a secret hide-out.
- You are a ‘do-it-yourself’ kind of person.
- You are exploring relatively cheap and easy underground bunker solutions.
Note that if you are seriously concerned about the probably of facing nuclear fallout, it’s worth investing in some Potassium Iodide pills. Preppers stock it and you should, too.

- Made In The USA this potassium iodide compound comes from India, with final manufacturing in the United States. Our facility adheres to the FDA requirements and guidelines with good manufacturing...
- Best Thyroid Protection Treatment In An Emergency
- Quick obsorb
This article will explore how to use pre-cast culvert sections for building an underground bunker. Mind you, this is not something you’re going to be able to do on your own. The bunker I’m talking about involves heavy machinery and a willingness to spend some serious money.
Culverts and How Preppers Can Use Them
Culverts carry water under roads or railways. In this sense, they could be thought of as manmade channels that allow water to follow its natural course.
Culverts can take many shapes and forms. You get round steel culverts, and small square culverts. For our purposes, I am talking about large, rectangular, U-shaped, pre-cast concrete, culvert sections.
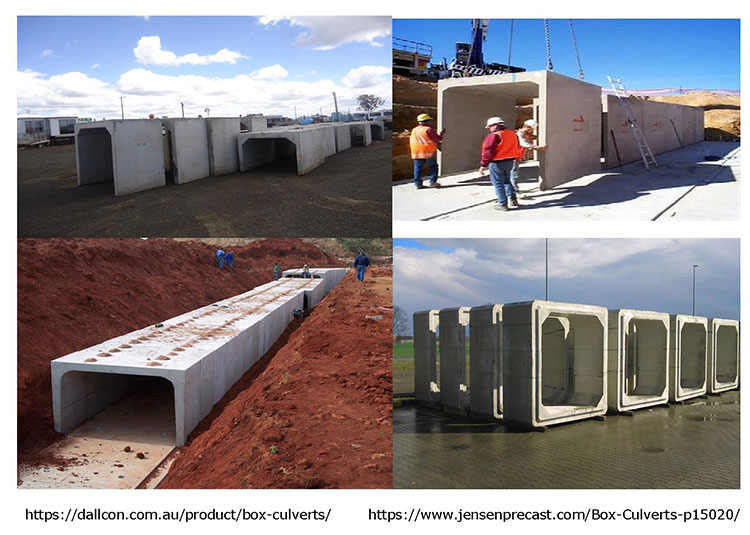
Please note: It may sound obvious, but I am not proposing that you take residence inside an existing, operational culvert. What I am suggesting is that new culverts can be used for more than just channeling water. They can be used for bunkers. Effectively and securely.
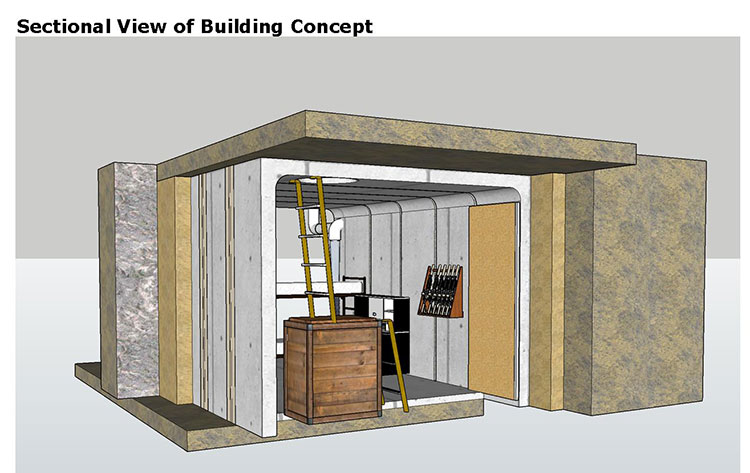
The Under Bunker Culvert Concept
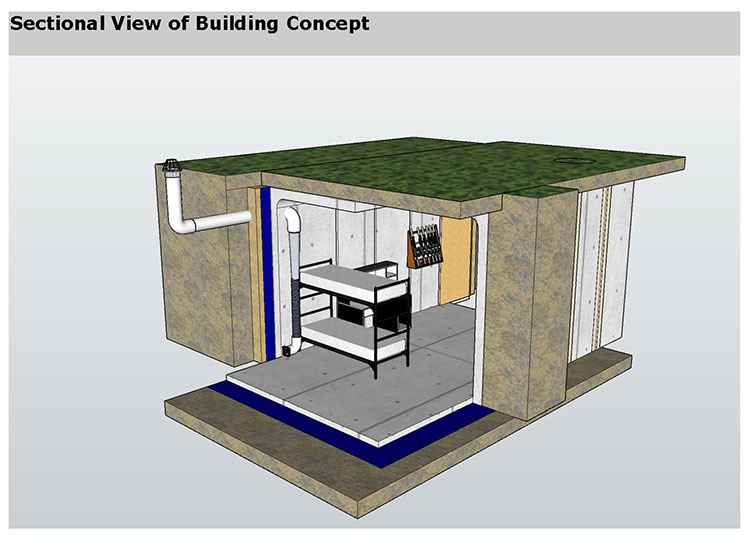
This basic idea revolves around placing these interlocking sections together and thereby creating a hollow, secure, and stable underground space.
The inverted U-shaped sections would be the most versatile to use. You can stack them next to each other to create an underground tunnel of virtually any length. This versatility allows you to create a bunker according to your size requirements.
Where to Start
You will start with a trench. The trench will need to be deeper, wider, and longer than your intended bunker. Bring in the backhoe for this!
Two words of advice before we continue. If you intend to cover it with grass or other garden features, make sure you go deep enough so that plants on top will have enough soil to take root in. Also, don’t do this at the lowest point of your property or anywhere water tends to dam.
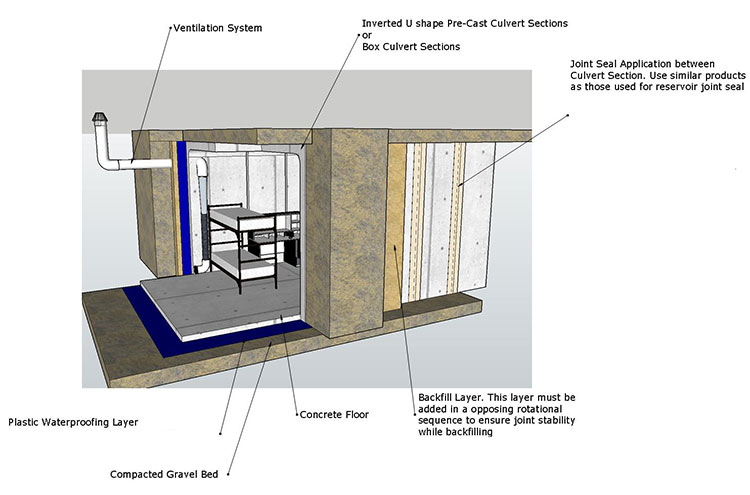
Once your trench is dug to size, you need to get gravel in there and compact it until you have a stable base prepared. Much the same way you would for a basement foundation. One or two feet thick should be enough.
Make sure your gravel has enough fine particulates so that it will compact to a high degree of hardness. No need to go overboard here, but just be sure that you have adequate stability for the concrete sections that you are going to place on the gravel bed.
Now is the time to lay a layer of waterproofing. Sheet plastic, like the kind used under standard basement or concrete flooring, can be laid over the compacted gravel before your culvert sections are put in place. Keep in mind that a crane truck will be placing them, so be sure to think about access and crane boom accessibility before digging the trench.
Structure, Entrances, End Closures and Flooring
You can order culvert sections to have manholes in them. Plan your access in advance and order accordingly. These manholes will be your access points into the bunker. Always create redundancy, as you never know what could go wrong, so make sure to have at least two entrances.
Once the culvert sections are in place, you will need to make a call regarding end closures. These are the open sections at both ends. Do you brick them up or cast them with concrete? Whichever way you decide to go, you will need to dig the trenches for the foundations of the closures at this stage. I would recommend casting concrete, but it’s up to you.
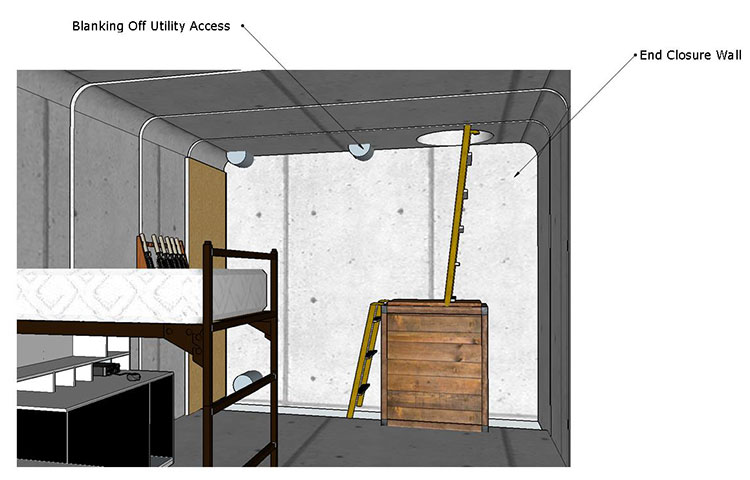
Also make sure to leave openings for ventilation and cables in these (closure) walls. If it was my bunker, I would have at least three holes in the top and one in the bottom, per closure. The versatility of access could come in handy later. You can install 4″ drain pipe before you backfill.

Once the foundations for your closure’s are done, you can cast the floor inside. I would recommend a 4″ concrete slab. Be sure to reinforce into the floor, but once again, nothing heavy duty. Standard principles for expansion joints apply.
Fitment Before Closure
Before you close off both sides, you might want to consider doing some of the interior fitments while the side of your bunker is still open. Airflow while working, cleaning, all these things will be easier and save you time.
If you are not ready, or the contractors are in a hurry, you can maybe just stash some of your equipment inside and then cover it with plastic when you board up the end-closures. The less stuff you need to disassemble to lug through the manholes the better.
Waterproofing the Joints
There are many products available in the market for waterproofing. Look for those that are used by concrete reservoir manufacturers to seal the joints on reservoirs. On your bunker, you need to seal:
- The joints between culvert sections.
- The joints between culvert sections and closures.
- The seam between the floor and culvert sections.
I would cover the entire structure in a plastic sheet before backfilling. It may be overkill, but you will most likely have plastic leftover from the layer you laid down beneath your floor. Why waste it?
Trench Backfill
Once you are done with with the waterproofing, it is time for backfill. If you are using a machine like a backhoe or front-end loader, make sure that they are gentle, both in terms of the amount of soil they tip at a time, but also the rate at which they tip. Remember that your structure is jointed, hard impacts can move sections, open seams or cause disruption of the bond between the floor and the culvert sections.
Another important consideration if to fill it evenly in an opposing order. For example, don’t fill up the trench entirely at one “end closure”, and the move to the other “end closure”. The weight of the soil on the one and can disrupt the structures position. Instead, dump a load at one end, then at the opposite end closure, and repeat. Apply this principle all the way around your structure as you fill the trench.
The culvert sections will become increasing stable and immovable as the level of backfill rises around them. I would recommend at least some compacting of the backfill. Nothing as serious as for the floor or foundation, but you don’t want air pockets around your structure and the soil will naturally compress over time, exposing your bunker. The backfill needs to be firm.
My Underground Bunker from Septic Tanks Article for the Rest
There are additional steps.
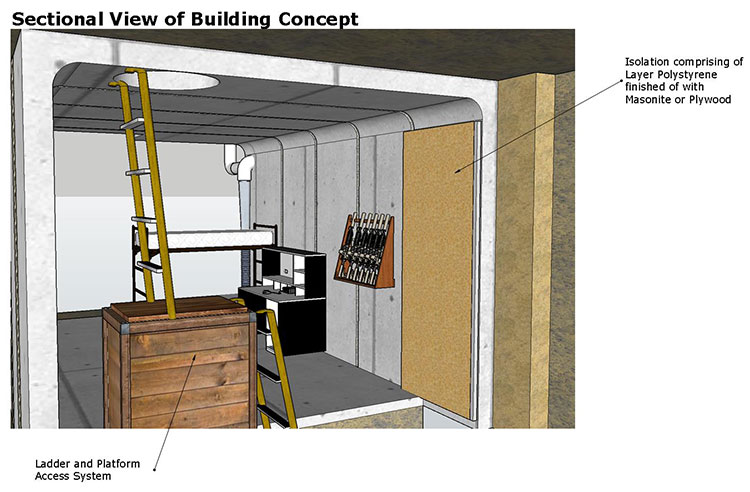
Building an underground bunker also means installing access points, an HVAC system of some type, ventilation and lighting.
I covered these in my related article Building an Underground Bunker from Septic Tanks.
The same principles apply with culverts. What I wrote about finishing your septic tank bunker off can also be applied to culverts.
Final Thoughts
The pre-cast concrete sections of culverts present a quick and easy way to get a fully functional bunker set-up. They are designed to go underground and to bear weight. Even if the joints leak a bit, it’s not as if you are trapped inside, so drowning is not really a threat.
The reason the floor gets cast inside the culverts sections, and the side closure walls stand inside the culvert sections, is to aid in keeping water out. But dampness could be an issue.
If you are storing ammunition or firearms and dampness is a concern, there are commercially available chemicals that come in packets or bags and absorb ambient moisture. Silica Gel Desiccant Bags are for instance used inside shipping containers to prevent condensation.
An old-school way of doing this is to wrap all items in finely woven cloth and submerge in grain or rice. You can also use husks or even peanut shells, provided they are dried when they go in. You can buy bulk grain and rice for animal feeds. Just throwing this out there, to open your mind to the fact that modern technology or some old school tricks can both provide solutions.
One other thing I want to add is the need to keep a few gallons of white vinegar. This has many uses, but a major one relating to the interior of your bunker is mold. White vinegar kills 82% of mold species. Just don’t spray while you are inside. You can also add baking soda to your mix, and mold should not be a problem any longer.
Otherwise, wishing you fun and success in setting up your underground refuge.
If you want to read more about how to survival a nuclear exchange, see Cresson Kearny’s Nuclear War Survival Skills.

- Kearny, Cresson H (Author)
- English (Publication Language)
- 340 Pages - 04/29/2022 (Publication Date) - Knowledge Publications Corporation (Publisher)