I covered what the best victory garden size for you is in my last post. Size and location are the first two decisions an aspiring gardener must make. The next task is preparing soil, but before grabbing a spade and turning up ground. Like the last post, I have pulled (and adapted) text from the Department of Agriculture‘s ABC of Victory Gardens guide published during World War II. This guide advised Americans on how to make a victory garden, with a particular focus on producing easy-to-grow, nutritious food to supplemental food rations and U.S. war efforts. For prepper purposes, we can view yesterday’s “victory garden” as today’s “survival garden.”
Preparing the Soil
The importance of good soil preparation cannot be overemphasized because this is where your gardening job starts. Unless you are willing to do a good job here, you might as well give up. The difference between a good crop or a poor crop lies in soil preparation. Remember that no vegetable can give you more than it finds in the soil, for the simple reason that everything it gives you comes from the soil. The answer to this is proper soil preparation.
Dig! Dig! Dig!
Vegetables, yes, even down to their roots, have to breathe air. That’s why the soil must be loosened and broken up to the full depth of your garden spade. Get at this digging just as soon as the ground thaws, the earlier the better. However, one warning, don’t start to dig until the earth falls apart when you squeeze a handful. If it is too moist it will not break up properly.
Two Methods to Choose From
First there is single digging, which, to be frank, is as far as most gardeners ever get, and which in most cases is sufficient. You push your spading fork or spade down straight into the ground, not at an angle, using the firm soil at the back of your tool as a pry. Don’t cheat! Push the spade in as far as you can go!
Dig in Compost or Fertilizer
If you have an compost or other humus or fertilizer, such as horse or cow manure, this is the time to make use of it. Spread it evenly over the ground or place it in the trench that you open up with your spade or fork. Make sure you cover it completely so that it will be down at the level where the roots get their food.
Double Digging for Poor Soils
Double digging is the next method for preparing your soil. They call it “double” because you go two spades deep. If you have a good layer of topsoil it is not necessary. Do this only when your topsoil is thin or the sub-soil is so hard you have to chip it out a little at a time. With this method you should throw the top layer off to one side, the second layer off to the other side. Then you throw the topsoil back in the trench first, with the second layer on top. The top layer, which is the poorer soil, may now be improved with humus, manure, or fertilizer.
Whichever method you use, don’t dig more than a strip four or five feet wide at one time. As you throw the dirt down, hit it with the fork, breaking up the large lumps into small pieces. Do this as you go along, and don’t let your digging get too far ahead of your raking. Level off the dug over ground with a good iron rake, using the back as well as the teeth to smooth out all depressions.
Use a Plow if Possible
We know that most people with small gardens do not have a plow or tractor at their disposal. Here’s a tip. If five or six other people in the neighborhood are going to have victory gardens, see if you can’t get together and hire a farmer or a contractor to come in and plow up all of your gardens on the same day. It will save the hardest work gardening requires.
Continue Preparing Soil
The next operation is to dig a trench about a foot or less in depth and as wide, carry or wheel this soil to the other end of the garden as shown in figure 1. This soil will be used to fill in the void remaining after your digging.
Figure 2 illustrates the method of turning over the soil as you dig and fill each trench. The old gardener recommends that you push the spading fork straight down into the soil to its full length and then turn over each spadeful so as to work in the manure or other organic matter. Break up the lumps as they appear and throw out any large stones, roots, or other undesirable manner. Do not dig too deep nor turn up the subsoil.
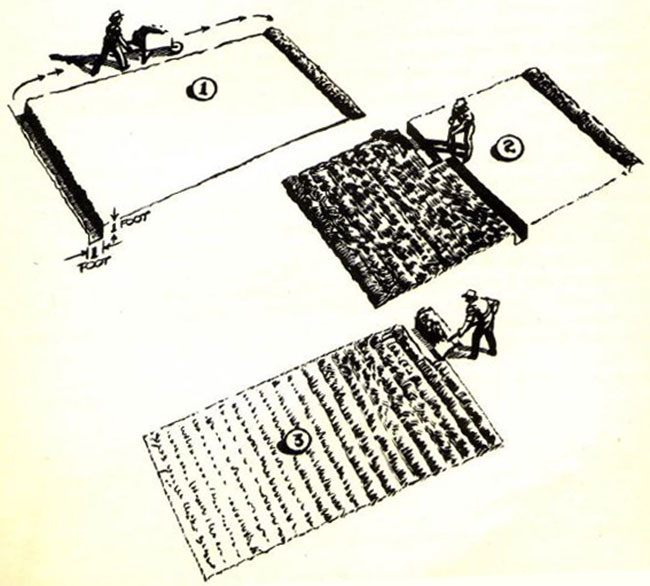
Work up the soil as you dig and smooth it as much as possible to make raking easy. The main purpose is to level off and pulverize the top three or four inches to make a good bed for your seeds and plants. Digging is back-breaking, but it is grand exercise. Wait until the garden soil is dry enough before you start to dig. Soil that sticks in a ball when pressed in your hand is too wet to be worked – wait until it crumbles under press.
Types of Soil
Clay – A clay soil is stiff and heavy; it warms up slowly in the spring and cannot be dug as early as a light sandy soil. However, it is a fine soil once it is improved. It retains plant foods and moisture very well. You can make it an excellent growing soil by adding sand, sifted coal or wood ashes, commercial humus or your own compost. Do this when you turn the soil over, mixing it thoroughly. Apply a light top dressing of lime about ten days after the digging is done. Then cultivate it into the surface. (Do not use lime at the same time you apply manure or fertilizer.) This type of soil is better if turned over in the fall (but not raked level) so that it is in a rough state during winter. It will then break up into loose particles much more easily in the spring.
Sandy – A sandy soil that has been improved properly, makes a fine bed for most vegetables. It does not retain moisture and nourishment until this has been done. if your soil is sandy, plant a cover crop such as buckwheat, rye, or oats in the fall. Then in the spring turn the cover crop under. You will also have to add considerable quantities of humus, peat moss, or your own compost. You will find that it will improve greatly each season with these treatments.
Preparing Soil with Fertilizers
Fertilizers have to purposes – first, to improve the soil; second, to hasten growth. Your first use of a fertilizer will serve both purposes if you apply it when you first turn the soil over, or better still, about a week before planting, work it well into the upper part of the soil.
Nitrogen, potash, and phosphorous are the essential elements that are lacking in sufficient quantities in most garden soil. They should be replaced with a good commercial fertilizer or an organic alternative One that is especially good to use at the beginning of the season is a commercial mixture. Cow manure and horse manure are both good for general use if you can obtain them. Other good fertilizers are bone meal, cottonseed oil, soybean meal, and tankage. These release their elements much more slowly than commercial fertilizers and therefore will not be of much use in forcing quick growth.
Preparing Soil with Lime
Use lime only if you know for certain that it is needed. You can find out if your soil needs it very easily. Order some Litmus paper. Dig up some soil and place it around the paper. If the paper turns dark red, you do not need lime. If the paper turns a bright red, lime should be used because the soil is sour. Use a finely powdered hydrated lime, and spread it sparingly over the surface of your garden cultivating it into the top few inches of soil.
The ABC of Victory Gardens Pamphlet
Much of this post came from the ABC of Victory Gardens pamphlet distributed widely during World War II. We have made the complete pamphlet available for download in PDF format. Click here to get a copy.
Further Recommendations

If you’re new to gardening, consider a copy of Mel Bartholomew’s best-selling book All New Square Foot Gardening. Then, when you’ve inevitably produced way more vegetables than you can eat in a season (a common beginner’s mistake), you’ll want a copy of the USDA’s Complete Guide to Home Canning.
It’s the go-to source on canning, and it’s inexpensive. You can get a pressure/canner cooker to accompany canning supplies and Mason jars that run from the high-end All American 930 to the more reasonably-priced Presto 8-Quart cooker.
1 comment
Yes! I love that pamphlet! Good stuff!