So you want to know how to paint your rifle camouflage. I painted mine 2 years ago and this is how I did it. The information in this post could also apply to equipment you may want to paint. Chances are high you’ll have paint left over anyway.
Note: If you do not want a permanent paint job on your rifle, an alternative is called “gun skins.” These are easier, faster, and removable. This may be a better option for you. If not, read on…
The Rifle I Wanted to Paint
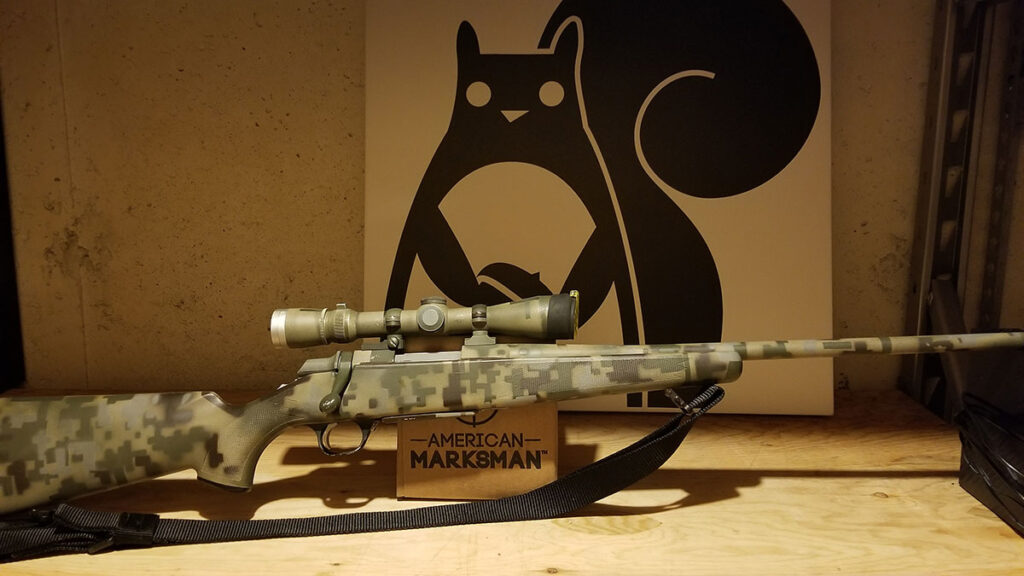
The idea to paint my rifle came from a local gun dealer. The rifle is a bolt-action Browning A-Bolt Stainless Stalker in .308 caliber. It’s all stainless steal with a black synthetic stock. I hump the woods with this thing, so I wanted stainless and synthetic. I’ve had bad luck hunting lousy weather with a blued rifle, and I’m always cautious about banging up the wood stock.
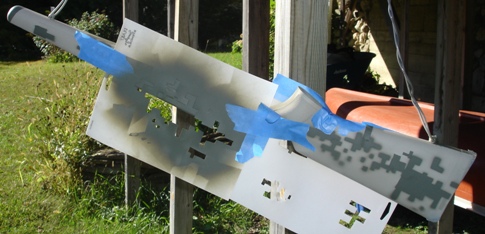
On the rifle I mounted a Leupold Vari-X III 2.5-8 x 36mm scope. The scope matched the stainless barrel. I took it to a local store for scope rings. The store owner looked at it and said, “Dude, why don’t you paint that thing?” I admit, it looked …. space-age-like. Here it is before I painted it:
The guy then goes into the back and brings out a rifle that he painted. It was camo – sort of. It was a rough job, let’s just put it that way. But it certainly wouldn’t stand out in the woods. This set about my desire to eliminate the beacon of light reflecting off the shiny gray whenever the sun shone down.
At first I was reluctant to paint it. I didn’t know how to paint a rifle and it seemed daunting to just spray paint a rather expensive rifle. So, I thought I’d go temporary with some sort of camo tape, but then I figured it’d just collect moisture under the tape and the tape would become slippery in the hands when wet.
Then I thought about sending the rifle to a professional to have it painted entirely in Real Tree. I eventually found a place, but the prices were totally outrageous, plus the shipping, and every part you added on bumped up the price big time. Screw that.
How to Paint Your Rifle
So I set about searching the web for good information on how to paint it. There were no perfect directions, so I blended the information from many and used the following approach.
Painting your rifle comes down to X steps:
- Buy the Paints
- Make Your Stencils
- Disassemble Your Rifle and Tape Protected Areas
- Lightly Scuff Non-Metallic Surfaces
- Apply Adhesion Promoter and Base Color
- Apply Paints to Your Pattern
Leaf, twig, and grass stencils are readily available if you don’t want digital camo, but it was my view that digital would look the best. (Download a free digital camouflage stencil I made.) Let’s roll!
Step One: Buy the Paints
The first obvious step to painting your rifle is to buy the paints. There are not that many paints that you’ll need to buy and they’re all quite affordable. You’ll save a mountain of money by doing this yourself rather than having your rifle shipped off to have it professionally painted. Remember, it’s apt to get dinged up anyway.
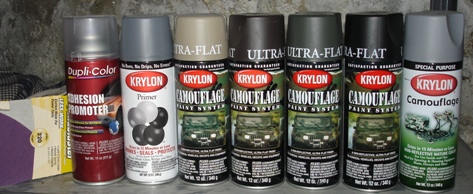
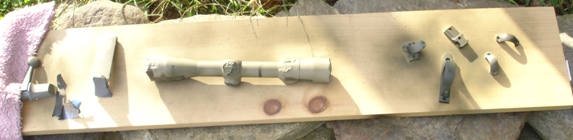
Pictured above from left to right is:
- 220 grit fine sand paper
- Dupli-Color “Adhesion Promoter”
- Krylon 1318 All Purpose Primer Gray
- Krylon Khaki Ultra Flat
- Krylon Brown Ultra Flat
- Krylon Olive Drab Ultra Flat
- Krylon Black Ultra Flat (I didn’t end up using this)
- Krylon Light Gray “Special Purpose” Camouflage
You don’t have to use these exacts paints, but Krylon is a decent brand and mine has stood up.
Step Two: Make Your Stencils
I bought a few sheets of acetate, then I just started cutting into it with an exacto-knife. I didn’t have much trouble cutting a pattern, but some people get frustrated getting it right (there is no right way). Don’t look at painting it as an exact science. Take your time, do it over days, ponder your next step, work it like art, work it like camo.
For those that want a little stencil help, I made a download-able pdf pattern. Print it on 8.5×11 paper and lay it across your sheets of acetate. Use it as a cutting guide.
Want to use my stencils to go by?
Download SHTF Blog’s Digital Camouflage Pattern
Step Three: Disassemble Rifle and Tape Protected Areas
I took the gun apart, the scope, rings, bolt, trigger guard, stock, etc. I stripped some electrical wire to hang the stock and barrel with.

I carefully taped everything I didn’t want painted: internal parts exposed, sling studs, the scope lens (be careful with the scope), Browning logo, etc.
Step Four: Lightly Scuff Non-Metallic Surfaces
I lightly scratched the surface of the stock and the scope with the sand paper.
I did not scuff any steel whatsoever. I wasn’t sure doing so would be necessary, and – as it turns out – it was not.
Step Five: Apply Adhesion Promoter and Base Color
Then I applied the adhesion promoter to the stock (helps the paint bond to the plastic). Then came the Krylon primer over everything, a few coats.
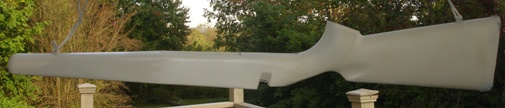
I decided to use Khaki as my base and I covered everything in it, the barrel, the stock, the parts. You can, of course, use any color you’d like as your base.
Step Six: Apply Paints in to Your Pattern
Mind you I was in no rush to do this, so I did it over the course of a week, giving each layer plenty of time to dry. I just started in with the stencils, alternating colors, bit by bit:
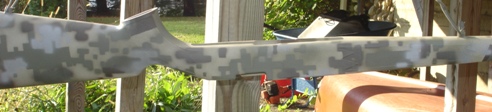
You’ll notice that I used NO black. Many modern military camouflages leave black out for a reason – it stands out. I favored light colors. The darkest I went was brown. When I did apply paint to the scope I went exceptionally light where the magnification numbers are. I can still read them fully.
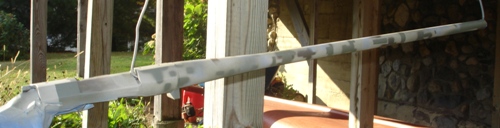
Digital Camo Rifle Results
I painted until I was happy with the stencil pattern, but something was still missing. The “digital” lines were too sharp. It didn’t blend as well as I liked, so from about 3 feet back I sprayed a real fine olive drab mist over everything. I let it fall in place very lightly and it made a big difference.
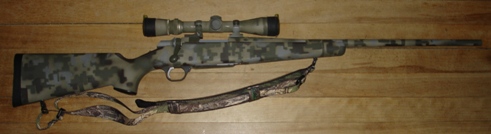
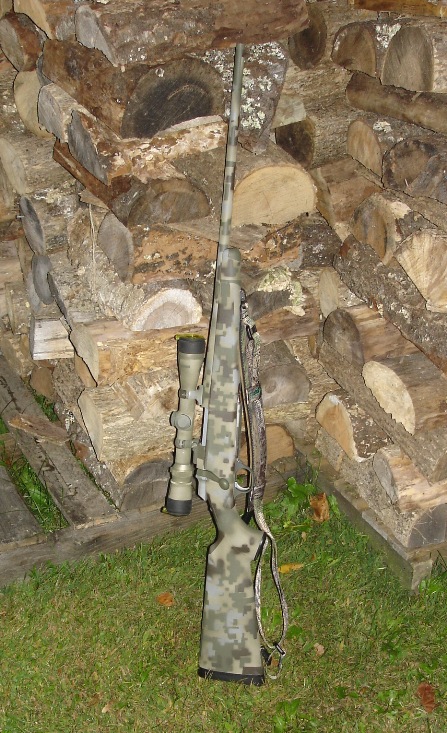
Be careful where you set your finished rifle down in the forest. Losing it – I’m not kidding – is a real possibility if you mindlessly set it down, walk away, and then come back. It really does blend in!
Finishing Touches
I added a camouflage sling and called it done! I hope this article has been informative and has given you the knowledge on how to paint your rifle so that yours won’t shine in the distance giving away your location, blend in with your surroundings, etc.
Thoughts or comments? Let me know how you would paint your rifle, and – happy painting!
**********

Update. A reader followed this post and painted his M4 carbine. He took a pic and wrote:
I pretty much followed your instructions on you painted your rifle. The only difference is I didn’t tape the template down. I held it on the flat area’s and allowed the spray to just blow through onto the other area’s. This gave a fade effect to the digi pattern.
I also used a medium to pattern air brush, (used for touching up vehicle paint). It gives the same spray pattern as a shaker can but the paint is thin so you don’t have to worry so much about runs or taping off numbers, name brand, etc.
37 comments
I’m impressed! Nice job Ranger Man.
Greg, the only thing I could see being different with a blued rifle is the fact that the barrel and parts are exceptionally smooth. My stainless barrel has a slight texture to it. For this reason I didn’t see the need to “scuff” it up with the sandpaper to promote adhesion.
I’m sure the paint job would come out fine, but you’d have to determine whether you want to take the sandpaper to the barrel. You could try skipping that step, but the paint might not hold as well.
Beautiful job. I assume it would also work on my ‘blued’ unit? Greg
That is awesome. I would be aweful concerned about painting a scope though. Could be cuz Im prone to accidents.
Nice job! Thanks for the post. I have a silver scope on a blued rifle, think I will paint it.
Speaking of killing the glare. With a nice set of Butler Creek Flip Open Scope Covers it’s real easy to add a killflash. They just set inside the scope cover and you slide the scope cover back on your rifle. The kill flash keeps you from spooking game when your objective reflects the sun. Also keeps you from giving a way your position if the SHTF your not shining out a reflective signal beacon to attract attention to yourself. You know those emergency signal mirrors that everyone has in your kit, well your scope acts just like one. They also make these for your binoculors as well. Use Rangerman’s search feature on Amazon and check them out. If you can’t find them there they have them at Midway USA.
NICE JOB, I’VE GOT THE DIGITAL KIT FROM DURACOAT, BUT HAVE ONLY TINKERED WITH IT. I MIGHT SCALE IT & CUT MY OWN…HHMMM….
Hi- I work for Krylon. You did an awesome job on the rifle. It looks great. I did want to mention that Krylon now has a camouflage paint with Fusion technology. What this means is that it bonds to plastic without the need for adhesion promoters. It is completely non-reflective as well. You can find out more on krylon.com. Good luck!
You and the guy from Krylon just made my day. I have my crossbow all apart to paint it and I was excited to find instructions and good pictures. I believe slow and steady will get the best results so I am also planning on taking as long as I have to to make it great. I am also tempted to try some hand painting with model paint, on the finnished product, to break it up even more. Have you got any tips or ideas for that?
Great job Ranger Man!!!
Question, how did you make the stencil/template of the digital camo?
Nice work. I just tried my first camo paint job. See it here at: https://home.comcast.net/~v2creative/camo.html
That looks super cool I think ill do the same with mine but with a darker green, peace!!
GOOD LOOKING JOB. I WAS WANDERING WHAT I NEEDED TO DO TO GET THE GUN OIL OFF OF MY GUN BEFORE PAINTING.
I didn’t find them, I just cut the pattern out randomly.
Nice job,
How did you find the digital patterns??
smart way of cammoflaging your rifle. looks like it turned out nice.
AWESOME!! I WANT TO DO THIS AS WOODLAND…JUST WORRIED ID SCREW IT UP!
sweet!
I used the same paints on my .22 rifle.
https://i192.photobucket.com/albums/z93/klwdesigns/IMG_2237.jpg
I practiced a new pattern on my hard plastic gun case just today before I paint my 7mm. I think this time I will just paint the stock instead of everything. I will look for the adhesion promoter as the stock is synthetic as opposed to my .22 which has a wooden stock.
How well has the paint stood up over time?
Very well. There are a few minor marks/scuffs on the paint where I set the rifle against a tree or in the back of a truck, but it doesn’t distract from its camouflaging effect in the least. If anything, those minor scuffs add to the effect.
This isn’t something I’d do to any rifle. I decided to do it to this rifle, because I knew it’d be my lifelong hunting rifle, no interest in any resale value.
Thanks for posting your directions. I was a little unsure so I used my air brush to put down the digi patterns after shaker canning the base coat, but I am happy with the results. One thing to add though. After you are done dont look at it for 24 hrs. I thought it some what sucked, but my said it was awsome. The next morning I went and looked at it to see if I could touch it up and it actually did look really good. Thanks again for the step by step. I was hoping to be able to upload the pics to show it but Oh’ well
damn thats a nice job!!
Question: I’m thinking of painting the slide on my M&P flat dark earth. You think that krylon paint is ok? Where did you order that paint and should I sand it down first or just clean it properly?
I don’t remember where I ordered the paint, but somewhere online. I used the Krylon paint on the exposed bolt assembly of the rifle. I would just clean it properly and not sand it (is it stainless now?). Know that the slide gets lots of action, so the paint job may not last as long depending on how often you shoot.
if you holster the weapon regularly do not paint the slide
thanks for this post! i had the courage to paint the furnature on my model 91 clone because of it and it looks great!
I did the same to my SKS but a desert digital camo that I use for Coyote and the wild pigs in the high desert area. Works out nice in the den waiting for them. Happy prepping and happy hunting.
yo how did u make the stencils.
plz tell me how or send me a link from were u got instructions
or just email me the instruction on how to do it.
sniperkid117@yahoo.com
yo how did u make the stencils.
plz tell me how or send me a link from were u got instructions
or just email me the instruction on how to do it.
sniperkid117@yahoo.com
/
Put 1 inch dia orange/pink/lime green reflective flourescent dots on the places where you hands will cover them while *actually* hunting. They will be hidden then, but exposed when you are just stacking the rifle against a tree. May help to see the rifle in dim lighting while ‘in the bush’…
I purchased a Remington 700 that has a little bit of rust on the barrel- The bore is fine. (took it out 2 days ago and it shoots great-so happy for $200) Looking into ways of fixing the rust and this seams like it migt be one of the better looking options. What is the best way to remove the rust to begin the project so that it doesn’t rust from the inside under the paintjob.
Just take some fine grit sand paper or crocus cloth and slowly remove it. After that the prep paint or adhesion promoter should preserve it.
Could use a bird’s nest as a killflash. Just weeds and foliage in a circle around the inside of the scope
Very nice article, and I am going to do this with a couple of guns, my deagle and M6 LWRC to start. A couple of knives and flash lights also. Thanks Ranger man.
Hey Krylon, I just tried painting my Remington Sendero SFII. The paint comes right off with the slightest touch. I really don’t want to sand the barrell. Has anyone else found anything that will stick to stainless without sanding if first?
Just curious you covered the internals so not to get anything on the inside an what about the barrel did you plug the ends ?? i ve been wanting to do something with my AK but am afraid that i ll mess something up on it , an was unsure if spray paint was safe to use on a gun … but i suppose its no diff. then the paints i ve seen for guns. btw very nice job on yours
Disassemble/tape up the internals, and you can use an earplug to plug the barrel.